

How it works
What a cash discount is
You raise your prices by a set percentage, say 4%. Customers who pay by card pay the new price. Customers who pay cash get the 4% taken off at the register. You end up with about the same amount either way.
The app changes real prices
The app rewrites item and modifier prices in Clover Inventory. Items you put in Exceptions keep their old price. Steps 5 to 6.1 apply the same percentage to items and modifiers you add later. The repricing itself is run by PayPlaxe's servers against your Clover catalogue, over a connection the app renews each time it is opened on the Clover device, at most once a day. Open the app on the device now and then, and after you change the program, so that connection stays valid.
The customer chooses at payment
After the cashier presses Pay, a screen asks the customer for cash or card. Cash applies the discount. Card keeps the raised price. Both totals are on that screen.
The receipt shows both numbers
You can print your own text on receipts, including the cash total, the card total and tips. Most merchants use this to answer questions at the counter.
Reports
The app records how much cash discount was applied and how much was collected in fees. The chart icon on the Cash Discount tab opens the two reports. Exporting a report creates a link, shown as a QR code and sendable by email; anyone holding the link can read the report, and it stops working one hour later.
Scheduled discounts are a separate feature
The Discounts tab is a separate feature and no part of the cash discount setup. It applies an amount or a percentage to a whole order or to selected items, on the days and times you choose. The one overlap is option 15: while your prices are raised it also raises fixed-amount item discounts, including the ones a scheduled discount adds.
Rules worth checking first
A cash discount is not a card surcharge. In a cash discount program the listed price applies to everyone and cash payers get money off. Surcharging adds a fee to card payments instead, and it is restricted in some states and by card network rules. Ask your processor what your account is allowed to do, and keep your posted prices in line with what the customer pays.
What it does
Cash discount program — the main feature
Guided setup
Five steps on one screen: percentage, exceptions, the price increase and four auto-update switches. The header shows how many are done.
Payment screen
After Pay the customer picks cash or card. The buttons carry the cash total and the card total. You can change the wording.
Price updates
New and existing items and modifiers stay at the raised price. Custom items, variable-price items and Clover gift cards can be skipped.
Receipt text
Your own text on paid and unpaid receipts. Tokens print the real numbers: Card Total, Cash Total, Card Tips, Cash Tips.
Reports
How much discount was applied and how much was collected in fees, in two reports: Fees Reports and Cash Discounted Reports. An export creates a link, shown as a QR code and sendable by email, that works for one hour.
Scheduled order discounts — a separate, optional feature
Scheduled discounts
A fixed amount or a percentage, on the whole order or on selected items, between a start and an end time on the weekdays you pick.
Automatic or by button
Automatically means every matching order gets it. Manually (via tender) means the cashier presses a button.
Archive and access
Archive a discount instead of deleting it, and restore it later. Limit which employees can edit discounts.
Price & installation
How to install
- Open the Clover App Market — on the device, or at clover.com/appmarket in your web dashboard.
- Find the app by name, or open its direct link from the button above.
- Tap Connect / Install and accept the permissions the app requests.
- The 30-day free trial starts automatically. The subscription then appears on your monthly Clover invoice.
- Open the app on the Clover device and sign in with a Manager or Admin employee account to configure it.
- To cancel later, uninstall the app from the App Market — the steps are right below.
How to cancel the subscription
Cancelling means uninstalling the app — there is no separate billing screen.
- Open the App Market — on the Clover device, or in the web dashboard.
- Open My Apps. Every app you pay for is listed there with its monthly fee.
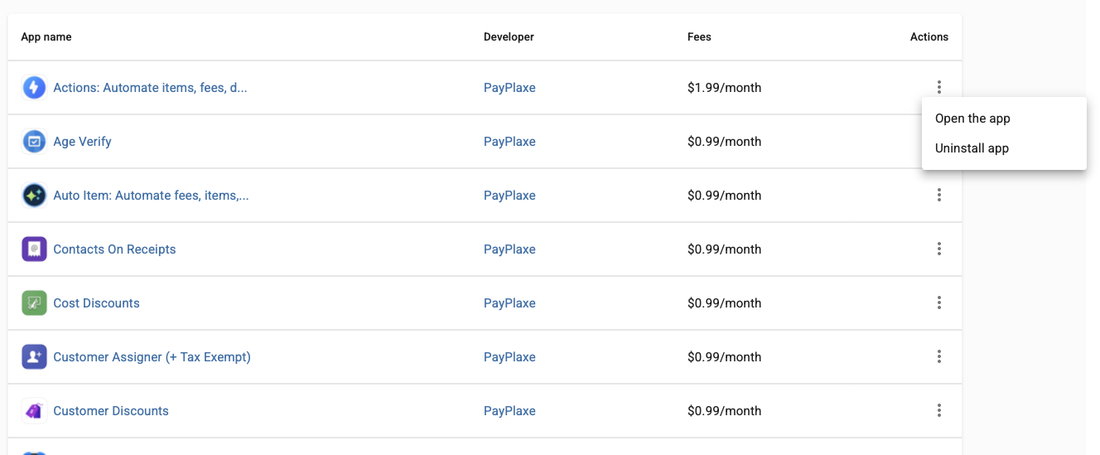
- Tap the ⋮ button on the app's row and choose Uninstall app.
- The app's own page works too: ⋮ next to the green Open the app button → Uninstall app.
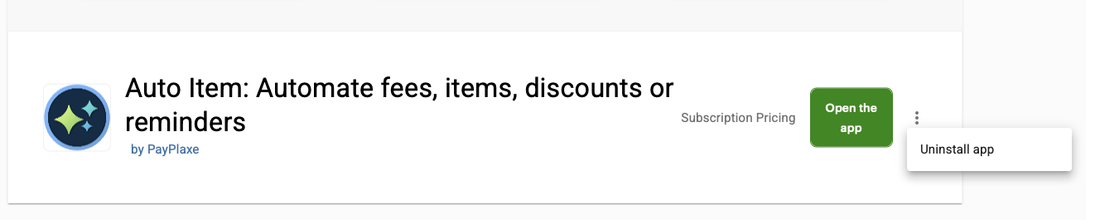
- Confirm. The subscription stops there and then — the app is off your next Clover invoice.
Install and cancel any time from the Clover App Market.
First setup
Do this once, in this order. It takes a few minutes and the app is then ready for the shift.
- Open Order Discounts → tab Cash Discount.The header keeps score: Status: and N / 5 steps completed. Manager or Admin login required. The cash discount program is for US Clover accounts: on an EU account the Cash Discount tab is not shown at all and only the Discounts tab works.
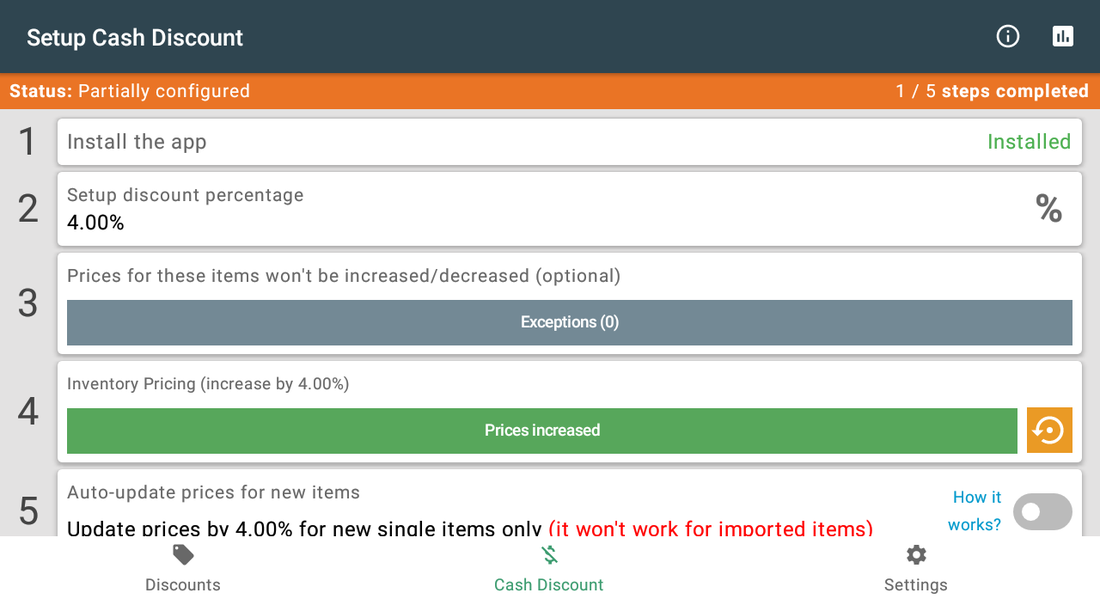
- Step 1 — Install the app: already done.The row reads Installed. Nothing to do.
- Step 2 — set the percentage. Tap % and enter it.4% is the usual starting point. It cannot be changed later while prices are raised.
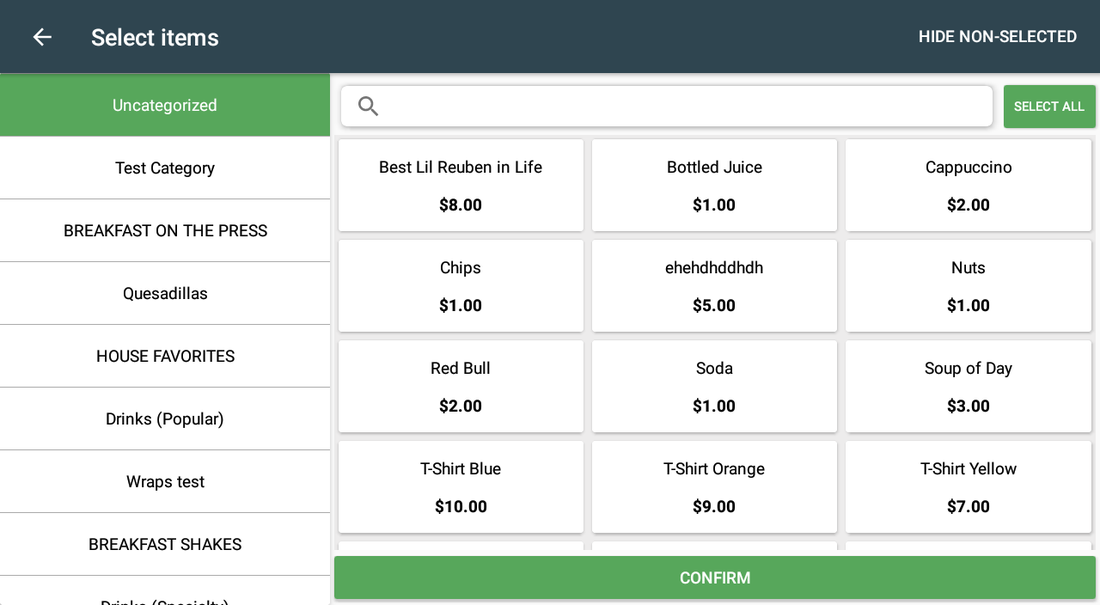
- Step 3 — add Exceptions.Lottery, stamps, gift cards, money orders — anything that must keep its shelf price. Do it before step 4.
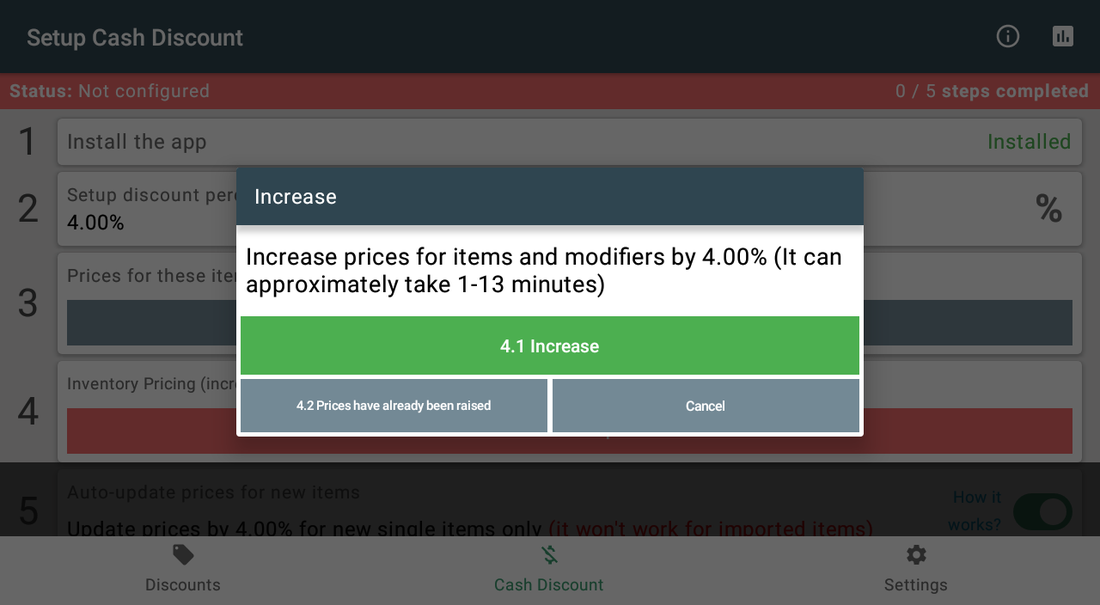
- Step 4 — run 4.1 Increase.This is what actually raises your prices. The dialog gives an estimate; a big catalogue takes a few minutes. Use 4.2 only if your prices are already raised.
- Wait for the sync. Open Clover Inventory, then give it 1–2 minutes.The row then reads Prices increased, with a yellow restore icon for the day you want the old prices back.
- Step 5 — Auto-update prices for new items: on.New items are saved at the raised price. Imported items are never touched.
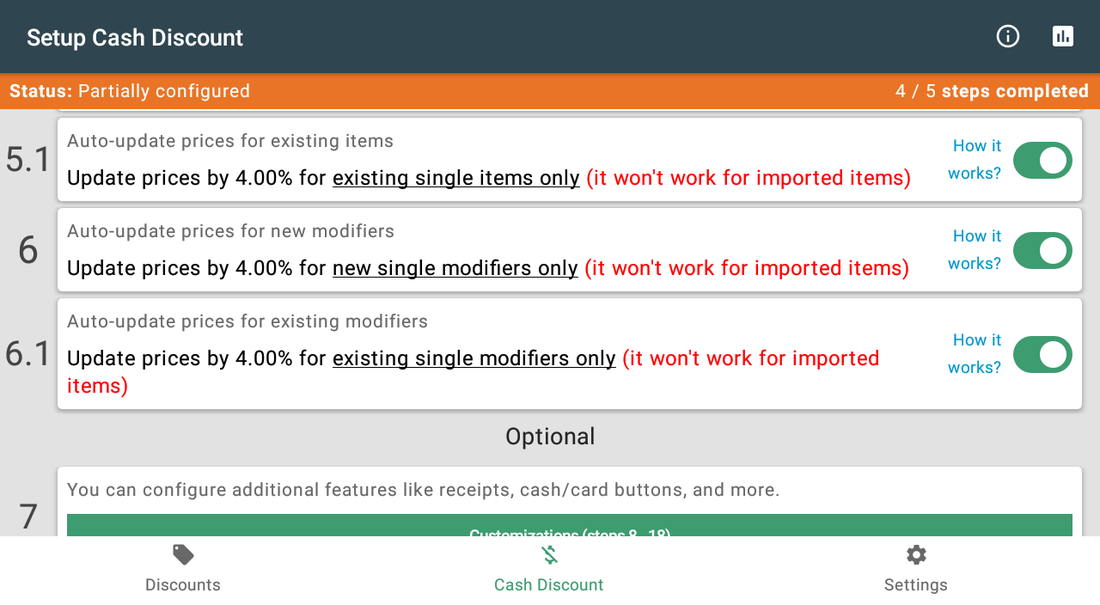
- Step 5.1 — Auto-update prices for existing items: on.Items you edit later stay at the raised level.
- Step 6 — Auto-update prices for new modifiers: on.Same rule for modifiers you add from now on.
- Step 6.1 — Auto-update prices for existing modifiers: on.The last switch. All four on → 5 / 5 steps completed, the program is live.
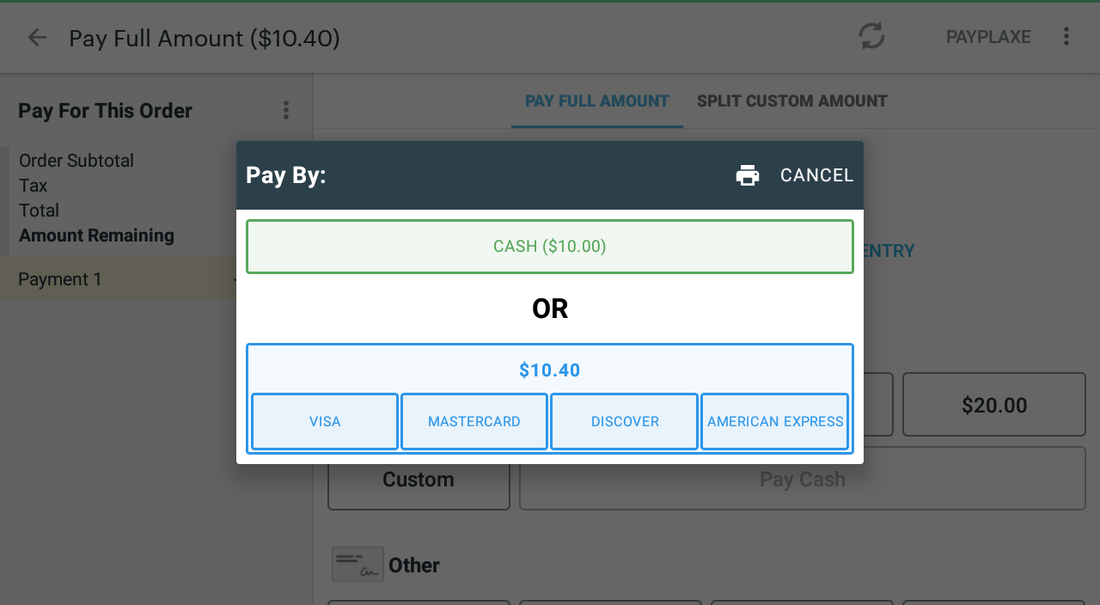
- Test it: one sale by card, one in cash.The payment screen appears by itself and shows both totals — $10.00 cash, $10.40 card.
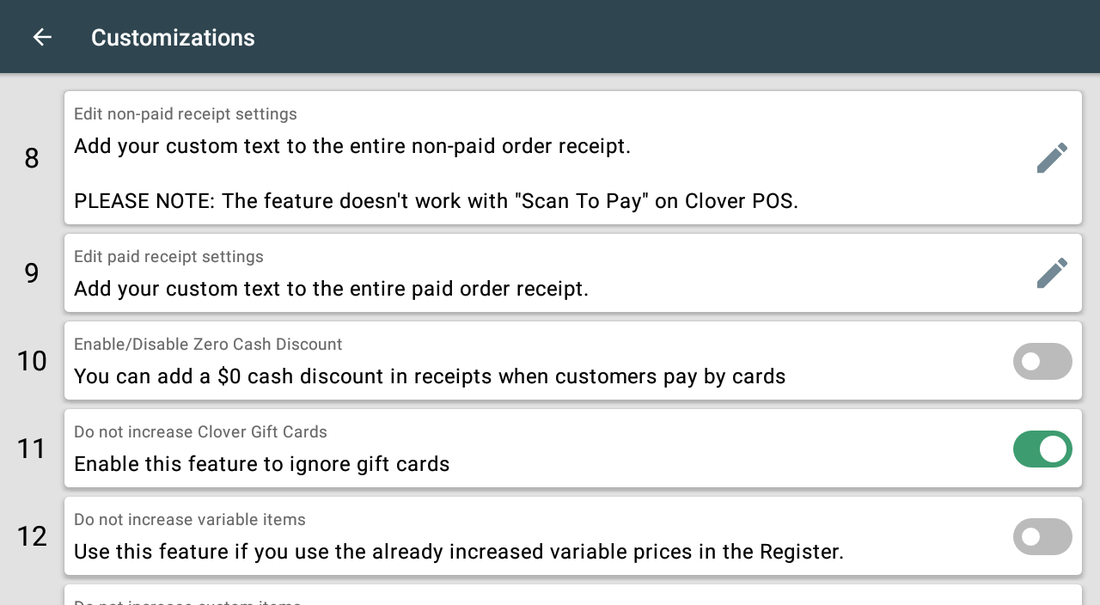
- Optional Step 7 — Customizations (8–19).Receipt text with both totals, gift cards, your own wording on the cash/card buttons. Skip it and the program still works.
- Optional Scheduled promotions. Tab Discounts → +.A separate feature; the cash discount program is finished at step 6.1.
Setup scenarios
Each scenario is a complete configuration — follow the steps in order.
1Set up the cash discount program
The usual case: you have items in Clover Inventory and you want card and cash to bring in the same amount.
- Open Order Discounts as Manager or Admin and go to the Cash Discount tab. The header shows Status: and how many of the five steps are done.
- Step 1 Install the app is already done. It reads Installed.
- Step 2 — tap the % button and enter your percentage. 4% is the usual starting point.
- Step 3 — open Exceptions and add everything that must keep its price: lottery, stamps, gift cards, money orders. Do this before step 4.
- Step 4 — open Inventory Pricing (increase by X%) and choose 4.1 Increase. Wait for it to finish.
- Open Clover Inventory, let it sync, wait 1–2 minutes. Step 4 then reads Prices increased.
- Turn on steps 5, 5.1, 6 and 6.1 so items and modifiers you add later are already at the raised price.
- Test it: one sale by card, one in cash. The header should read 5 / 5 steps completed.
2Set it up when you have no items in Clover
Services, repairs and counters where the cashier types the amount. There is nothing to raise, but the program still works.
- Open the Cash Discount tab and set your percentage in step 2 as usual.
- Go to step 4, Inventory Pricing, and start the increase.
- The app warns that the catalogue is empty: You have zero items. Please add items before you increase prices. You can choose 'Mark my inventory increased' if you won't use items.
- Choose Mark my inventory increased. No price is changed. The app treats the catalogue as raised and step 4 counts as done.
- At the register, ring the sale as a custom item and type the normal price. The app raises that line by your percentage, then gives the percentage back when the customer pays cash.
- Run one test sale by card and one in cash before you open.
3Set it up when your prices are already raised
You raised the prices yourself, or you are moving from another app, and only need the discount side.
- Complete steps 1 to 3 of the setup: percentage and exceptions.
- In step 4 use 4.2 Prices have already been raised instead of the increase.
- Confirm the warning. No price is changed. You are telling the app that the catalogue is already at the higher level.
- Turn on steps 5, 5.1, 6 and 6.1 so anything added later is created at the raised price.
- Run a test sale by card and one in cash.
4Run ordinary scheduled discounts
This part is a separate feature, no part of the cash discount setup. It is the plain promotion tool: a percentage or an amount, on a schedule. One overlap: while prices are raised, option 15 also raises the fixed-amount item discounts a scheduled discount adds.
- Open the Discounts tab and tap +.
- Give the discount a name and choose Discount type: Percentage or Amount. The coloured square next to the name field opens a colour picker; that colour marks the discount's card.
- Apply on … decides the target: the entire order or selected items.
- Add to order … decides who applies it. Automatically means every matching order gets it. Manually (via tender) means the cashier presses a button.
- Set From and To and tick the weekdays. Each of them holds a time and a date: the times are the daily window, the dates are the first and the last day the discount runs. For example 15:00 to 18:00, Monday to Thursday.
- Save. The card then shows the discount's name, its amount or percentage, and — for an automatic discount — the dates, times and weekdays it runs on.
- For a manual discount, open Restrictions in Settings and take Add/edit discounts away from employees who should not change it.
Reference
Screens and settings
Every screen of the app and what each setting does. (12)
Screens and settings
Every screen of the app and what each setting does. (12)
Cash Discount tab — the five steps
Everything the program needs is on this one screen, and the header keeps score.
| Setting | What it does |
|---|---|
| Status header | Status: Not configured, Partially configured or Configured, with N / 5 steps completed on the right. |
| 1 · Install the app | Already done on a device that has the app — it reads Installed. |
| 2 · Setup discount percentage | The % button opens Enter cash discount percent. It is locked while prices are raised. |
| 3 · Exceptions (N) | “Prices for these items won't be increased/decreased (optional)”. The counter shows how many items are excluded. |
| 4 · Inventory Pricing (increase by X%) | The button underneath reads Please increase prices before and Prices increased after. Once prices are raised, a yellow restore icon appears next to it — it puts the original prices back. |
| 5 · 5.1 · 6 · 6.1 Auto-update | New items, existing items, new modifiers, existing modifiers. Each one carries the note (it won't work for imported items). Turn on all four. |
| Optional 7 · Customizations (steps 8…19) | Receipts, gift cards, the cash/card buttons and the rest. The screen itself marks this block Optional. |
| Toolbar | The info icon opens the app's own Troubleshooting notes; the chart icon opens Reports. |
Step 3 — exceptions
| Setting | What it does |
|---|---|
| Category column | Filters the item list on the left. |
| Item grid | Tap items to exclude them from every price change. |
| SELECT ALL / HIDE NON-SELECTED | Bulk-select, or show only what is already excluded. |
| CONFIRM | Saves the exception list; the counter on step 3 updates. |
Step 4 — the pricing dialog
Step 4 is the one that actually changes prices, and it has two buttons that do very different things.
| Setting | What it does |
|---|---|
| 4.1 Increase | The default choice — pick this one. The app rewrites item and modifier prices by your percentage, and the dialog states how long it will take. Use it every time you set the program up, and every time you change the percentage. |
| 4.2 Prices have already been raised | Only if your prices are already raised. It marks the catalogue as raised without changing a single price — for merchants who put the raised prices in themselves. If you are not certain your shelf prices already include the percentage, do not use it: the app will then discount from prices that were never raised. |
| Cancel | Closes the dialog and changes nothing. |
| Afterwards | Open Clover Inventory, let it sync and give it 1–2 minutes before selling. The status row on the Cash Discount tab then reads Prices increased. |
Steps 5–6.1 and the optional step 7
| Setting | What it does |
|---|---|
| 5 / 5.1 | New single items only · existing single items only. |
| 6 / 6.1 | New single modifiers only · existing single modifiers only. |
| Hint under each row | States the percentage and warns that imported items are not covered. |
| 7. Customizations (steps 8…19) | Marked Optional — receipts, buttons, gift cards and the rest. |
The payment selection screen
This is the cash discount as the customer sees it. Option 13 Show cash/card price total is on by default, so both totals are on screen at once: $10.00 in cash, $10.40 by card.
| Setting | What it does |
|---|---|
| Pay By: header | The dialog opens on top of Clover's payment screen after Pay. It is on by default; option 14 hides it if you would rather pick the tender yourself. |
| CASH ($10.00) | The green button is the cash price — what the customer pays if they pay cash. Tapping it applies the cash discount and sends the order to a cash payment. |
| $10.40 | The card total, printed above the brands. This is the shelf price after the increase — the two figures side by side are what makes the program obvious to the customer. |
| VISA MASTERCARD DISCOVER AMERICAN EXPRESS | Any brand — or the frame around them — sends the order to a card payment at the card total. All four brands are always shown; there is no setting to hide individual brands. |
| Without option 13 | Turn option 13 off and the screen shows the saving instead of the two totals: the button reads CASH (-$0.40) and there is no card total above the brands. |
| Printer icon | Prints the non-paid receipt, so the customer can compare the cash and card totals on paper before deciding. |
| SPLIT BY GUEST | Only shown on orders that already have guests. It opens Select payment types for guests [BETA]: mark each guest as cash or card, then Confirm — the cash discount is applied only to the items of the guests paying cash. |
| CANCEL | Closes the dialog and returns to Clover's payment screen. Nothing is charged and nothing is discounted. |
Customizations — options 8 to 12.1
Step 7 on the Cash Discount tab opens this list. Everything here is optional: the program runs without it. Options are numbered, so you can point staff at a number.
| Setting | What it does |
|---|---|
| 8 · Edit non-paid receipt settings | Custom text on the receipt printed before payment. This is where you print the cash total next to the card total so the customer can compare. It does not work while Clover's Scan To Pay is on — the app says so on the card itself. |
| 9 · Edit paid receipt settings | The same editor for the receipt printed after payment — usually the line that states how much the customer saved by paying cash. |
| 10 · Enable/Disable Zero Cash Discount | Adds a $0.00 cash discount line to card receipts, so every receipt shows the program even when no discount was given. |
| 11 · Do not increase Clover Gift Cards | Gift card sales keep their face value: selling a $50 card must not become $52. |
| 12 · Do not increase variable items | For stores where the cashier already types the raised price into a variable-priced item. Leave it off if you want the app to do the raising. |
| 12.1 · Do not increase custom items | The same for Custom Item entries typed straight into the Register. |
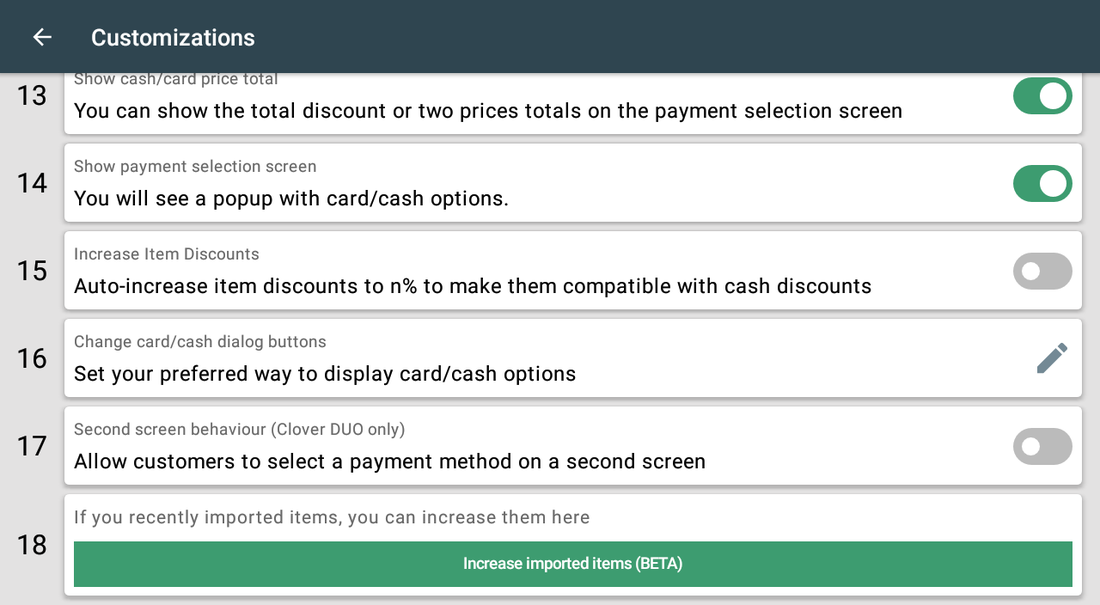
Customizations — options 13 to 19
The rest of the same screen: how the payment choice looks and behaves, the Clover Sale switch and the one-off price tool at the bottom.
| Setting | What it does |
|---|---|
| 13 · Show cash/card price total | Shows both totals on the payment screen — the cash total on the green button and the card total above the brands. On by default. Turn it off and the button shows the saving instead, CASH (-$0.40). |
| 14 · Show payment selection screen | The Pay By: popup itself. On by default — turn it off only if you want the cashier to pick the tender on Clover's own screen. |
| 15 · Increase Item Discounts | While prices are raised, a fixed item discount is raised by the same percentage, so $1.00 off stays $1.00 off in real money after the cash discount is worked out. Items in Exceptions are skipped. |
| 16 · Change card/cash dialog buttons | Opens Select display type with four layouts: Cash & Card Brands, Cash/PIN Debit/EBT & Card Brands, Card Brands & Cash (reversed) and Card Brands & Cash/PIN Debit/EBT (reversed). The two reversed layouts put the card brands above the cash button on the Pay By: screen instead of below it; the Debit/EBT versions change the wording on the cash button. |
| 17 · Second screen behaviour (Clover DUO only) | Moves the choice to the customer-facing screen: on a Clover DUO the customer picks cash or card themselves instead of the cashier. |
| 18 · Do not increase prices in Clover Sale | Amounts typed into the Clover Sale app stay exactly as the cashier entered them; the Cash Discounts tender button in Sale keeps working. Off by default. Turn it on only if the amounts your staff type into Sale already include the percentage — otherwise a cash payment is discounted from a price that was never raised and you lose that percentage on every Sale transaction. |
| 19 · Increase imported items (BETA) | A one-off raise for items you have just imported — auto-update never touches imported items. The card only appears when step 5.1 (auto-update for existing items) is on. |
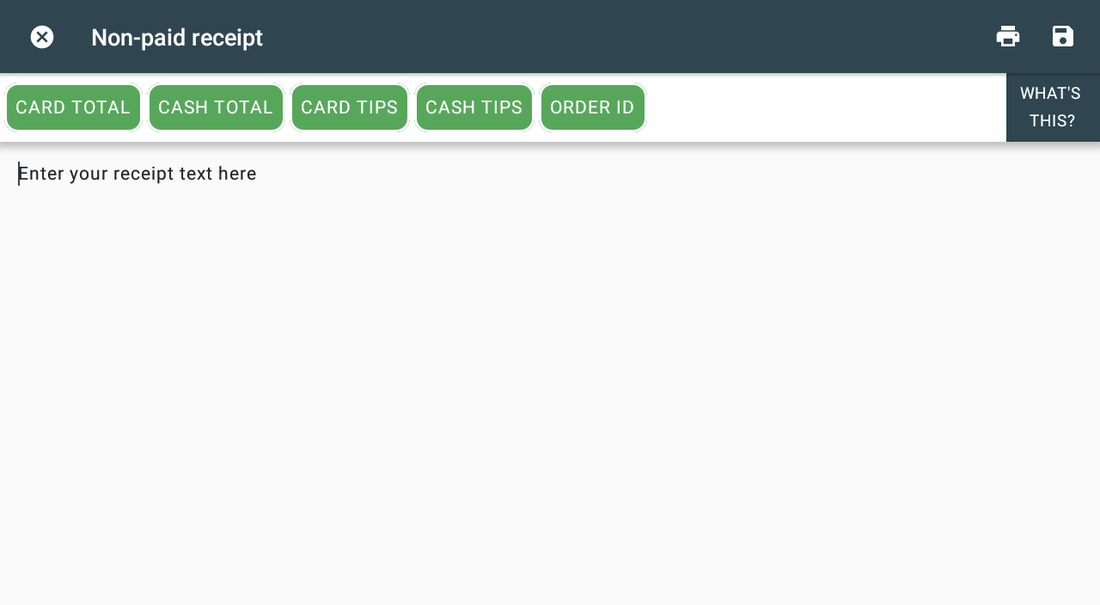
Option 8 — the receipt editor
Options 8 and 9 open this editor. The buttons insert tokens that print the real numbers. Step-by-step video: youtu.be/tAgHloyOckw.
| Setting | What it does |
|---|---|
| CARD TOTAL / CASH TOTAL | Insert the amount the customer pays by card or in cash. |
| CARD TIPS / CASH TIPS | Insert a tip line; the app asks for the percentage (01–99). |
| ORDER ID | Inserts the Clover order number. |
| WHAT'S THIS? | Explains what the buttons convert to on a printed receipt. |
| Printer icon | Test print on real paper. |
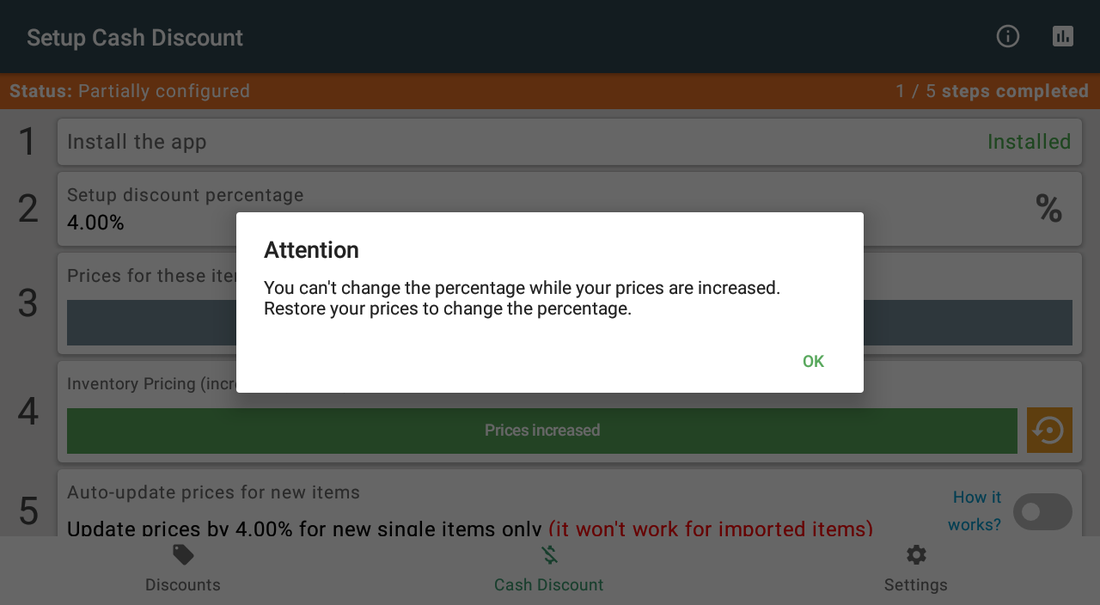
When the percentage is locked
| Setting | What it does |
|---|---|
| Attention dialog | You can't change the percentage while your prices are increased. Restore prices in step 4 first. |
Reports
The chart icon on the Cash Discount tab toolbar opens them.
| Setting | What it does |
|---|---|
| Fees Reports | The total amount of collected fees. |
| Cash Discounted Reports | The total amount of applied cash discounts. |
| The table | Pick a start and an end date; the lines are listed under Date/Time, Amount, Order ID and Details. Over a long period the app reports Loaded last 1000 records. |
| Export | Create report? builds a link and shows it as a QR code; SEND VIA EMAIL sends the same link to an address you type. Anyone holding that link can read the report, and it stops working one hour after it is created. |
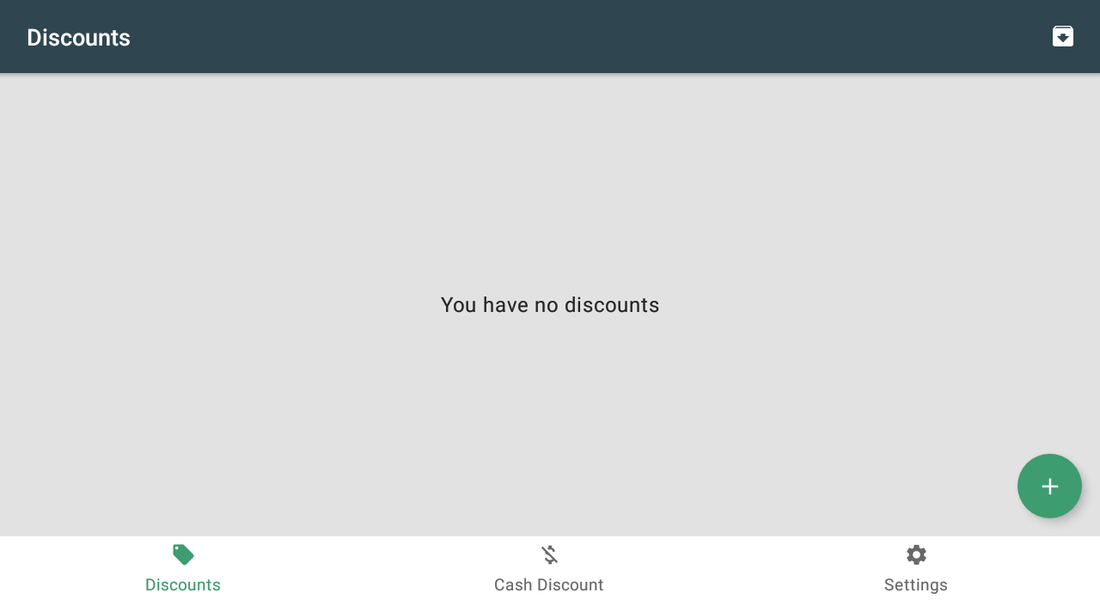
Discounts tab
| Setting | What it does |
|---|---|
| + button | Creates a scheduled discount: amount or percentage, whole order or selected items, automatic or manual. |
| Archive icon | Opens the archived discounts. |
Settings tab
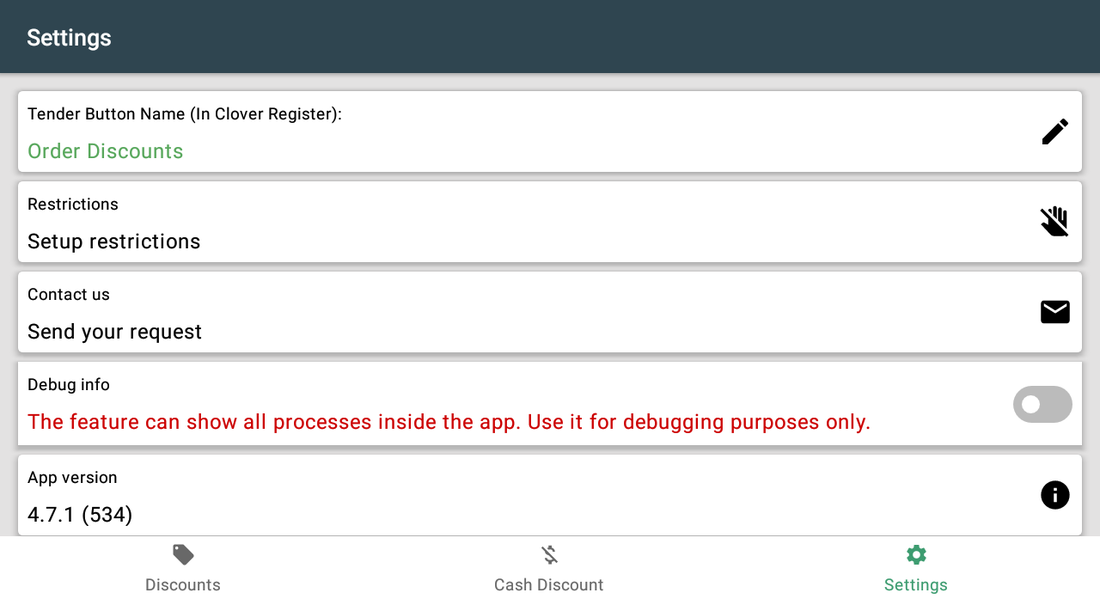
| Setting | What it does |
|---|---|
| Tender Button Name (In Clover Register): | The name of the app's tender button on Clover's payment screen — the button a cashier presses to apply a manual discount. Tapping the row opens Set the app button name in Clover Register. The Settings tab needs a Manager or Admin login, and the rename is refused for an employee who has the Change tender button restriction. |
| Restrictions | Per employee: Add/edit discounts, Edit manual discount and Change tender button. |
| Contact us | Send your request — opens the support dialog. |
| Debug info | Internal processing; for support sessions only. |
| App version | The installed version. |
Screenshots taken from the running app on a Clover device. The apps’ interface language is English. Click a screenshot to enlarge.
Everyday use
What the cashier does after the app is configured.
- Ring up the order as usual.
- Tap Pay — the Pay By: screen asks the customer for CASH, with the cash total printed on the button (the amount saved instead, if you turned option 13 off), or a card brand.
- Cash: the discount is applied automatically and the total drops to the pre-raise price.
- Card: the raised price stands; the receipt can show both totals if you configured the text.
- For a manual discount, tap your tender button and pick the discount from the list.
- At the end of the day open the reports — the chart icon on the Cash Discount tab — to see the cash discounts applied and the fees collected.
Troubleshooting
Symptom on the left, what to do on the right.
| Symptom | What to do |
|---|---|
| The receipt text is set, but the cash/card totals never print. | Clover's Scan To Pay is on. The custom text on the non-paid receipt does not work while it is active — switch it off with Clover's manual, then print a test receipt. |
| You can't change the percentage while your prices are increased. | Restore prices first (step 4 → decrease), change the percentage, then raise prices again. |
| Imported items kept the old price. | Imported items cannot be raised in place. Decrease prices, import the items, then raise the inventory again. |
| Changes are processing when starting a price change. | A previous price operation is still running. Wait about five minutes and try again. |
| Prices in the Register do not match the app. | Open Clover Inventory so it syncs with the cloud and wait 1–2 minutes; the Register reads prices from Clover, not from the app. |
| Custom or variable-price items are being raised twice. | Turn on Do not increase custom items and Do not increase variable items in Customizations. |
| Gift card sales are getting the increase. | Enable Do not increase Clover Gift Cards in Customizations. |
| The app's dialog never appears on the payment screen; Clover shows "Customer is choosing payment method". | Open the Clover Setup app → Payments and uncheck Automatically take payment on Connected Device, so payment is taken on the primary device. |
| Settings cannot be opened or changed. | Sign in with an employee whose Clover role is Manager or Admin. Some apps also have their own Restrict access switch that locks the configuration. |
| The app works erratically, or stops reacting after the device has been idle. | Turn off Battery Saver in the device's Android settings and keep the device online. |
| A change made on one device is not visible on another. | Settings sync through the cloud; give it a minute and make sure both devices have a network connection. |