

How it works
You describe the trigger once
What should be added and when. The Register applies it to every matching order.
Four tabs
Automations are the rules for the Register. Extensions raise or lower the amount to be paid in the Clover Sale app; the payment-screen alert is set under their Configs screen. Statistics counts, per action type, how often actions were applied on paid orders. Settings holds the rest.
Three ways to apply
Prompt me asks the cashier. Trigger automatically applies silently. Apply manually (BETA) does nothing on its own — the cashier runs it from the Auto Item tender button.
Four moments
The first item in the cart, going to pay, or, in BETA, while the subtotal is above an amount you set or while a chosen item is in the cart. The two BETA moments are re-checked while the order is open, and what they applied is taken off again as soon as the basket stops matching.
It writes to the Clover order
Items, custom items, service charges, notes and order discounts go onto the order. Taxes and payment stay with Clover.
What it does
Ten actions
Add Item, Add Service Charge, Set Order Note, Add Custom Item, Add Custom Item as a percentage of the subtotal, Add Order Discount by percentage or amount, Show Reminder, Remove Item, Remove Service Charges.
Three apply modes
Prompt me asks the cashier first, Trigger automatically applies on its own, and Apply manually (BETA) is run by the cashier from the Auto Item tender button.
Four trigger moments
First item in the cart, going to pay, or, in BETA, while the subtotal is above an amount or while a chosen item is in the cart.
Order type filter
A trigger can be limited to one Clover order type.
Statistics
A BETA tab counts, per action type, how often that action was applied on paid orders — with an export you can email; the link is valid for 24 hours. Percentage order discounts, Remove Item and Remove Service Charges are not reported yet.
Payment-screen alert
Show a message of up to 250 characters on this device. It appears when an order is created and when payment starts, on Register orders as well as in the Clover Sale app.
Your wording on the prompt
Rename the apply and cancel buttons and set their colours.
Set it up from a browser
autoitem.payplaxe.com opens the same triggers, Extensions and Statistics on a computer. It is not a separate product: this is the setup side of the app you already have, with nothing extra to buy. Sign in with Login via Clover. Everything that happens during a sale stays on the Clover device.
Price & installation
How to install
- Open the Clover App Market — on the device, or at clover.com/appmarket in your web dashboard.
- Find the app by name, or open its direct link from the button above.
- Tap Connect / Install and accept the permissions the app requests.
- The 30-day free trial starts automatically. The subscription then appears on your monthly Clover invoice.
- Open the app on the Clover device and sign in with a Manager or Admin employee account to configure it.
- To cancel later, uninstall the app from the App Market — the steps are right below.
How to cancel the subscription
Cancelling means uninstalling the app — there is no separate billing screen.
- Open the App Market — on the Clover device, or in the web dashboard.
- Open My Apps. Every app you pay for is listed there with its monthly fee.
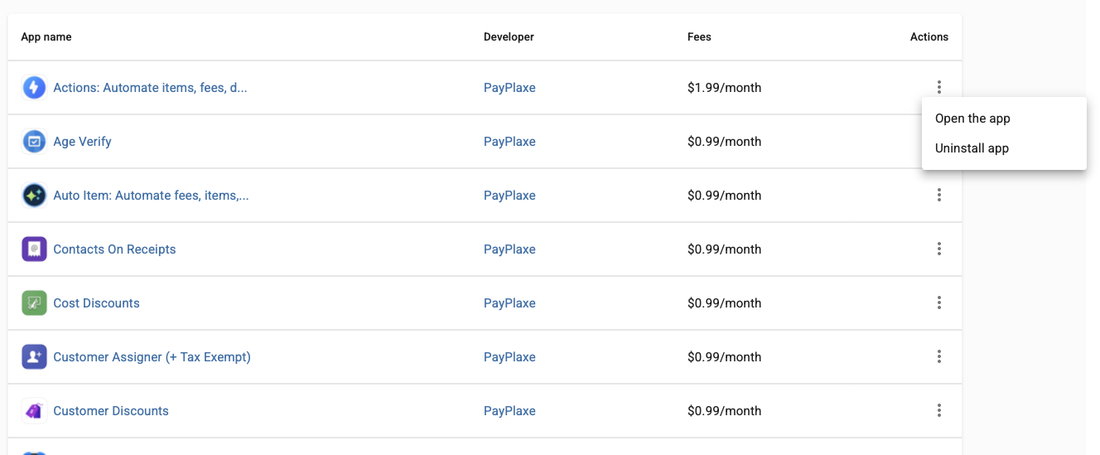
- Tap the ⋮ button on the app's row and choose Uninstall app.
- The app's own page works too: ⋮ next to the green Open the app button → Uninstall app.
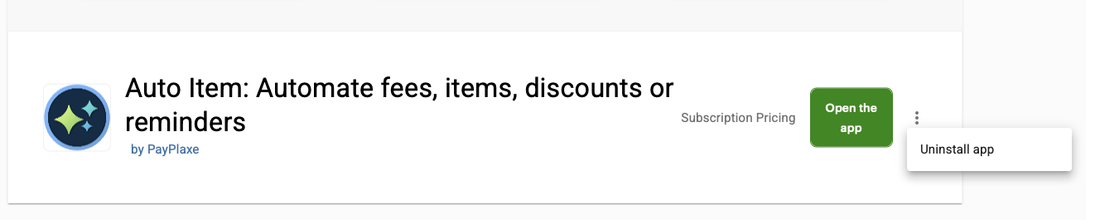
- Confirm. The subscription stops there and then — the app is off your next Clover invoice.
Install and cancel any time from the Clover App Market.
First setup
Do this once, in this order. It takes a few minutes and the app is then ready for the shift.
- Open Auto Item. The Automations tab lists your triggers with their When and Do lines.
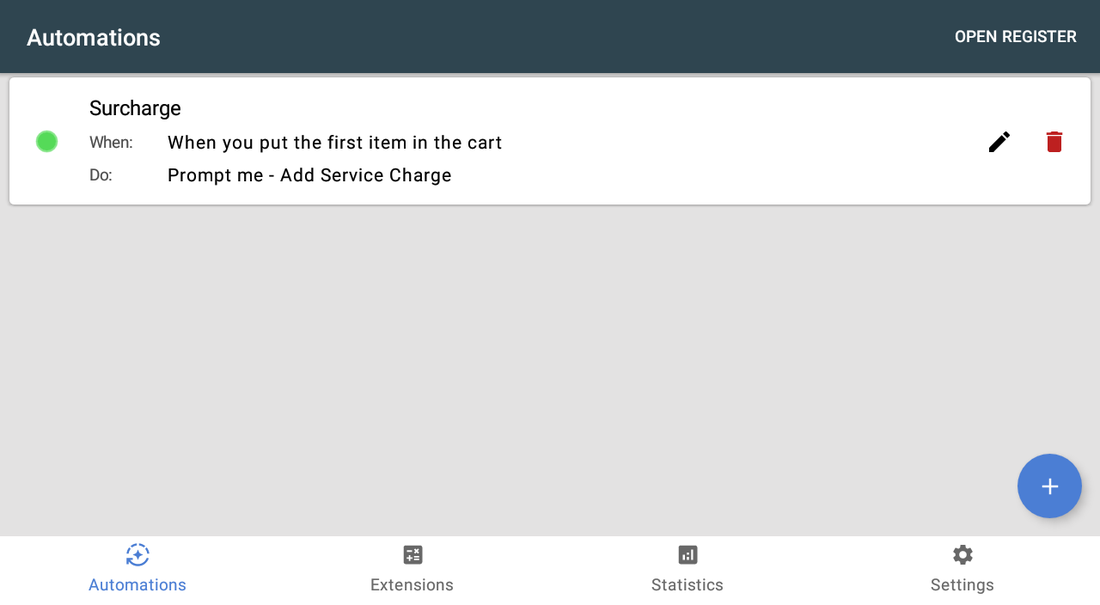
- On first launch grant the Android draw over other apps permission the app asks for. Without it the Apply trigger prompt cannot appear.
- Create the service charge in Clover first if you plan to use one: Setup → Additional Charges.
- Tap + and fill the steps of the trigger editor (six, or four for Apply manually).
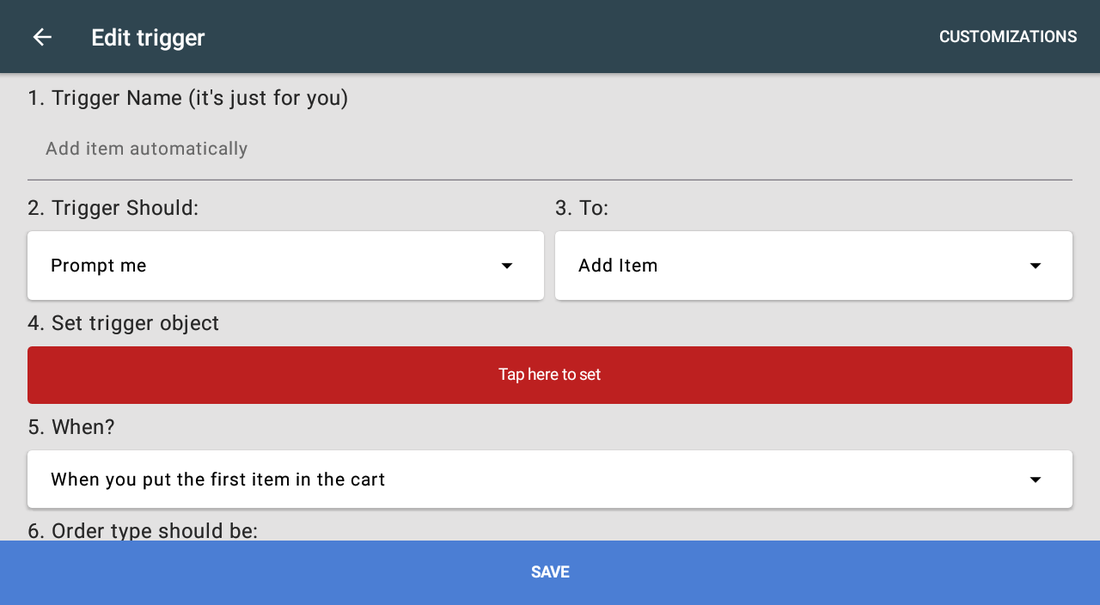
- Step 4 — tap the red Tap here to set bar and enter the object: item, amount, note or discount value.
- Save and tap OPEN REGISTER in the top bar to test the trigger on a real order right away.
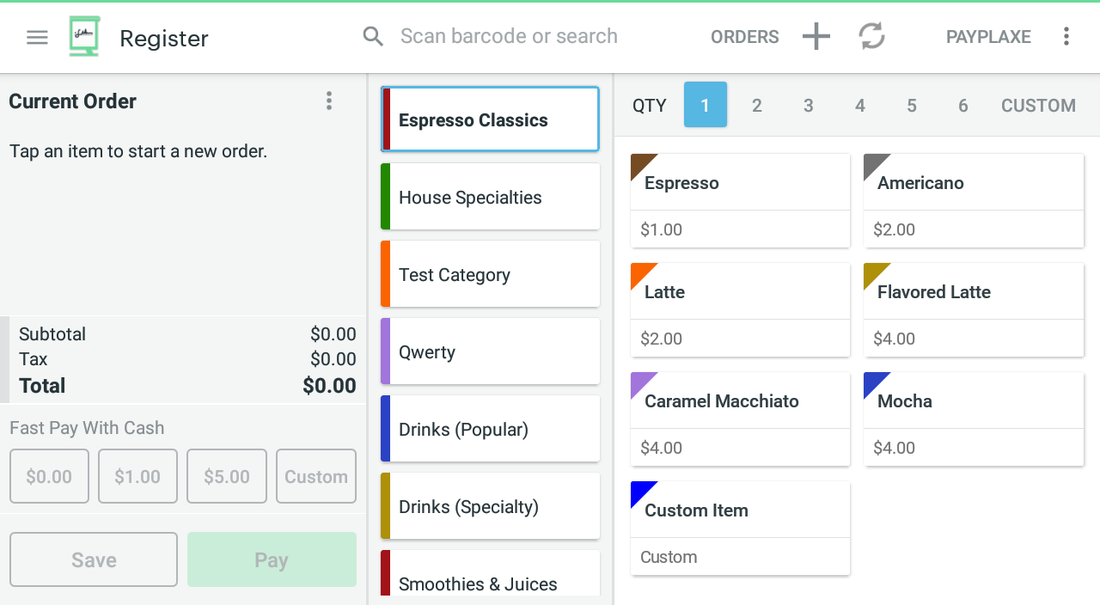
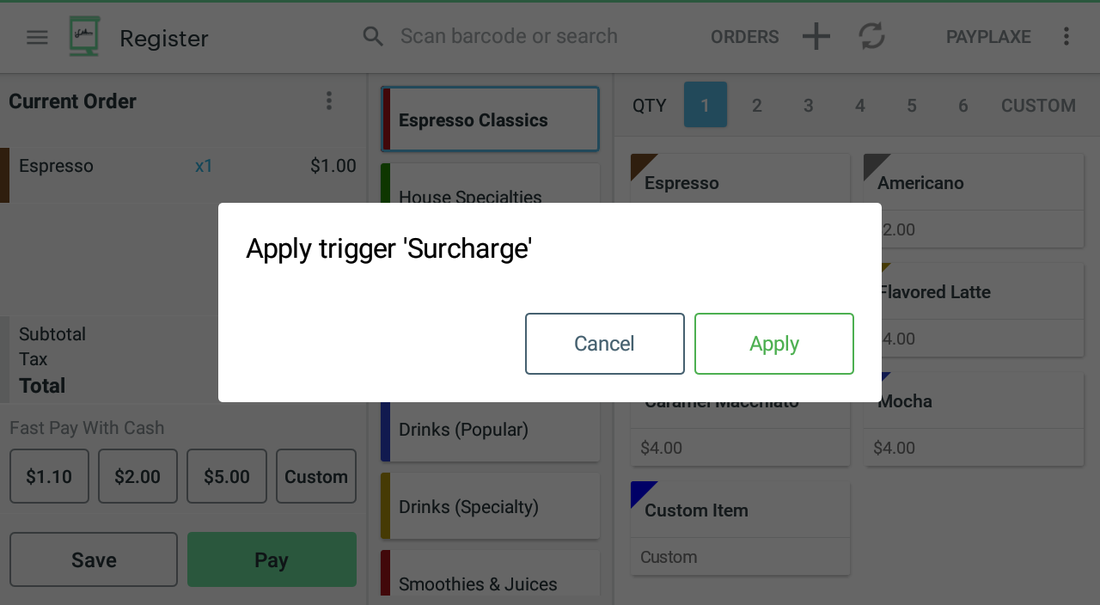
- Ring up an order that matches the trigger.A Prompt me trigger shows Apply trigger 'Name' with your two buttons; tap Apply and check the result on the order.
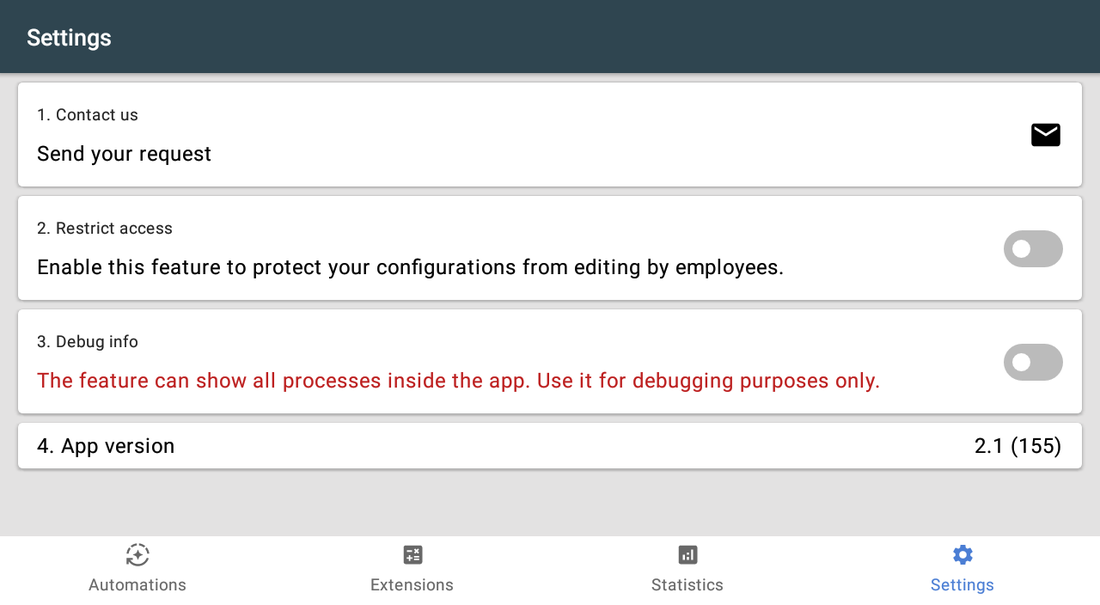
- Open Settings. Leave 2. Turn on the app on — no trigger runs on this device while it is off — and turn on 3. Restrict access so staff cannot edit the configuration. Both switches need a Manager or Admin login.
Setup scenarios
Each scenario is a complete configuration — follow the steps in order.
1Bag fee on every order
A small charge that must never be forgotten and never be argued about.
- Open Auto Item → Automations and tap +.
- Step 1 — name it Bag fee.
- Step 2 — Trigger Should: Trigger automatically.
- Step 3 — To: Add Custom Item.
- Step 4 — set the item name and amount, ticking Taxable if required.
- Step 5 — When?: When you put the first item in the cart, then save.
2Service charge only on large orders
A charge that should appear once the basket passes a threshold.
- Create a trigger and set To = Add Service Charge (create the charge itself in the Clover Setup app first).
- Set Trigger Should = Prompt me so the cashier can still decline.
- In When? choose [BETA] While subtotal is more than and enter the amount.
- Open Customizations and rename the buttons so the prompt is unambiguous.
- Save and test with a basket above and below the threshold.
3Automatic discount for one order type
Pick-up orders get a standing discount; dine-in does not.
- Create a trigger with To = Add Order Discount (percentage).
- Set the discount name and percentage in Set trigger object.
- Choose Trigger automatically and the moment When you go to pay.
- In step 6 select your pick-up order type.
- Save and test on a pick-up order. (Statistics does not yet report percentage order discounts — its tile shows Soon...)
Reference
Screens and settings
Every screen of the app and what each setting does. (5)
Screens and settings
Every screen of the app and what each setting does. (5)
Automations tab
| Setting | What it does |
|---|---|
| Status dot | Green — active, red — stopped. Tap the dot and confirm to stop or start the trigger. |
| When / Do | The trigger moment and the action, in plain text. |
| Pencil / bin | Edit or delete the trigger. |
| OPEN REGISTER | Opens the Clover Register for an immediate test. |
| Bottom tabs | Automations, Extensions (Sale app), Statistics, Settings. |
Trigger editor
| Setting | What it does |
|---|---|
| 1. Trigger Name | Your own label, not shown to customers. |
| 2. Trigger Should | Prompt me · Trigger automatically · Apply manually (BETA). |
| 3. To | Add Item, Add Service Charge, Set Order Note, Add Custom Item, Add Custom Item (% of subtotal), Add Order Discount (percentage / amount), Show Reminder, Remove Item, Remove Service Charges. |
| 4. Set trigger object | The concrete item, charge, note text, amount or percentage. |
| 5. When? | First item in the cart · When you go to pay · [BETA] While subtotal is more than X · [BETA] When item in the cart. The last one adds a Select item button next to the dropdown — pick the item to watch. Both BETA moments are re-checked while the order is open, and what they applied is removed again if the basket stops matching. Hidden when step 2 is Apply manually (BETA) — a manual trigger has no moment and no order-type filter. |
| 6. Order type should be | Restricts the trigger to one Clover order type. |
| CUSTOMIZATIONS | Apply and cancel button titles and colours. |
The Prompt me dialog
A trigger set to Prompt me stops in the Clover Register and asks first. This is the whole dialog the cashier sees.
| Setting | What it does |
|---|---|
| Title | Apply trigger 'Name' — the name you gave the trigger, so the cashier knows what is about to happen. A Show Reminder trigger is titled Reminder: 'Name' and shows the reminder text below the title. |
| Apply | Runs the action: adds the item, the charge, the note or the discount to the open order. |
| Cancel | Skips it. The order is left alone. The skip is recorded only so the same trigger is not asked again on this order — Statistics counts what was actually applied to a paid order, not declines. |
| Button names and colours | Both buttons are yours — rename and recolour them in the trigger editor (Apply button title, Cancel button title and the two colour settings). |
| Note triggers | A trigger that sets an order note opens a text field in the same dialog: type up to 100 characters, then tap Apply. |
| No way past it | The dialog does not close on Back or on a tap outside — the cashier has to pick one of the two buttons. |
The Auto Item tender button
On the Clover Register payment screen the tender button named Auto Item opens Select trigger. This is where a cashier runs an Apply manually trigger, and where anything the triggers already added is taken back off.
| Setting | What it does |
|---|---|
| Select trigger | Lists every active trigger with an APPLY button. The list ignores the trigger's own moment and order-type filter, so any trigger in it can be put on the open order — read the name before you tap. |
| APPLY | Runs that trigger on the current order at once, with no prompt. It changes the amount the customer pays, so check the order after tapping it. |
| Revert applied triggers (N) | At the bottom. N is how many triggers are on this order; the button opens the list and takes the items, charges, notes or discounts back off. Greyed out when N is 0. |
| From the Sale app | The same tender button opened from the Clover Sale app does not show this list — it opens the Extensions amount screen instead. |
Settings
The three switches can only be changed by an employee logged in as Manager or Admin; anyone else gets You need to be a manager or admin to change it.
| Setting | What it does |
|---|---|
| 1. Contact us | Sends a support request. |
| 2. Turn on the app | The master switch for this device. While it is off no trigger runs here — nothing is added to an order and nothing is asked. |
| 3. Restrict access | Protects the configuration from employees. |
| 4. Debug info | Internal processing log; for support only. |
| App version | The installed version. |
Screenshots taken from the running app on a Clover device. The apps’ interface language is English. Click a screenshot to enlarge.
Everyday use
What the cashier does after the app is configured.
- Automatic triggers need no action from the cashier.
- A Prompt me trigger shows Apply trigger 'Name' with your two buttons at the trigger moment — confirm or decline.
- An Apply manually (BETA) trigger only runs when the cashier picks it: tap the Auto Item tender button, then APPLY on the trigger you want.
- Added by mistake? On the payment screen tap the Auto Item tender button and use Revert applied triggers while the order is still open.
- Check Statistics weekly to see how often each kind of action was applied.
Troubleshooting
Symptom on the left, what to do on the right.
| Symptom | What to do |
|---|---|
| You don't have the Clover Register app. | The trigger targets the Register but the app is missing on this device. Install Clover Register, or build the rule under Extensions for the Sale app instead. |
| The subtotal trigger never fires. | While subtotal is more than is BETA and compares against the order subtotal before taxes — check the amount you entered. |
| A charge or item added by a trigger disappeared from the order. | That is one of the two BETA moments. [BETA] While subtotal is more than and [BETA] When item in the cart are re-checked while the order is open, and what they added is taken back off as soon as the basket no longer matches — after an item is voided and the subtotal falls below the amount, for example. Bring the order back above the threshold, or move the trigger to When you go to pay. |
| Your Clover token is invalid or Error 23. | Reinstall the app from the App Market so it can get a fresh token. |
| Statistics is empty. | The tile opens on today only — widen the two date fields at the top (history goes back about three months). A trigger is counted only after the order it ran on has been paid. Creating a report is just the export step; the link it produces stays valid for 24 hours. |
| The app's dialog never appears on the payment screen; Clover shows "Customer is choosing payment method". | Open the Clover Setup app → Payments and uncheck Automatically take payment on Connected Device, so payment is taken on the primary device. |
| Settings cannot be opened or changed. | Sign in with an employee whose Clover role is Manager or Admin. Some apps also have their own Restrict access switch that locks the configuration. |
| The app works erratically, or stops reacting after the device has been idle. | Turn off Battery Saver in the device's Android settings and keep the device online. |
| A change made on one device is not visible on another. | Settings sync through the cloud; give it a minute and make sure both devices have a network connection. |