

How it works
It reads your Clover catalogue
A scanned barcode is matched against item codes and SKUs in Clover Inventory.
You decide what the screen shows
Colours, taxes and the stock count are all settings. They are set in the Clover app; the web version follows them and answers Can't be changed here if you try to change one.
It resets itself
Twenty seconds after the last scan the screen goes back to the start.
Kiosk mode locks the device
The device stays in Price Check until someone long-presses the open tab for four seconds.
What it does
Scan or search by name
Search by code uses the scanner. Search by name lets staff type a product name.
Price with taxes
Show price with taxes shows the shelf price and the price including taxes after each scan.
Stock quantity
Show item quantity adds the count on hand. It needs Track Stock in Clover Inventory.
Auto-clear
The screen resets 20 seconds after the last scan, so the next customer starts from a clean screen.
Kiosk mode
Locks the device to Price Check. To exit, long-press the open tab for four seconds.
Appearance
Change the scan button, background and result colours, or reset everything to defaults.
Phone companion
Scan the QR code in the app to run price checks from an Android phone or tablet on the shop floor.
Web version
pricecheck.payplaxe.com opens the same lookup screen in a browser: a phone, a tablet, a laptop or a second Clover device. It signs in with your Clover account and uses the settings made on the Clover POS. SEARCH BY NAME stays in the Clover app. It is the same app, not a separate product: the browser is another way to open it, with the same Clover account and nothing extra to buy.
Price & installation
How to install
- Open the Clover App Market — on the device, or at clover.com/appmarket in your web dashboard.
- Find the app by name, or open its direct link from the button above.
- Tap Connect / Install and accept the permissions the app requests.
- The 30-day free trial starts automatically. The subscription then appears on your monthly Clover invoice.
- Open the app on the Clover device and sign in with a Manager or Admin employee account to configure it.
- To cancel later, uninstall the app from the App Market — the steps are right below.
How to cancel the subscription
Cancelling means uninstalling the app — there is no separate billing screen.
- Open the App Market — on the Clover device, or in the web dashboard.
- Open My Apps. Every app you pay for is listed there with its monthly fee.
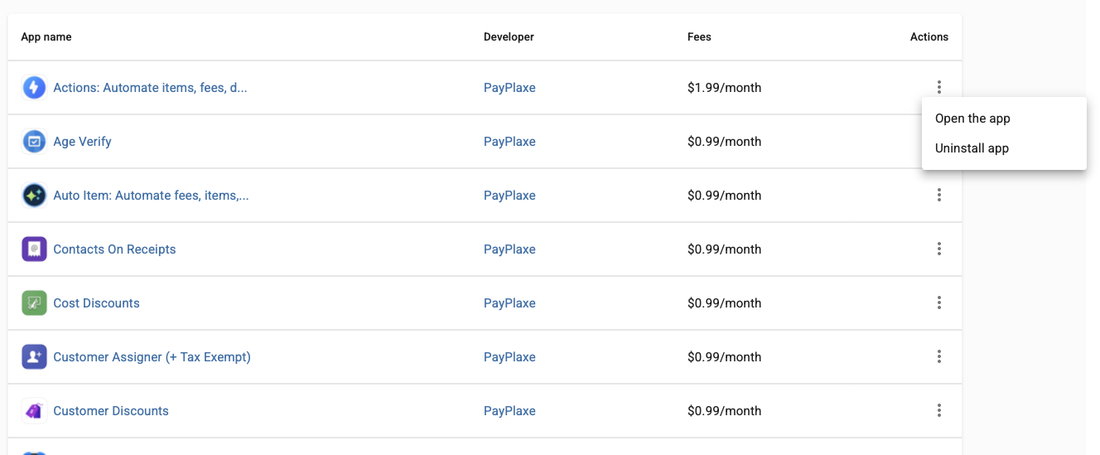
- Tap the ⋮ button on the app's row and choose Uninstall app.
- The app's own page works too: ⋮ next to the green Open the app button → Uninstall app.
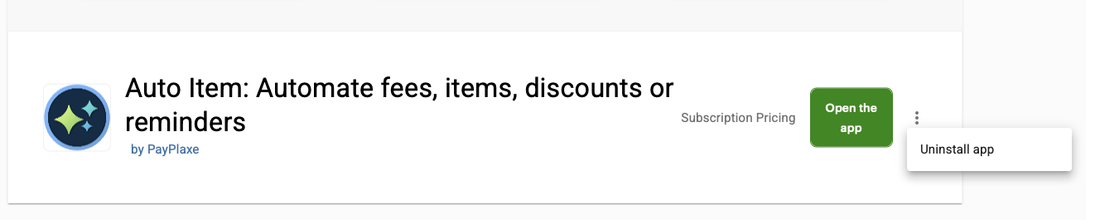
- Confirm. The subscription stops there and then — the app is off your next Clover invoice.
Install and cancel any time from the Clover App Market.
First setup
Do this once, in this order. It takes a few minutes and the app is then ready for the shift.
- Open Price Check on the device you want to dedicate to lookups.
- Open Settings → Behaviour and turn on Show price with taxes and, if you track stock, Show item quantity.
- Open Appearance and set the scan button, background and result colours.
- Test a scan with a real product and check the result screen.
- When the device is ready for customers, open Settings, tap 1. Enter Kiosk Mode and confirm the dialog.
- To exit kiosk mode, long-press the open tab (SEARCH BY CODE) for four seconds.
Setup scenarios
Each scenario is a complete configuration — follow the steps in order.
1A customer-facing price station
A spare Clover device at the end of an aisle answers price questions without staff.
- Open Price Check on the device you want to dedicate to this.
- Open Settings → Behaviour and turn on Show price with taxes.
- Leave Auto-clear screen after 20 seconds on so the display resets between customers.
- Open Appearance and set the Scan button colours so the button stands out to customers.
- Open Settings, tap 1. Enter Kiosk Mode and confirm the dialog.
- To leave kiosk mode, long-press the open tab (SEARCH BY CODE) for four seconds.
2Staff price checks on the shop floor
The team needs prices and stock while standing at the shelf.
- In Settings open Companion App.
- Install the PayPlaxe Price Check app on the Android phone from Google Play.
- Scan the QR code shown on the Clover screen to pair the phone with your merchant.
- Turn on Show item quantity so staff also see what is left in stock.
- Use the phone camera or a paired scanner to look up items away from the counter.
3Match the station to your store's look
The screen faces customers, so it should not look like a developer test page.
- Open Settings → Appearance.
- Set the Scan button, Background and Result colours.
- Check the result screen with a real product before leaving the settings.
- If a change goes wrong, use Reset all customizations.
- Lock it in with kiosk mode.
4A price station on a device you already have
A tablet or an old laptop in the aisle answers price questions without a second Clover device.
- On the Clover POS open Price Check, go to Settings and open 2. Companion App to show the QR code.
- On the other device open the web version and press Login via QR code, then scan the QR code from the Clover screen. Login via Clover signs in with the Clover account instead.
- Choose the input: the coloured scan button opens the camera of the device (the browser asks for camera permission once), or connect a USB or Bluetooth scanner that sends Enter after the code.
- Scan one real product and check the card — name, price, and the taxes or the quantity if they are turned on in the Clover app.
- Open Settings and tap Enter Kiosk Mode for full screen. To leave it, long-press the Price Check title at the top.
Reference
Screens and settings
Every screen of the app and what each setting does. (2)
Screens and settings
Every screen of the app and what each setting does. (2)
Lookup screen
| Setting | What it does |
|---|---|
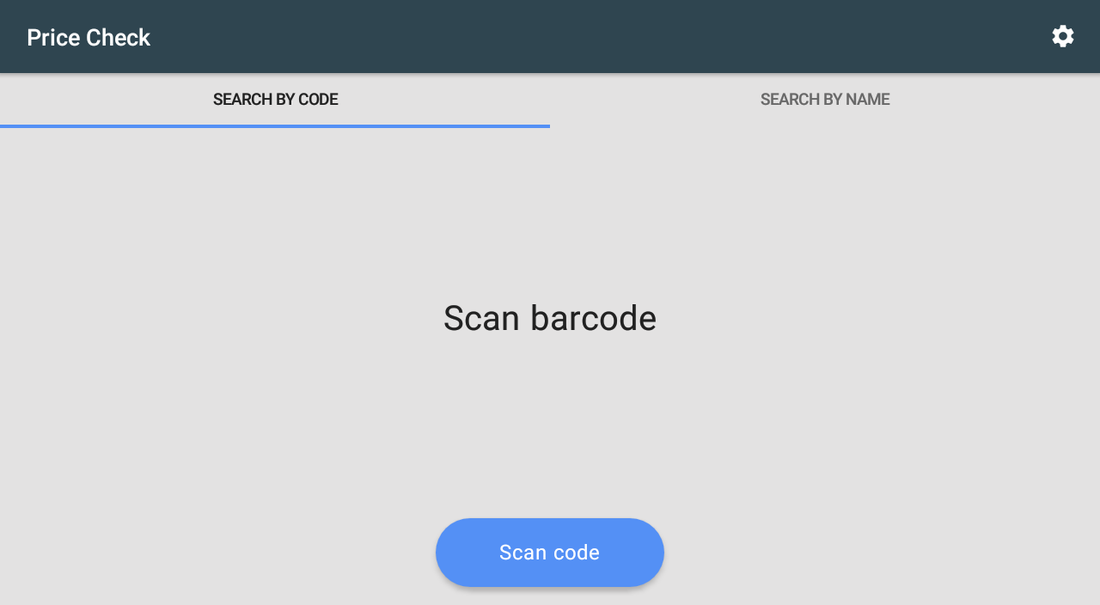
| SEARCH BY CODE | Scanner input — the customer scans the barcode. |
| SEARCH BY NAME | Keyboard input for staff. |
| Scan code button | The big call to action; its colours are configurable. |
| Gear | Opens Settings (hidden while in kiosk mode). |
Settings
| Setting | What it does |
|---|---|
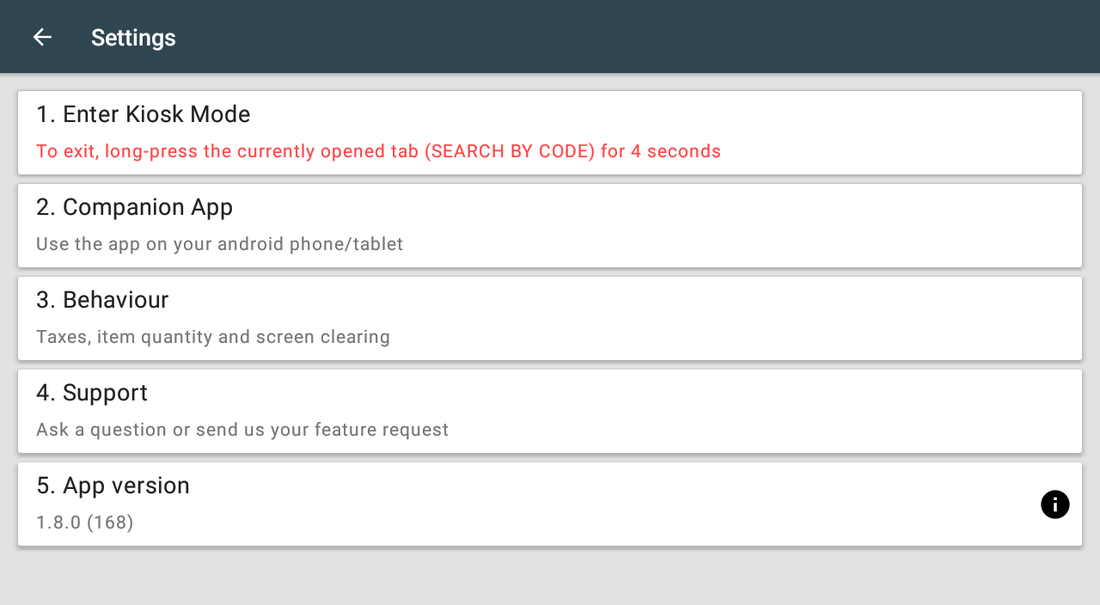
| 1. Enter Kiosk Mode | Locks the device to Price Check; exit with a four-second long press on the open tab. |
| 2. Companion App | QR code to pair the Android phone version. |
| 3. Behaviour | Taxes, item quantity and the 20-second auto-clear. |
| 4. Appearance | Scan button, background and result colours (text colour and fill for each), plus a reset. |
| 5. Support | Ask a question or send a feature request. |
| 6. App version | The installed version. |
Screenshots taken from the running app on a Clover device. The apps’ interface language is English. Click a screenshot to enlarge.
Everyday use
What the cashier does after the app is configured.
- Customers scan their item and read the price; the screen clears itself.
- Staff can switch to SEARCH BY NAME to look something up by name.
- If a code is unknown, add the barcode to the item in Clover Inventory.
Troubleshooting
Symptom on the left, what to do on the right.
| Symptom | What to do |
|---|---|
| The app reports that the item was not found. | The scanned code does not match any item code or SKU in Clover Inventory. |
| Quantity is not shown. | Turn on Show item quantity and enable Track Stock for your store in Clover Inventory. |
| Cannot leave kiosk mode. | Long-press the currently open tab for a full four seconds. |
| Colours look wrong after edits. | Use Reset all customizations in Appearance. |
| The app's dialog never appears on the payment screen; Clover shows "Customer is choosing payment method". | Open the Clover Setup app → Payments and uncheck Automatically take payment on Connected Device, so payment is taken on the primary device. |
| Settings cannot be opened or changed. | Sign in with an employee whose Clover role is Manager or Admin. Some apps also have their own Restrict access switch that locks the configuration. |
| The app works erratically, or stops reacting after the device has been idle. | Turn off Battery Saver in the device's Android settings and keep the device online. |
| A change made on one device is not visible on another. | Settings sync through the cloud; give it a minute and make sure both devices have a network connection. |