

How it works
The rental catalogue is separate
Rentable items are kept in your PayPlaxe account with their own price type, not in Clover Inventory. Every Clover device in the store sees the same list. The app needs an internet connection: without one the Inventory tab stays empty and no order can be created or completed.
An order starts the clock
The order records the customer, the deposit, any extra items and the due date, and prints a QR receipt when Use receipts: is on. If stock is tracked, the item loses one unit at this moment.
The total comes from the elapsed time
The app charges every started unit at the item's rate, counted from the moment the order was created until you close it. A Fixed item charges its flat price instead.
An order has two screens
Tapping an order card opens Order Details, which shows the order and offers a reprint and a delete. Its COMPLETE ORDER button opens the Complete Order screen. That second screen is where the deposit is returned, the total corrected, the due date changed and the payment started.
The deposit goes back before checkout
On the Complete Order screen press RETURN DEPOSIT (CASH) or RETURN DEPOSIT (TRANSACTION) first. Cash leaves the drawer and is written to the Clover Cash Log. A card deposit is refunded on its own Clover transaction, and the app then offers to print the refund receipt.
Payment closes the order for good
COMPLETE ORDER on that screen hands the total to the Register, so rentals appear in normal Clover reports. Once the payment is taken the order is marked completed, the screen closes, and the card in the list no longer opens.
The rental terms are yours
The app tracks time, deposits and stock. Late fees, damage and the rental agreement itself stay between you and the customer, so keep your own paperwork.
What it does
Time-based pricing
Each item is priced Fixed or per Seconds, Minute, Hour or Day. The app charges every started unit: part of an hour counts as a full hour.
Rental inventory
Rentable items are created in the app and kept in your PayPlaxe account, separate from Clover Inventory. Every Clover device in the store sees the same list, and the app needs an internet connection to load it.
Two ways to import from Clover
CLOVER INVENTORY on the Inventory tab opens your Clover catalogue. IMPORT on the Edit Item screen does the same from inside an item, and asks Select Unit Of Measure for a Per Unit item. Either way the item is stored only when you tap SAVE.
Stock modes
One store-wide setting in Settings: Do Not Track, Available/Unavailable or Track Stock Count. Creating an order takes one unit off the item; completing or deleting the order puts it back. You never mark an item busy by hand. Counts drift down today, because a unit is also subtracted whenever a running order is saved again, so recount before you trust a number. A count never goes below zero.
Deposits
Per order: None, Set note, Add cash into the drawer, or Card (Create a transaction). A card deposit is not a hold. It is a normal Clover sale on a separate order named Deposit (item name).
Deposit return
The Complete Order screen shows the button that matches the deposit. RETURN DEPOSIT (CASH) takes the cash back out of the drawer and logs it. RETURN DEPOSIT (TRANSACTION) opens the Clover transaction so you can refund the card, then offers to print the refund receipt. Once returned the button reads DEPOSIT RETURNED.
QR receipts
When Use receipts: is on, a receipt prints as the order is created. It carries the receipt number, a QR code of that number, the item name, the deposit, the price and the start time. The print icon in Order Details prints it again.
Orders board
The Orders tab lists orders, newest first. The search field matches the customer name or the receipt number. The QR button at the bottom right scans a receipt into the search field. SHOW COMPLETED adds the closed orders, which are read-only.
Overdue alerts
PayPlaxe checks due dates every minute. When one passes, the device shows a Rent Item - Due Date notification with Total overdue orders - and the count, and repeats it when a cashier logs in. Orders with no due date are never counted.
Export
EXPORT in the Orders tab menu asks for a date range and an e-mail address. The app mails a download link and shows the same link as a QR code on screen. The file is an .xls. The link lasts 24 hours.
Price & installation
How to install
- Open the Clover App Market — on the device, or at clover.com/appmarket in your web dashboard.
- Find the app by name, or open its direct link from the button above.
- Tap Connect / Install and accept the permissions the app requests.
- The 30-day free trial starts automatically. The subscription then appears on your monthly Clover invoice.
- Open the app on the Clover device and sign in with a Manager or Admin employee account to configure it.
- To cancel later, uninstall the app from the App Market — the steps are right below.
How to cancel the subscription
Cancelling means uninstalling the app — there is no separate billing screen.
- Open the App Market — on the Clover device, or in the web dashboard.
- Open My Apps. Every app you pay for is listed there with its monthly fee.
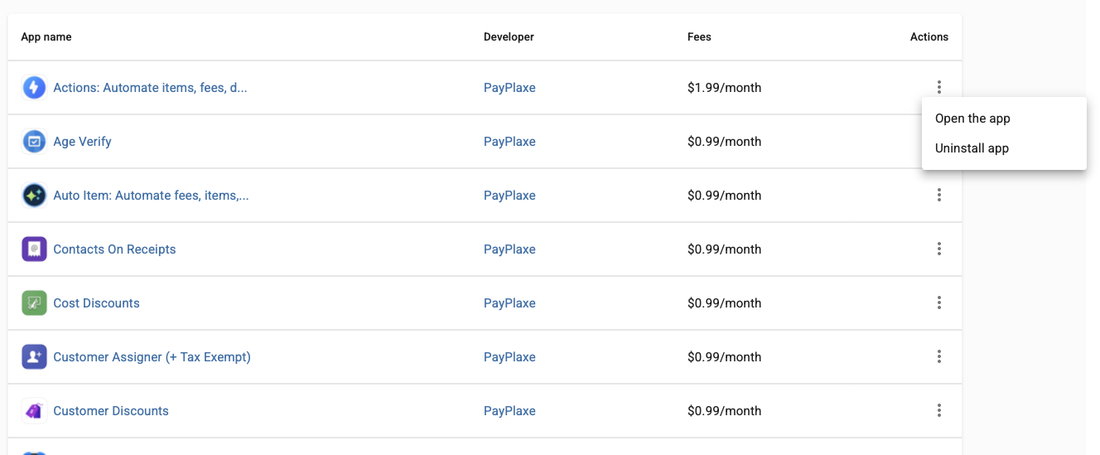
- Tap the ⋮ button on the app's row and choose Uninstall app.
- The app's own page works too: ⋮ next to the green Open the app button → Uninstall app.
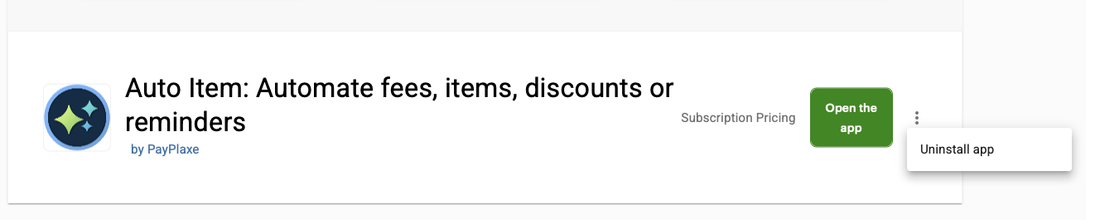
- Confirm. The subscription stops there and then — the app is off your next Clover invoice.
Install and cancel any time from the Clover App Market.
First setup
Do this once, in this order. It takes a few minutes and the app is then ready for the shift.
- Open Rent Item. The bottom tabs are Inventory, Orders and Settings.
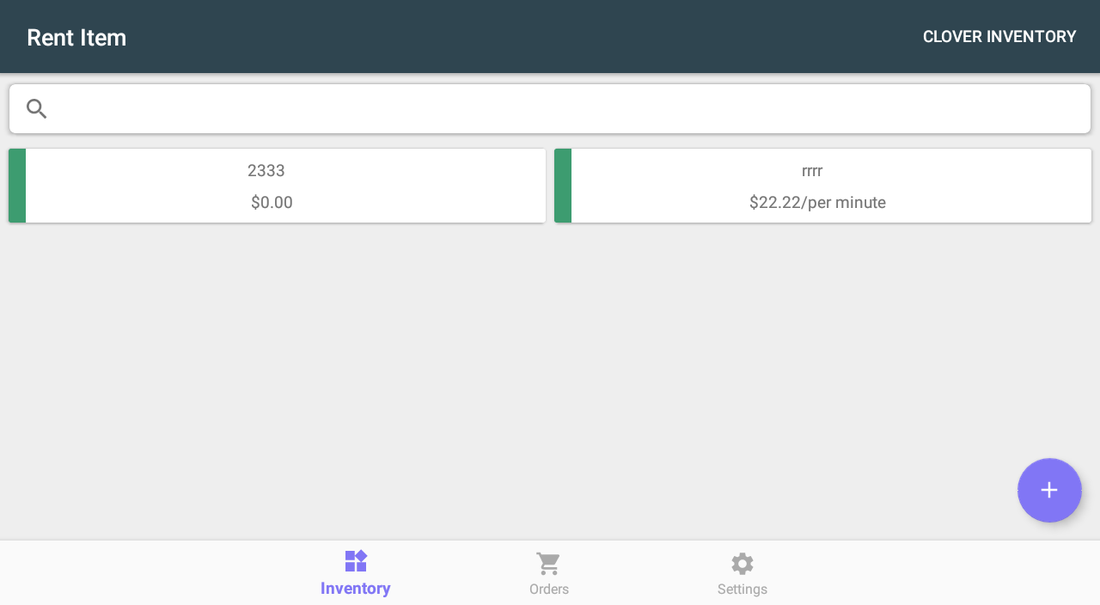
- Open Settings and set Use receipts:, Sort Items By: and Stock tracking mode:. Email Address: is shown from your Clover account and is changed there, not here.
- On Inventory tap + to create a rentable item, or CLOVER INVENTORY to bring one in from your Clover catalogue.
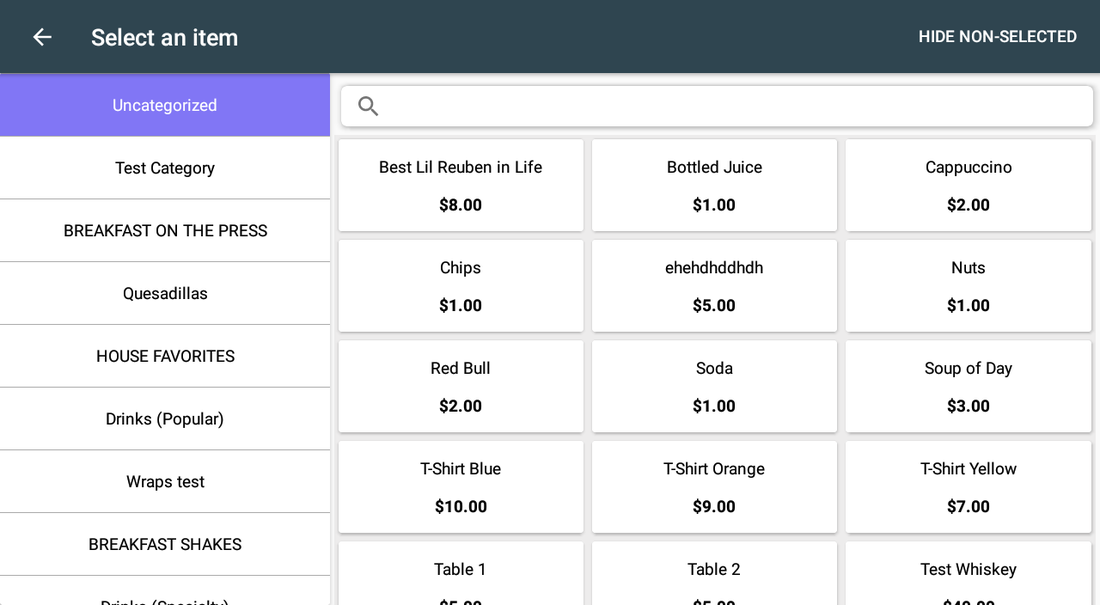
- The Clover picker takes one item at a time. Tap an item and the screen closes; the item opens in Item Details but is not saved yet.
- Tap the pencil icon to open Edit Item. Set Enter price* and Price Type* (Fixed, Seconds, Minute, Hour, Day), then tap SAVE.
- If Stock tracking mode: is not Do Not Track, the same screen shows Available? or Enter stock quantity. Fill it in before saving.
- Tap the item, then NEW ORDER. Fill in the customer, pick the deposit, add extras in Additional Items (BETA) and tap SUBMIT.
- On return open Orders, tap the order, tap COMPLETE ORDER, return the deposit, then tap COMPLETE ORDER again and take the payment in the Register.
Setup scenarios
Each scenario is a complete configuration — follow the steps in order.
1Rent by the hour (bikes, pool tables, karts)
The classic case: the customer takes the item now and pays for the time used at the end.
- Open Rent Item → Inventory and tap +.
- Fill in Enter name* and Enter price*, set Price Type* to Hour and tap SAVE.
- In Settings set Stock tracking mode: to Track Stock Count. It applies to every rentable item. Then open the item and enter how many you own.
- Tap the item, then tap NEW ORDER. Fill in Name (optional), Phone (optional) and the Due Date.
- Pick the deposit in Deposit / Initial Payment, enter the amount and tap SUBMIT. Add cash opens the drawer and logs the amount; Card (Create a transaction) opens the Clover payment screen and charges the card.
- The QR receipt prints if Use receipts: is on. Hand it to the customer.
- On return open Orders and find the order by customer name, or tap the QR button and scan the receipt.
- Tap the order card, then tap COMPLETE ORDER. This opens the Complete Order screen and takes no payment yet.
- Return the deposit first: RETURN DEPOSIT (CASH) or RETURN DEPOSIT (TRANSACTION). The button turns green and reads DEPOSIT RETURNED.
- Check the total, correct it with Total For Rent (tap to correct) if you need to, then tap COMPLETE ORDER and take the payment in the Register.
2Fixed-price bookings (party room, equipment set)
The price does not depend on time. You need the booking, the due date and the deposit.
- Create the item with Price Type* set to Fixed and the full booking price, then tap SAVE.
- In Settings set Stock tracking mode: to Available/Unavailable. It applies to every rentable item.
- Leave Available? switched on. Creating the order marks the room busy on its own, and completing or deleting the order frees it again.
- When booking, set Due Date to the end of the slot and write the details in Note (optional).
- Take the deposit as Card (Create a transaction). It is charged as a normal Clover sale and is given back later as a refund on that transaction.
- Open the Orders tab to see what has to come back. Overdue orders are red, with overdue: and the due date.
3Rental plus extra sales in one order
A helmet, a drink or a cleaning fee charged together with the rental.
- Tap the rental item on Inventory and tap NEW ORDER.
- On the order form open Additional Items (BETA).
- Tick the extra items in the Clover picker and confirm. The block then reads how many items are selected.
- Fill in the customer and the deposit and tap SUBMIT. The extra items are stored with the order.
- On return open the order and tap COMPLETE ORDER. The screen shows Total For Rent (tap to correct) and Total For Additional Items separately.
- Return the deposit, then tap COMPLETE ORDER. The Register receives the rental line plus every stored extra item.
4Track overdue rentals and export the log
See what has not come back and report on the month.
- Open Orders. Overdue orders are red, with overdue: and the due date. The rest show created: and the date the order was opened.
- Use the search field to look up an order by customer name or by the receipt number from the QR code. Item names are not searched.
- Tap the QR button at the bottom right to scan the customer's receipt instead of typing.
- Use SHOW COMPLETED in the top-right menu when you need the closed orders too. It then reads Hide completed.
- Tap EXPORT in the same menu. In Export Orders fill in Enter your email and pick Start date and End date.
- Tap EXPORT. The app shows Link generated! with a QR code of the link, and mails you the same link. Save the .xls as soon as it downloads.
Reference
Screens and settings
Every screen of the app and what each setting does. (8)
Screens and settings
Every screen of the app and what each setting does. (8)
Inventory tab
| Setting | What it does |
|---|---|
| Search field | Finds rentable items by name or product code. |
| Item card | The item name and its rate, e.g. $22.22/per minute. The stripe on the left is the colour set on the item. |
| CLOVER INVENTORY | Opens your Clover catalogue to bring an item in. |
| + button | Opens the Edit Item screen for a new rentable item. |
| Barcode scan | Scanning a product code on this tab opens that item. An unknown code answers Item not found. |
| Tabs | Inventory · Orders · Settings. |
Select an item (import from Clover)
Reached from CLOVER INVENTORY. It takes one item at a time.
| Setting | What it does |
|---|---|
| Category list | Left column; pick the category to browse. |
| Search field | Filters the item grid. |
| Item grid | Tap one item. The screen closes at once and the item opens in Item Details. Repeat for the next item. |
| HIDE NON-SELECTED | Does nothing here: nothing can be ticked, so there is never anything to hide. |
| Variable items | Come in with no price. Set the price on the Edit Item screen. |
Edit Item screen
Opened by + on the Inventory tab, or by the pencil icon in Item Details. Nothing is stored until you tap SAVE.
| Setting | What it does |
|---|---|
| Enter name* | The name shown on the item card. Up to 25 characters. |
| Colour square | Right of the name. Sets the colour of the stripe on the item card. |
| Enter price* | The rate for one unit of time. With Fixed it is the whole price. |
| Price Type* | Fixed, Seconds, Minute, Hour, Day. |
| Available? / Enter stock quantity | Shown only when Stock tracking mode: is not Do Not Track: a switch, or the number of units you own. |
| Product Code (optional) | Up to 25 characters. Scanning this code on the Inventory tab opens the item. |
| Product ID (Uneditable) | Always empty and disabled. |
| IMPORT | Top right. Replaces the fields with a Clover item. A Per Unit item asks Select Unit Of Measure first. |
| SAVE | Stores the item and answers Saved. Leaving without it keeps nothing. |
Item Details dialog
Opens when you tap an item on the Inventory tab.
| Setting | What it does |
|---|---|
| Pencil icon | Opens the Edit Item screen. |
| Delete icon | Deletes the rentable item after a confirmation. Past orders keep the item name. |
| Name, Price | Read-only. |
| Price Type | A dropdown. Changing it here changes the rate for the order you are about to start; the saved item keeps its own price type. |
| NEW ORDER | Opens the order form. |
| NOT AVAILABLE | Replaces NEW ORDER when the item is at zero. Tapping it answers Item is not available. |
| CANCEL | Closes the dialog. |
New order form
Opened by NEW ORDER. Everything on this form is stored with the order.
| Setting | What it does |
|---|---|
| Item | The item and its rate. Read-only. |
| Name (optional), Phone (optional) | Customer details. The name is what the Orders search matches. |
| Deposit / Initial Payment | The type: None, Set note, Add cash or Card (Create a transaction). The amount field appears beside the dropdown. |
| Additional Items (BETA) | Opens the Clover multi-select picker. The items are stored with the order. They can be changed later on the Complete Order screen. |
| Note (optional) | Free text. It appears in the export. |
| Due Date | A date, then a time. It drives the red overdue: mark and the notification. It can be left empty. |
| SUBMIT | Creates the order and answers Created. Cash goes into the drawer first; a card deposit opens the Clover payment screen first. |
Orders tab
| Setting | What it does |
|---|---|
| Search field | Matches the customer name or the receipt number. Item names are not searched. |
| Order card | name: the customer and the item, uuid: the receipt number, and either completed, overdue: with the due date, or created: with the date the order was opened. |
| QR button | Bottom right. Opens the Clover scanner and puts the scanned code into the search field. |
| SHOW COMPLETED | Menu item. Adds the closed orders to the list and then reads Hide completed. A completed card does not open. |
| EXPORT | Menu item. Opens the Export Orders dialog. |
| Tapping a card | Opens the Order Details dialog. |
Order Details dialog
What the order is. Nothing on it is editable.
| Setting | What it does |
|---|---|
| Print icon | Prints the QR receipt again. |
| Delete icon | Deletes the order after a confirmation. This cannot be undone. It is blocked while a cash or card deposit is unreturned: Order can't be deleted. Please return deposit. |
| Customer Name, Item, Time | The customer, the rented item and how long the order has been open. |
| Total, Total For Rent, Total For Additional Items | The amount as it stands now. The last row appears only when extra items were stored with the order. |
| Due Date, Details | The due date, in red when it has passed, then the phone and the note. |
| COMPLETE ORDER | Opens the Complete Order screen. It takes no payment by itself. |
| CLOSE | Closes the dialog. |
Complete Order screen
Opened by COMPLETE ORDER in Order Details. Everything you can still change on an order is here.
| Setting | What it does |
|---|---|
| Total amount | Rent plus stored extra items. Tapping it opens the same correction dialog as the row below. |
| Total For Rent (tap to correct) | Tap, type the amount in Correct amount and tap Save. The order becomes a fixed amount and stops counting time for this payment. |
| Due Date (tap to change) | Offers Change due date and Remove due date. |
| RETURN DEPOSIT (CASH) | Takes the amount back out of the drawer and writes it to the Clover Cash Log. |
| RETURN DEPOSIT (TRANSACTION) | Opens the Clover transaction of the card deposit so you can refund it. Back in the app it asks Would you like to print the refund receipt? |
| DEPOSIT RETURNED | The green state of that button once the money is back. It cannot be pressed again. |
| ADD ADDITIONAL ITEMS | Opens the multi-select picker. The selection is saved with the order at once, and the Register bills it at checkout. Once extras are stored, the button reads CHECK ADDITIONAL ITEMS with their number. |
| COMPLETE ORDER | Builds the Clover order and opens the Register. After the payment the order is completed and the screen closes for good. |
| CLOSE | Leaves without paying. A corrected total is not kept. |
Screenshots taken from the running app on a Clover device. The apps’ interface language is English. Click a screenshot to enlarge.
Everyday use
What the cashier does after the app is configured.
- Handing out: tap the item, tap NEW ORDER, fill in the customer, choose the deposit, add any extras in Additional Items (BETA) and tap SUBMIT; give the printed QR receipt to the customer.
- While rented: the order sits in Orders showing created: and the date it was opened, and turns red with overdue: and the due date once that date has passed.
- Overdue: the device shows a Rent Item - Due Date notification with the number of overdue orders, and shows it again when a cashier logs in. Only orders with a due date are counted.
- Taking back: open the order, or tap the QR button and scan the receipt, then tap COMPLETE ORDER to open the Complete Order screen.
- On that screen return the deposit first, correct the total if you need to, then tap COMPLETE ORDER and take the payment in the Register. Completing is final, so nothing can be returned afterwards.
- Close the order as soon as the item is back. While it stays open the time keeps counting.
Troubleshooting
Symptom on the left, what to do on the right.
| Symptom | What to do |
|---|---|
| An imported item shows $0.00. | It was a variable-price item in Clover. Open the item, tap the pencil icon, enter the price, pick the price type and tap SAVE. Until then it rents for $0.00. |
| The item I picked in CLOVER INVENTORY is not in the list. | Picking it only opened Item Details. The item is stored when you tap the pencil icon and then SAVE on the Edit Item screen. Closing the dialog discards the import. |
| The rental total looks wrong. | Open the order, tap COMPLETE ORDER, then tap Total For Rent (tap to correct) and set the right amount. Do it before you take the payment: leaving the screen without paying drops the correction. |
| An item cannot be rented out. | Its count is zero, so the dialog shows NOT AVAILABLE. Either the item is out on a running order, or Track Stock Count has reached zero, or Available? was switched off on the Edit Item screen. Completing or deleting the order gives the unit back. |
| The stock count keeps falling. | A known defect: a unit is subtracted not only when the order is created but every time a running order is saved again, which happens when you change a due date, return a card deposit or an order goes overdue. The count never goes below zero. Correct the number by hand on the Edit Item screen, and do not use these counts for stocktaking. |
| The customer lost the QR receipt. | Open the order in Orders and tap the print icon in the Order Details header. You can also find the order by the customer name. |
| An order will not delete. | The app answers Order can't be deleted. Please return deposit. Open the order, tap COMPLETE ORDER and return the cash or card deposit first. Deleting is permanent, so export the log first if you need the record. |
| A payment was cancelled and an unpaid order is left in Clover. | Both the card deposit and the checkout create a Clover order before the payment screen opens, and nothing removes it if you cancel. Delete that order in the Clover Orders app, then repeat the step in Rent Item. |
| Scanning a rental receipt says Item not found. | You scanned it on the Inventory tab, which looks for product codes. Scan receipts on the Orders tab, with the QR button at the bottom right. |
| The order was completed before the deposit was returned. | A completed order cannot be reopened and its return button is gone. Give the cash back from the drawer, or refund the deposit payment in the Clover Orders app on the order named Deposit (item name), and note it in your own records. |
| The Inventory tab is empty and orders will not save. | The rental catalogue is loaded from your PayPlaxe account, so the device needs an internet connection. Check the connection and reopen the tab. |
| The app's dialog never appears on the payment screen; Clover shows "Customer is choosing payment method". | Open the Clover Setup app → Payments and uncheck Automatically take payment on Connected Device, so payment is taken on the primary device. |
| Settings cannot be opened or changed. | Sign in with an employee whose Clover role is Manager or Admin. Some apps also have their own Restrict access switch that locks the configuration. |
| The app works erratically, or stops reacting after the device has been idle. | Turn off Battery Saver in the device's Android settings and keep the device online. |
| A change made on one device is not visible on another. | Settings sync through the cloud; give it a minute and make sure both devices have a network connection. |