
How it works
Clover refunds money, this returns goods
The refund itself is done in Clover. The app puts the item back into the stock count.
It reacts to the refund
A background service watches Clover orders. When a refund is processed, Select items to return opens on its own; older returns are done from Orders.
Stock tracking is required
Track Stock must be on for your Clover account. The app checks this when it opens and warns you if it is off.
The log lives in your PayPlaxe account
Every return is posted to your PayPlaxe account for this merchant, which is why the same history opens in the browser and can be exported. Clover receives only the stock change.
What it does
Opens by itself after a refund
When a refund is processed on the Clover device, Select items to return appears with the refunded lines of that order already ticked.
Return from a previous order
Orders lists the last 100 orders for returns handled later. The search box matches the order ID.
Quantity per line
Tap the quantity box on a line to open Change quantity and enter how many units actually came back.
History and return receipts
Every return is recorded. Tap a row for date, item name, item ID, count and amount; Print Receipt prints a Returned Item slip on the Clover printer.
Reports by date
The history opens on today. Set the two date cards to any period, then create a report: a QR code of the link plus SEND VIA EMAIL.
Clover Orders shortcut
Launch Orders opens Clover Orders to find the sale and its order ID.
Works with stock tracking
The app checks that Track Stock is on for your Clover account and warns you when it is not.
Web version
returnitems.payplaxe.com opens the same returns history in a browser, with Report and Settings only. It is the same app you already have on Clover — the reports and settings side of it, with nothing extra to buy. Sign in with Login via Clover. Returning items stays on the Clover device.
Price & installation
How to install
- Open the Clover App Market — on the device, or at clover.com/appmarket in your web dashboard.
- Find the app by name, or open its direct link from the button above.
- Tap Connect / Install and accept the permissions the app requests.
- The 30-day free trial starts automatically. The subscription then appears on your monthly Clover invoice.
- Open the app on the Clover device and sign in with a Manager or Admin employee account to configure it.
- To cancel later, uninstall the app from the App Market — the steps are right below.
How to cancel the subscription
Cancelling means uninstalling the app — there is no separate billing screen.
- Open the App Market — on the Clover device, or in the web dashboard.
- Open My Apps. Every app you pay for is listed there with its monthly fee.
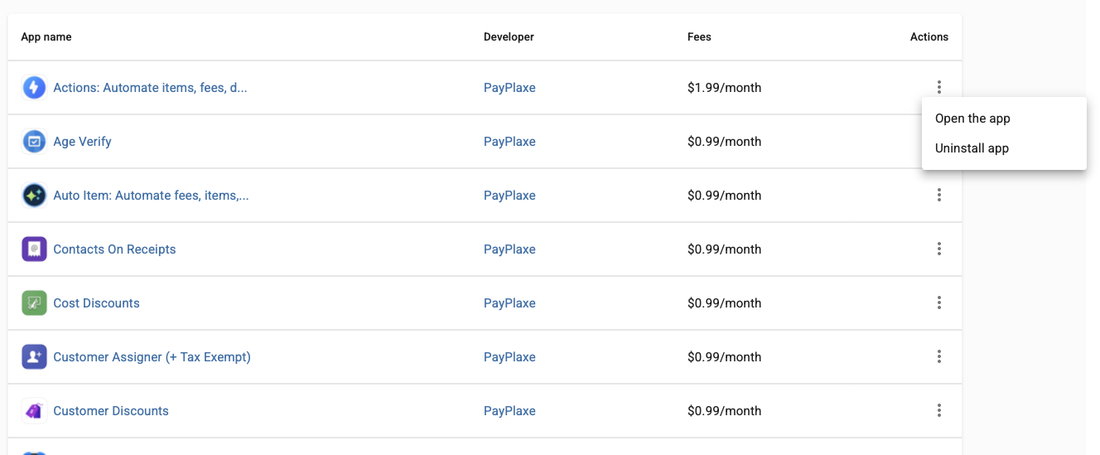
- Tap the ⋮ button on the app's row and choose Uninstall app.
- The app's own page works too: ⋮ next to the green Open the app button → Uninstall app.
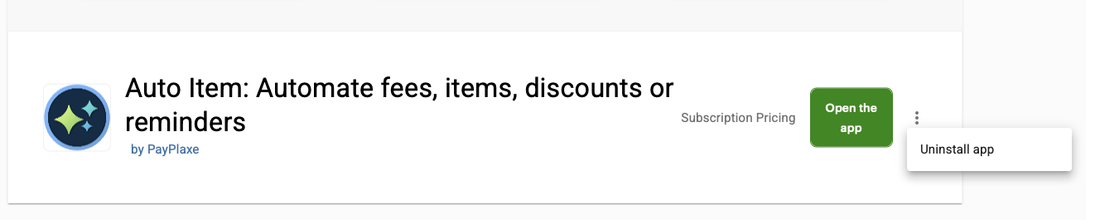
- Confirm. The subscription stops there and then — the app is off your next Clover invoice.
Install and cancel any time from the Clover App Market.
First setup
Do this once, in this order. It takes a few minutes and the app is then ready for the shift.
- In Clover Inventory turn on Track Stock so Clover keeps stock counts for your account.
- Open Return Item. If Track Stock is off you will see Please enable tracking stock.
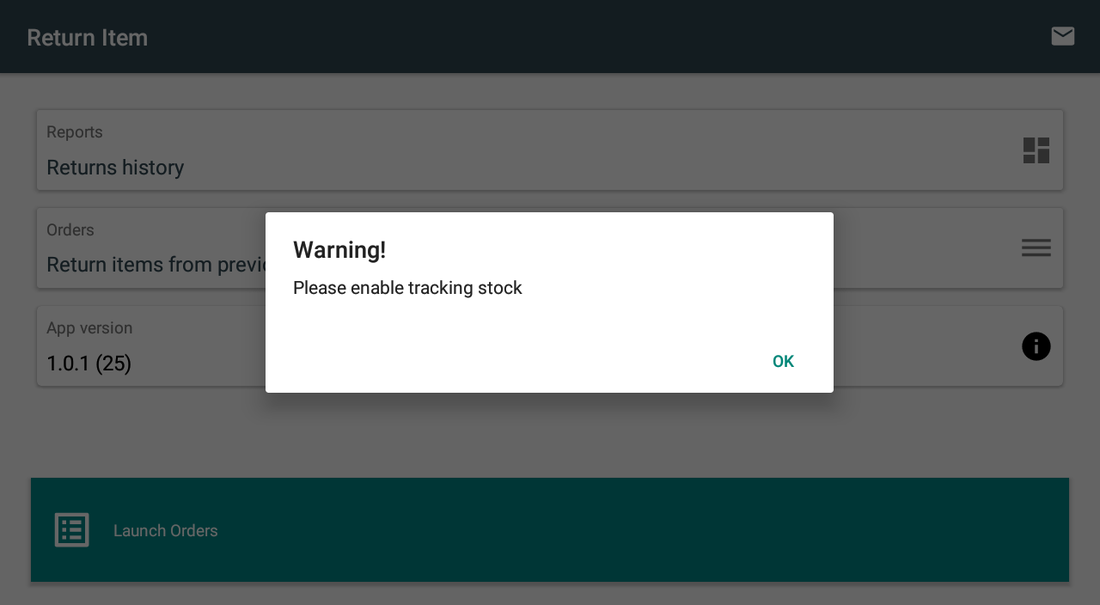
- The main screen offers Reports, Orders and Launch Orders.
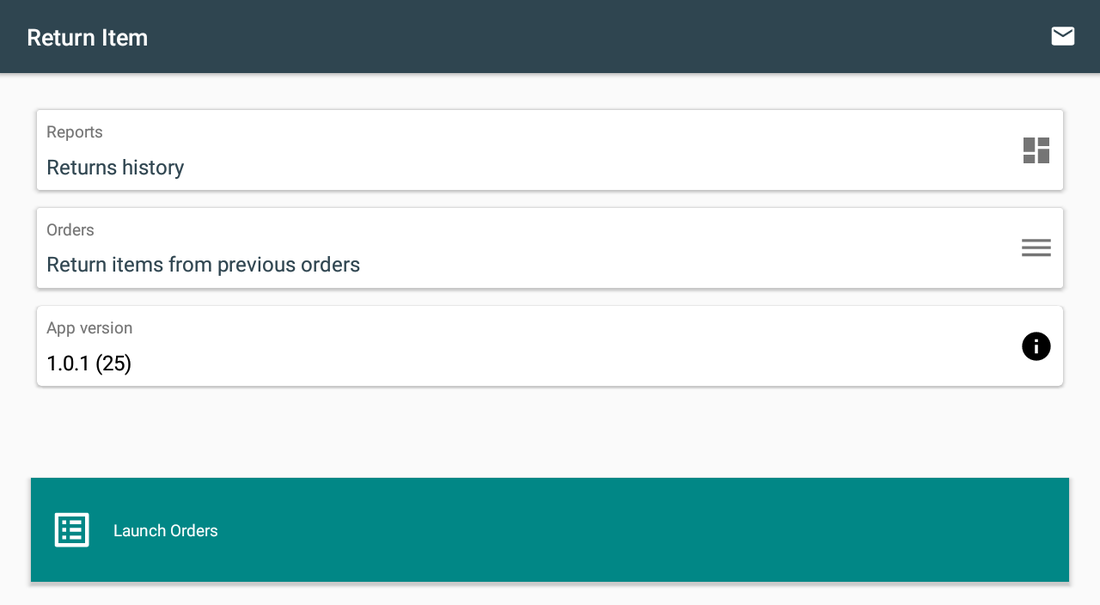
- Do a test: sell one unit and refund it in Clover. Select items to return opens by itself; press RETURN ITEMS and check the stock count.
Setup scenarios
Each scenario is a complete configuration — follow the steps in order.
1Prepare: turn on stock tracking
Track Stock has to be on for your Clover account before a return can land in a stock count.
- Open Clover Inventory and turn on Track Stock so Clover keeps stock counts for your account.
- Open Return Item; if Track Stock is off, the app shows Please enable tracking stock.
- Turn Track Stock on for your account in Clover Inventory, then reopen the app.
- Do a test: sell one unit, refund it in Clover, then return it with the app and check the count.
2A customer returns a product
The money goes back in Clover; the goods must go back on the shelf and into the count.
- Refund the payment in Clover as you normally would.
- Select items to return opens by itself on top of whatever is on screen. The refunded lines are already ticked, and the other lines of the same order are listed unticked.
- Untick anything the customer did not physically hand back. Every ticked line is added to its Clover stock count when you confirm, and the app has no undo.
- If only part of a line came back, tap its quantity box, type the number of units in Change quantity and confirm with Ok.
- Press RETURN ITEMS: the stock counts go up and the returns appear in the history. CLOSE dismisses the dialog and changes nothing.
3Return an older refund from Orders
If the pop-up was closed, or the goods come back a day later, the return is done from the order list.
- Open Return Item and choose Orders · Return items from previous orders.
- The list shows the most recent 100 orders with time and date, total, payment state and order ID.
- Type the order ID in the search box; it matches the order ID only, not a customer name, an amount or a date.
- If you do not have the ID, use Launch Orders to find the sale in Clover Orders and copy it from there.
- Tap the order, untick what did not come back, adjust quantities, then press RETURN ITEMS.
4Check what was returned this month
Returns are a shrinkage signal worth watching.
- Open Reports · Returns history. It opens on today only.
- Tap the two date cards to set the start and the end of the period you want.
- Tap a return for its details, and Print Receipt if you need a paper copy.
- Tap the share button and confirm Create report?: a QR code of the report link appears, with SEND VIA EMAIL.
- Access to that link expires — the app says one hour, the browser version says 24 hours. Create the report again if the link stops opening.
Reference
Screens and settings
Every screen of the app and what each setting does. (5)
Screens and settings
Every screen of the app and what each setting does. (5)
Main screen
| Setting | What it does |
|---|---|
| Reports · Returns history | Returns recorded in the selected period; opens on today — tap the two date cards to widen the range. |
| Orders · Return items from previous orders | The most recent 100 orders, searchable by order ID. |
| App version | The installed version. |
| Launch Orders | Opens Clover Orders to find the sale. |
| Support (envelope icon) | Opens the PayPlaxe contact dialog. |
Orders list
| Setting | What it does |
|---|---|
| Search… | Matches the Clover order ID only — not a customer name, an amount or a date. |
| Order row | Time and date, order total, payment state and the order ID. |
| List length | The most recent 100 orders, or the last 100 matches of a search. |
| Tapping a row | Opens Select items to return for that order. |
Select items to return
| Setting | What it does |
|---|---|
| Item row | Item name and price, a quantity box and a checkbox. Lines already refunded arrive ticked; the other lines of the order are listed unticked. |
| Quantity box | Tap it to open Change quantity and type how many units came back. The stock count goes up by that number. |
| RETURN ITEMS | Adds every ticked line to its Clover stock count and records it in the history. Untick what did not come back first — the app has no undo, and a wrong count has to be corrected in Clover Inventory. |
| CLOSE | Closes the dialog without changing any stock count. |
Returns history
| Setting | What it does |
|---|---|
| Date cards | Start and end of the period. The screen opens on today, 00:00 to 23:59. |
| Row · Info | Date, item name, item ID, count and amount. |
| Print Receipt | Prints a Returned Item slip on the Clover printer with the store header, the item and the amount. |
| Share button | Create report? → a QR code of the report link, plus SEND VIA EMAIL. Access to the link expires. |
Stock tracking warning
| Setting | What it does |
|---|---|
| Please enable tracking stock | Shown when Track Stock is off for your Clover account; turn it on in Clover Inventory. |
| OK | Closes the warning. The app still writes the stock update for every ticked line, but with Track Stock off Clover keeps no count for the item: the write starts from zero, so the resulting count is wrong. Turn Track Stock on first. |
Screenshots taken from the running app on a Clover device. The apps’ interface language is English. Click a screenshot to enlarge.
Everyday use
What the cashier does after the app is configured.
- Refund the payment in Clover as usual.
- Select items to return opens by itself; untick anything the customer did not hand back.
- Correct the quantity on a line if only part of it came back, then press RETURN ITEMS.
- For an older refund, open Return Item → Orders and find the order by its ID.
- Check the returns history at the end of the day.
Troubleshooting
Symptom on the left, what to do on the right.
| Symptom | What to do |
|---|---|
| Please enable tracking stock. | Track Stock is off for your Clover account. Turn it on in Clover Inventory, then reopen the app. |
| The order cannot be found. | The list holds the most recent 100 orders and the search box matches the order ID only. Use Launch Orders to find the sale in Clover Orders, then search by the order ID shown there. |
| Stock did not increase. | The line was not ticked in Select items to return, so nothing was written for it. Open Orders, find the order and repeat the return with the line ticked. |
| The count is wrong after a return. | What was added is the quantity shown on the line. With Track Stock off Clover keeps no count for the item, so the write starts from zero. Turn Track Stock on in Clover Inventory and correct the count there. |
| The pop-up appeared after a refund and I closed it. | Nothing went back into stock. Open Orders, find the order and do the return from there. |
| The report link no longer opens. | Access to a generated report expires. Open the returns history and create the report again. |
| The app's dialog never appears on the payment screen; Clover shows "Customer is choosing payment method". | Open the Clover Setup app → Payments and uncheck Automatically take payment on Connected Device, so payment is taken on the primary device. |
| Settings cannot be opened or changed. | Sign in with an employee whose Clover role is Manager or Admin. Some apps also have their own Restrict access switch that locks the configuration. |
| The app works erratically, or stops reacting after the device has been idle. | Turn off Battery Saver in the device's Android settings and keep the device online. |
| A change made on one device is not visible on another. | Settings sync through the cloud; give it a minute and make sure both devices have a network connection. |