

How it works
Every message is an event
An event has a name for you, the text the customer reads, a schedule and the weekdays it prints on.
Two kinds of schedule
ONE TIME runs between two dates. ALWAYS has no end date and keeps printing until you delete the event or give it a ONE TIME period that has passed.
The app has to be opened on the device
Printing runs through Clover's receipt hook on the device itself. Opening Text On Receipts on the Clover device registers that hook and copies the current events to the device. Do it after installing, and after every change made in the browser.
Several events can run at once
All active events print one after another. Their texts are joined end to end with nothing in between, so if you run two messages at once, write each one so it still reads correctly when it follows the other.
Test it on paper first
TEST PRINT prints the message from the editor on the Clover device, before any customer sees it. It prints only the event you are editing. The text comes out as one paragraph: line breaks are dropped, and a character like < is read as markup, so what follows it can disappear.
Watch what you promise
Whatever you print is a statement to the customer. Return windows, refund terms and price promises are held against you, so keep the wording accurate.
What it does
Up to 400 characters
Enough for a promotion, a policy line or a short thank-you note.
One time or Always
One time runs between a start and an end date. Always prints with no end date. There is no on/off switch: to stop it, delete the event or set it to One time with dates that have passed.
Weekday schedule
Choose the days the text prints: weekends only, weekdays only, or every day.
Several events at once
A permanent policy line and a temporary sale message can coexist.
Test print
Print the message on real paper from the editor, before any customer sees it. Test print exists on the Clover device only.
Web version
textonreceipts.payplaxe.com manages the same events from a browser, with the same fields. It is the same app, not a separate product: the browser is where it is set up, with the same Clover account and nothing extra to buy. Sign in with Login via Clover. A change made there, a delete included, starts working only after Text On Receipts is opened on the Clover device.
Price & installation
How to install
- Open the Clover App Market — on the device, or at clover.com/appmarket in your web dashboard.
- Find the app by name, or open its direct link from the button above.
- Tap Connect / Install and accept the permissions the app requests.
- The 30-day free trial starts automatically. The subscription then appears on your monthly Clover invoice.
- Open the app on the Clover device and sign in with a Manager or Admin employee account to configure it.
- To cancel later, uninstall the app from the App Market — the steps are right below.
How to cancel the subscription
Cancelling means uninstalling the app — there is no separate billing screen.
- Open the App Market — on the Clover device, or in the web dashboard.
- Open My Apps. Every app you pay for is listed there with its monthly fee.
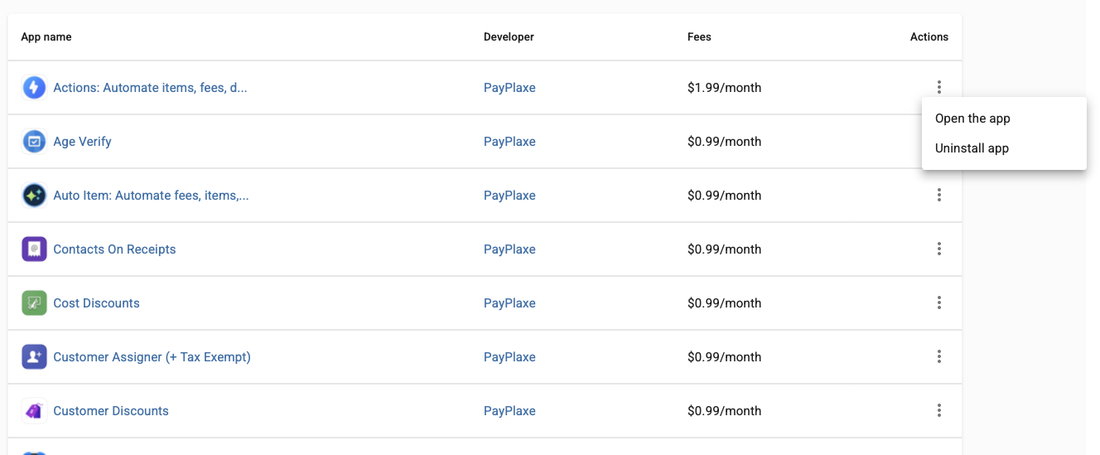
- Tap the ⋮ button on the app's row and choose Uninstall app.
- The app's own page works too: ⋮ next to the green Open the app button → Uninstall app.
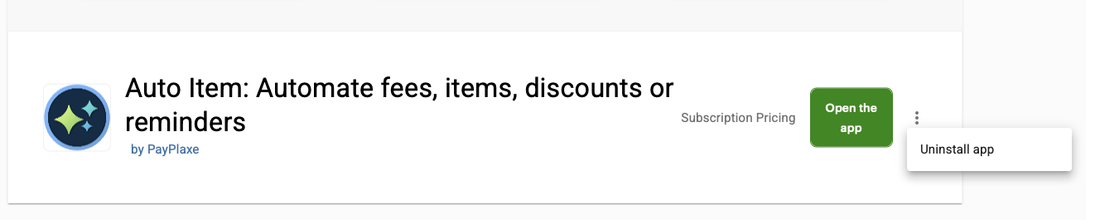
- Confirm. The subscription stops there and then — the app is off your next Clover invoice.
Install and cancel any time from the Clover App Market.
First setup
Do this once, in this order. It takes a few minutes and the app is then ready for the shift.
- Open Text On Receipts; existing events are listed with their dates and weekdays.
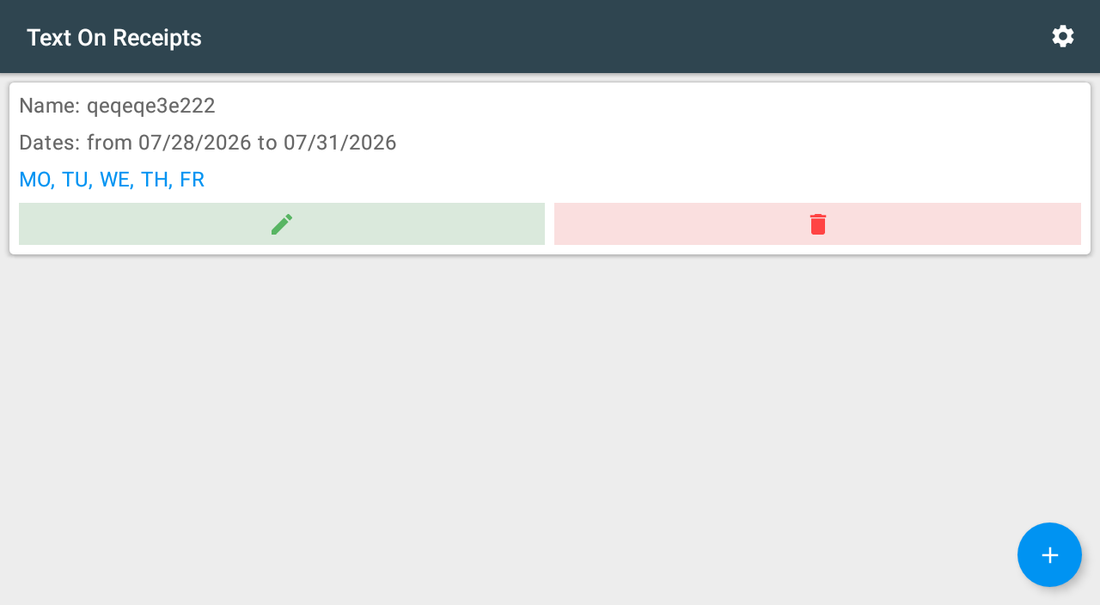
- Tap +, or the pencil to edit an existing event.
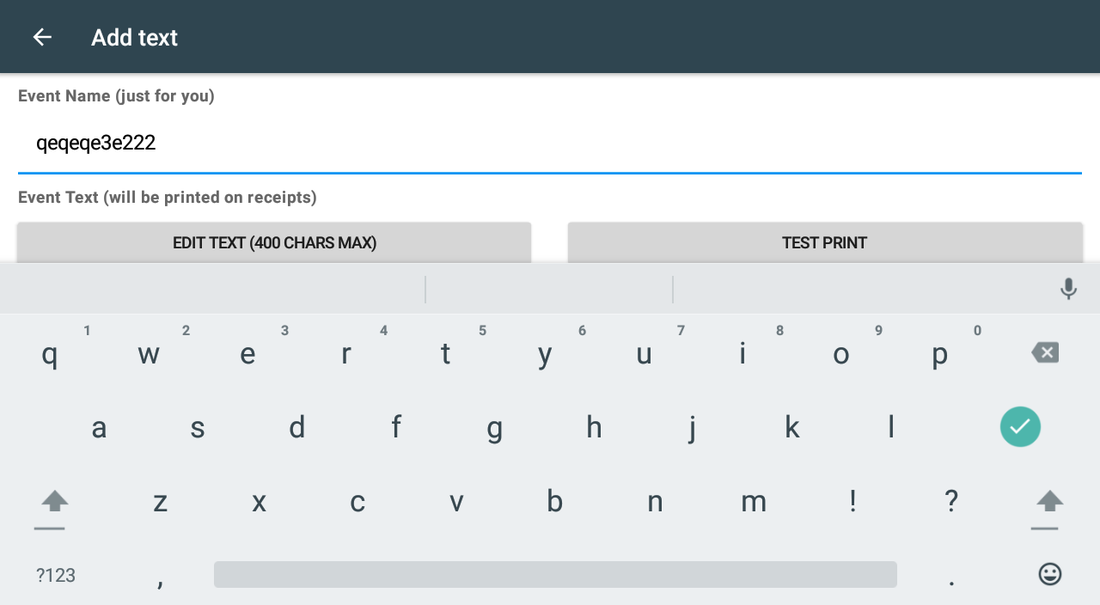
- Fill Event Name (just for you) — it is not printed.
- Tap EDIT TEXT (400 CHARS MAX), write what the customer will read, and confirm with the tick in the toolbar. Leaving with the X asks Changes won't be saved.
- Choose ONE TIME with dates, or ALWAYS.
- Tick the weekdays, run TEST PRINT and save.
Setup scenarios
Each scenario is a complete configuration — follow the steps in order.
1A week-long sale announcement
The message should start and stop by itself, without anyone remembering to remove it.
- Open Text On Receipts and tap +.
- Enter the event name — this is only for you, it does not print.
- Tap Edit text (400 chars max) and write the announcement.
- Choose One time in Event Schedule.
- Set Print from and To to the sale dates and tick every weekday.
- Use Test print to check the wording on paper, then save. The message prints as one paragraph — line breaks you type are dropped.
2A permanent policy line
Return rules, allergen notices or a legal line that must be on every receipt.
- Create a new event and write the policy text.
- Choose Always as the schedule so it has no end date.
- Tick all seven weekdays.
- Save — the line now prints on every receipt.
- Delete or edit the event whenever the policy changes.
3A weekend-only message
Different opening hours or a weekend promotion.
- Create an event with the weekend text.
- Choose Always so it keeps repeating every week.
- Tick only SA and SU.
- Save and check a receipt on Saturday.
- Keep your weekday message as a separate event so the two never collide.
4Changing the text from the office
The manager is not in the shop, but the message on the receipts has to change.
- Open the web version in any browser and press Login via Clover. There is no separate password.
- If the page answers Open Text On Receipts on your Clover POS, then try again, open the app once on the device and sign in again.
- Open Text On Receipts in the menu, then edit an event or create one with the + button.
- Change the wording with Edit text (400 chars max) — in the browser it is a dialog with an x/400 counter and Ok / Cancel — then save.
- Go to the shop, or ask someone there, and open Text On Receipts on the Clover device. Until that happens the receipts keep printing the old text.
Reference
Screens and settings
Every screen of the app and what each setting does. (5)
Screens and settings
Every screen of the app and what each setting does. (5)
Events list
| Setting | What it does |
|---|---|
| Name | Your label for the event. |
| Dates | The active period for a ONE TIME event. |
| Weekday line | The days the text prints on. |
| Pencil / bin | Edit or delete the event. Delete asks for confirmation and cannot be undone — the text has to be typed again. |
| + button | Creates a new event. |
| Gear icon | Opens the Settings screen. |
Event editor
| Setting | What it does |
|---|---|
| Event Name (just for you) | Internal label, never printed. |
| EDIT TEXT (400 CHARS MAX) | Opens the text screen. Write the message there and confirm with the tick; typing stops at 400 characters. |
| TEST PRINT | Prints the message immediately on the receipt printer. Clover device only. |
| Event Schedule | ONE TIME (with Print from / To) or ALWAYS. |
| On these days | The weekdays the event prints on. |
| SAVE / CANCEL | Stores or discards the event. |
Text editor
Opened with EDIT TEXT (400 CHARS MAX). On the Clover device it is a screen of its own.
| Setting | What it does |
|---|---|
| Enter your receipt text here | The message the customer reads. Typing stops at 400 characters. |
| Save | The tick in the toolbar. Keeps the text and returns to the event; the event itself is stored with SAVE. |
| X | Asks Changes won't be saved: Leave without saving or Continue editing. |
| Edit text | In the browser the same text is a dialog with an x/400 counter and Ok / Cancel. |
Settings
Opened with the gear icon on the events list; in the browser it is the second entry in the menu.
| Setting | What it does |
|---|---|
| Contact us | Send your request — opens the support contacts. |
| App version | The installed version. Support asks for it. |
| Merchant ID | Browser version only, read-only; tapping it answers You can't change this parameter. |
Web version
The same events in a browser, on a computer, a tablet or a phone.
| Setting | What it does |
|---|---|
| Where | The web version, opened in any browser. |
| Login via Clover | The only sign-in: your Clover account, no separate password. The app must have been opened on the Clover device at least once, otherwise the page answers Open Text On Receipts on your Clover POS, then try again. |
| Menu | Two entries: Text On Receipts (the events) and Settings. |
| Fields | Name, text (400 characters), One time / Always, Print from / To and the seven weekdays — all editable. |
| Not in the browser | Test print, and the printing itself. Everything that happens at the register stays on the Clover device. |
| After a save | A red warning asks you to open the app on the Clover POS to sync the change. A delete shows no warning, but needs the same step. |
Screenshots taken from the running app on a Clover device. The apps’ interface language is English. Click a screenshot to enlarge.
Everyday use
What the cashier does after the app is configured.
- Nothing to do at the register — active events print by themselves, once the app has been opened on the device.
- Update the text of a standing event whenever the message changes.
- Delete or let a ONE TIME event expire when the campaign ends.
- After changing or deleting an event in the browser, open Text On Receipts on the Clover device — until then the old text keeps printing.
Troubleshooting
Symptom on the left, what to do on the right.
| Symptom | What to do |
|---|---|
| The text does not print. | The event is outside its date range, or today's weekday is not ticked. If it has never printed at all, open Text On Receipts on the Clover device once: opening the app is what switches the printing on and copies the events to the device. |
| The message is cut off. | The limit is 400 characters, and long words wrap; shorten the text and test print again. |
| The text I changed on the web still prints the old wording. | A change made in the browser reaches the printer only after Text On Receipts is opened on the Clover device. Open the app there and check the event. |
| An event I deleted on the web still prints. | The browser shows no warning when you delete, but the same step is needed: open the app once on the Clover device. |
| The message prints as one block of text. | That is how it prints: line breaks from the editor are dropped, and all active events are joined end to end. Write each message as running text and check it with TEST PRINT. |
| The app's dialog never appears on the payment screen; Clover shows "Customer is choosing payment method". | Open the Clover Setup app → Payments and uncheck Automatically take payment on Connected Device, so payment is taken on the primary device. |
| Settings cannot be opened or changed. | Sign in with an employee whose Clover role is Manager or Admin. Some apps also have their own Restrict access switch that locks the configuration. |
| The app works erratically, or stops reacting after the device has been idle. | Turn off Battery Saver in the device's Android settings and keep the device online. |
| A change made on one device is not visible on another. | Settings sync through the cloud; give it a minute and make sure both devices have a network connection. |