

How it works
A rule has six settings
Title, prompt or automatic, what it does, the object it works on, when it fires, and which order type it applies to.
Two moments to fire
A rule fires when the first item goes into the cart, or when the payment screen opens. Nothing happens in between.
Prompt or silent
Prompt me shows a dialog the cashier confirms or declines. Add automatically applies the rule without asking.
It changes the order, not the payment
Rules add or remove items, service charges, discounts and notes on the Clover order. Payments and taxes stay with Clover.
You can undo it
What a rule did to the current order can be undone from the Actions tender button on the Register payment screen: what it added comes off, what it removed goes back on.
The same rules everywhere
Rules sync to every Clover device, so one register cannot drift from the others.
What it does
Nine things a rule can do
Add Service Charge, Set Order Note, Add Item, Add Custom Item, Add Custom Item - % of order subtotal, Add Order Discount (percentage), Add Order Discount (amount), Remove Item, Remove Service Charge.
Prompt or automatic
Prompt me asks the cashier. Add automatically applies the rule without asking — a short message such as 'Delivery Fee' Applied appears on the Register.
Two trigger moments
You put the first item to the cart or You open the payment screen.
Order type filter
Limit a rule to one Clover order type, so a delivery fee never lands on a walk-in order.
Your wording on the dialog
Rename the apply and cancel buttons and set their text colour.
Revert
Undo what a rule did to the current order: on the Clover Register payment screen tap the Actions tender button, then the red Revert applied actions button at the bottom of Select action. What a rule added comes off the order; an item or a service charge a rule removed goes back on.
Apply a rule by hand
The same Actions tender button opens Select action, where every rule has an APPLY button. The cashier can run a rule on the open order at any moment — paused rules and rules for other order types are on the list too.
Sync and protection
Rules sync to every register. Restrict access stops employees from editing them.
Set it up from a browser
actions.payplaxe.com opens the rule list and the six-step editor in a browser, signed in with Login via Clover. It is the same app, not a separate product: the browser is where it is set up, with the same Clover account and nothing extra to buy. Everything that happens at the register stays on the Clover device: the browser shows no prompt, applies and reverts nothing on an order, and has no Actions tender button.
Price & installation
How to install
- Open the Clover App Market — on the device, or at clover.com/appmarket in your web dashboard.
- Find the app by name, or open its direct link from the button above.
- Tap Connect / Install and accept the permissions the app requests.
- The 30-day free trial starts automatically. The subscription then appears on your monthly Clover invoice.
- Open the app on the Clover device and sign in with a Manager or Admin employee account to configure it.
- To cancel later, uninstall the app from the App Market — the steps are right below.
How to cancel the subscription
Cancelling means uninstalling the app — there is no separate billing screen.
- Open the App Market — on the Clover device, or in the web dashboard.
- Open My Apps. Every app you pay for is listed there with its monthly fee.
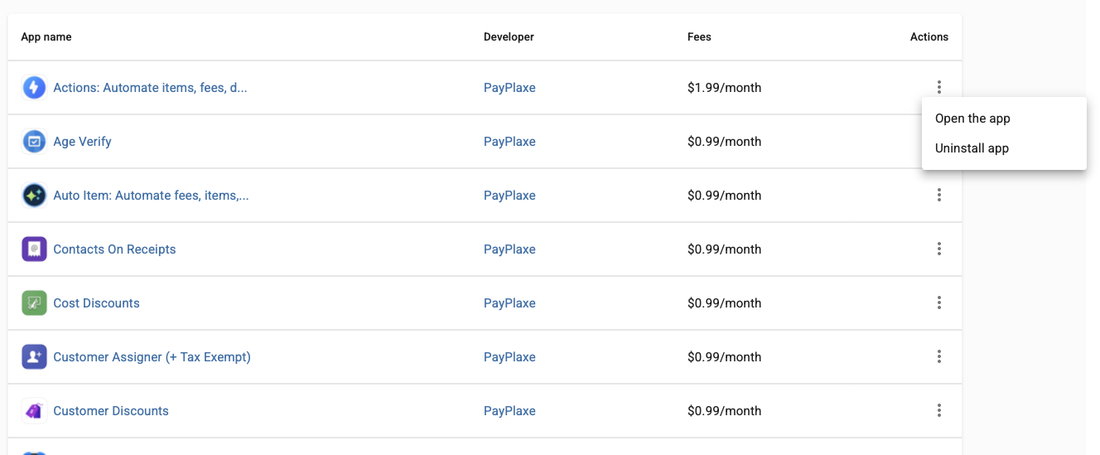
- Tap the ⋮ button on the app's row and choose Uninstall app.
- The app's own page works too: ⋮ next to the green Open the app button → Uninstall app.
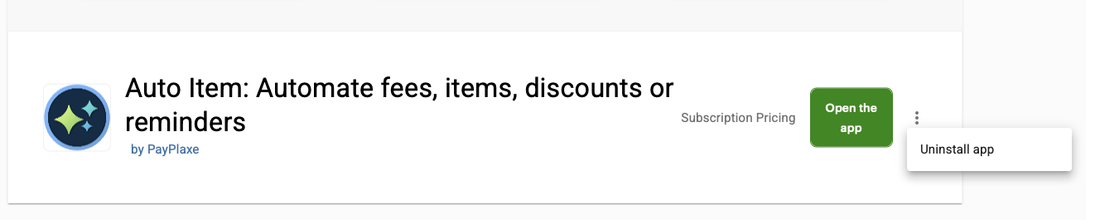
- Confirm. The subscription stops there and then — the app is off your next Clover invoice.
Install and cancel any time from the Clover App Market.
First setup
Do this once, in this order. It takes a few minutes and the app is then ready for the shift.
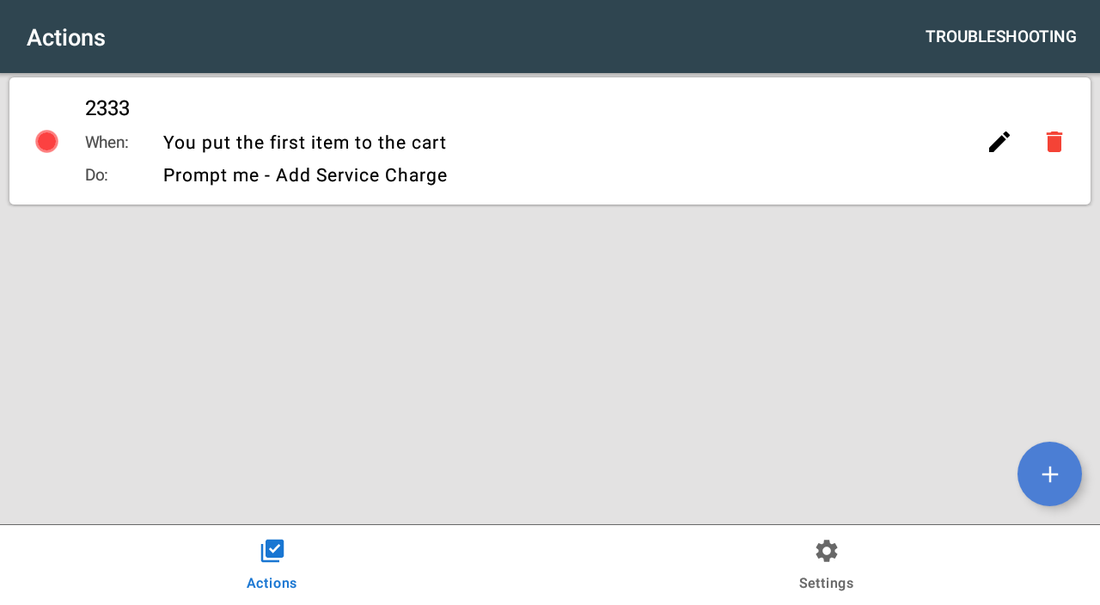
- Open Actions. The list shows every rule with its When and Do lines; the dot on the left says whether it is active.An empty list reads You have no triggers for the Register app — on this screen the app calls a rule a trigger.
- Grant the draw over other apps permission when the app asks for it.Until it is granted the app shows a Warning! dialog on every open and sends you to the Android permission screen. Without the permission the Apply action prompt cannot appear at the register.
- If the rule needs a service charge, create it first in Clover: Setup app → Additional Charges (Register plan or higher).Shortcut: in the service charge picker of step 4 tap How to setup?, then Open Clover Setup.
- Tap + and fill the six steps of the editor from top to bottom.
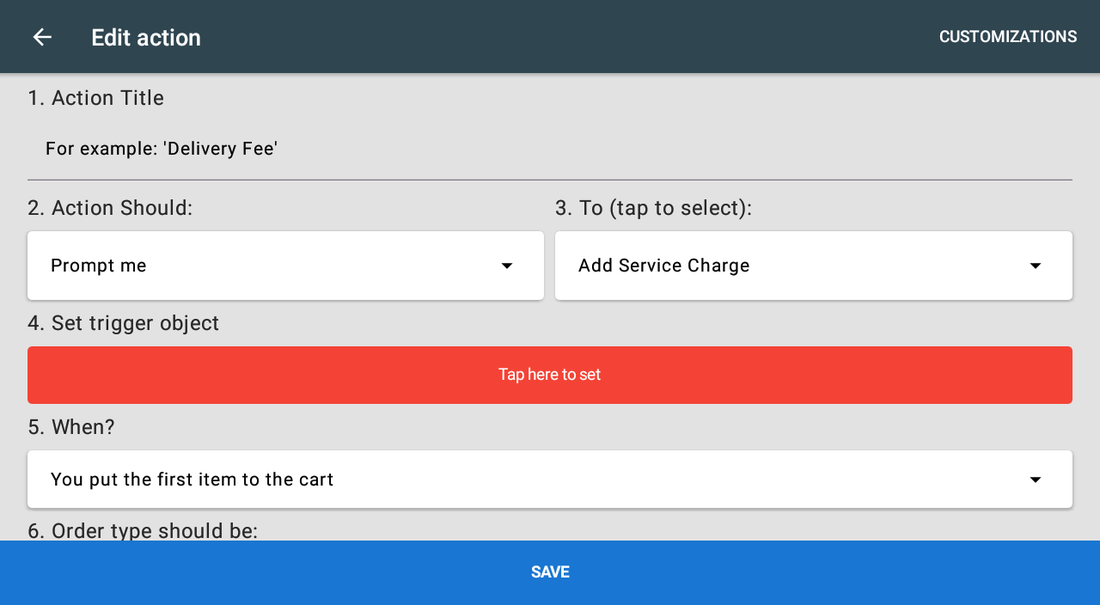
- Step 4 — Set trigger object is the red bar: tap it and enter the item, amount, note or discount the rule works with.A rule without it cannot be saved. The one exception is Set Order Note: it saves with the note left blank — an automatic rule then writes nothing, and a Prompt me rule asks the cashier to type the note.
- Use CUSTOMIZATIONS in the top bar to rename the apply and cancel buttons and set their colours.
- Save, then test the rule on a real order before the shift starts.
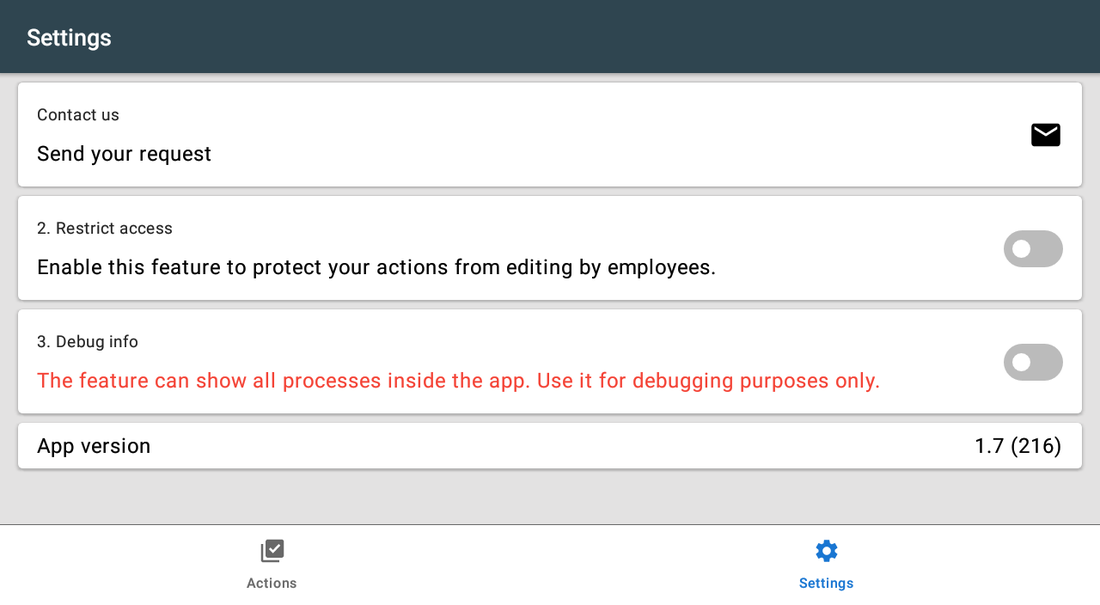
- Open Settings. Leave 2. Turn on the app switched on and turn on 3. Restrict access so employees cannot edit or disable your rules.With 2. Turn on the app off this device applies no rule at all, although the list still shows them as active.
Setup scenarios
Each scenario is a complete configuration — follow the steps in order.
1Delivery fee added automatically to delivery orders
The fee should appear on every delivery order without the cashier remembering it.
- Open Actions and tap +.
- Step 1 — Action Title: Delivery Fee.
- Step 2 — Action Should: choose Add automatically.
- Step 3 — To: choose Add Custom Item.
- Step 4 — Set trigger object: name it Delivery, set the amount and tick Taxable if it is taxed.
- Step 5 — When?: You put the first item to the cart.
- Step 6 — Order type should be: select your delivery order type, then Save.
2Ask the cashier before adding a service charge
Large parties get a service charge, small ones do not — so the cashier decides at the payment screen.
- In Clover open the Setup app → Additional Charges and create the service charge with its percentage (a Register plan or higher is required).
- In Actions create a rule with Action Should = Prompt me and To = Add Service Charge.
- In Set trigger object select the service charge you created in Setup. If the list is empty, tap How to setup? in that dialog, then Open Clover Setup.
- Set When? to You open the payment screen.
- Open Customizations and rename the buttons, e.g. Add 18% and No thanks.
- Save — at payment the cashier gets a two-button prompt.
3An order note on delivery and pick-up orders
Some order types need a line the kitchen or the packer must see. A note is written on the Clover order, so it travels with the ticket.
- Open Actions, tap + and name the rule, for example Delivery note.
- Action Should: = Add automatically if the note must always be there, or Prompt me if the cashier should confirm it.
- To (tap to select): = Set Order Note.
- Tap the red Tap here to set bar and type the note text, for example Check the address and phone before handing over.
- When? = You put the first item to the cart so the note is on the ticket from the start.
- Order type should be: = your delivery type. Repeat the rule for pick-up if that type needs a different note.
- Save and ring a test order of that type. The note appears on the Clover order and prints with the ticket.
Reference
Screens and settings
Every screen of the app and what each setting does. (8)
Screens and settings
Every screen of the app and what each setting does. (8)
Actions list
| Setting | What it does |
|---|---|
| Status dot | Green — the rule is active. Red — it is paused and does not fire on its own. Tap the dot to pause or resume the rule: the app asks Do you want to disable this trigger?. A paused rule can still be applied by hand from the Actions tender button. |
| When | The trigger moment: first item in the cart, or the payment screen. |
| Do | What happens, e.g. Prompt me - Add Service Charge. |
| Pencil | Opens the rule editor. |
| Bin | Deletes the rule after an Are you sure? confirmation. It disappears from every device and cannot be brought back — pause it with the dot instead if you may need it again. |
| TROUBLESHOOTING | Opens the built-in answers for the most common problems. |
| + button | Creates a new rule. |
| Empty list | You have no triggers for the Register app — no rule has been created yet. |
Rule editor
Six numbered steps. Work top to bottom — later steps depend on earlier ones.
| Setting | What it does |
|---|---|
| 1. Action Title | Your own name for the rule, e.g. Delivery Fee. It is not shown to customers. |
| 2. Action Should | Prompt me asks the cashier; Add automatically applies without asking. |
| 3. To (tap to select) | The action: Add Service Charge, Set Order Note, Add Item, Add Custom Item, Add Custom Item - % of order subtotal, Add Order Discount (percentage), Add Order Discount (amount), Remove Item, Remove Service Charge. |
| 4. Set trigger object | The concrete object: the amount, the note text or the discount value. Add Item and Remove Item open the Select an item picker; Add Service Charge and Remove Service Charge open the list of Clover service charges, which also carries How to setup? → Open Clover Setup. |
| 5. When? | You put the first item to the cart or You open the payment screen. |
| 6. Order type should be | Limits the rule to one Clover order type. Leave empty for all. |
| CUSTOMIZATIONS | Apply and cancel button titles and their text colours. |
Select an item
| Setting | What it does |
|---|---|
| Where | Step 4 of the editor, for an Add Item or a Remove Item rule. |
| Search… | Filters your Clover items by name. |
| Tapping an item | Picks it for the rule — one item per rule. For an item priced per unit the app then asks for the quantity in Set count. |
Apply action — the prompt
| Setting | What it does |
|---|---|
| Title | Apply action 'Delivery Fee' — the name of the rule that is asking. |
| Note field | Only for a Set Order Note rule: the preset text, which the cashier can retype, up to 100 characters. |
| Apply button | Your wording and colour from CUSTOMIZATIONS. It writes the change to the open order. |
| Cancel button | Declines the rule. The decline is recorded against the order, so that rule does not ask again on it. If it was declined by mistake, apply the rule by hand from the Actions tender button. |
Select action — the Actions tender button
| Setting | What it does |
|---|---|
| Where | Clover Register → the payment screen → the Actions tender button. |
| The list | Every rule you have, with its When and Do lines — paused rules and rules for other order types included. |
| APPLY | Applies that rule to the open order straight away, with no prompt. It changes the order, so read the rule name first. A service charge that is already on the order is refused with This action is already applied, but an item can be added twice. |
| Revert applied actions (N) | The red button at the bottom; N counts the rules already applied to this order. It opens Revert actions and stays grey while nothing has been applied. |
Revert actions
| Setting | What it does |
|---|---|
| Where | The red Revert applied actions button at the bottom of Select action. |
| The list | The rules already applied to this order. With none it reads You don't have applied actions for this order. |
| REVERT | Undoes that rule on the order: an item, service charge, discount or note it added is taken off, and an item or service charge it removed is put back. |
| Back to actions | Returns to Select action. |
Settings
| Setting | What it does |
|---|---|
| 1. Contact us | Sends a support request from the app. |
| 2. Turn on the app | The master switch for this device. With it off no rule fires here — no fee, no note, no discount — although the list still shows them as active. Leave it on. |
| 3. Restrict access | When on, employees cannot edit your rules — only managers and admins. |
| 4. Debug info | Shows internal processing; for support sessions only. |
| 5. App version | The installed version. |
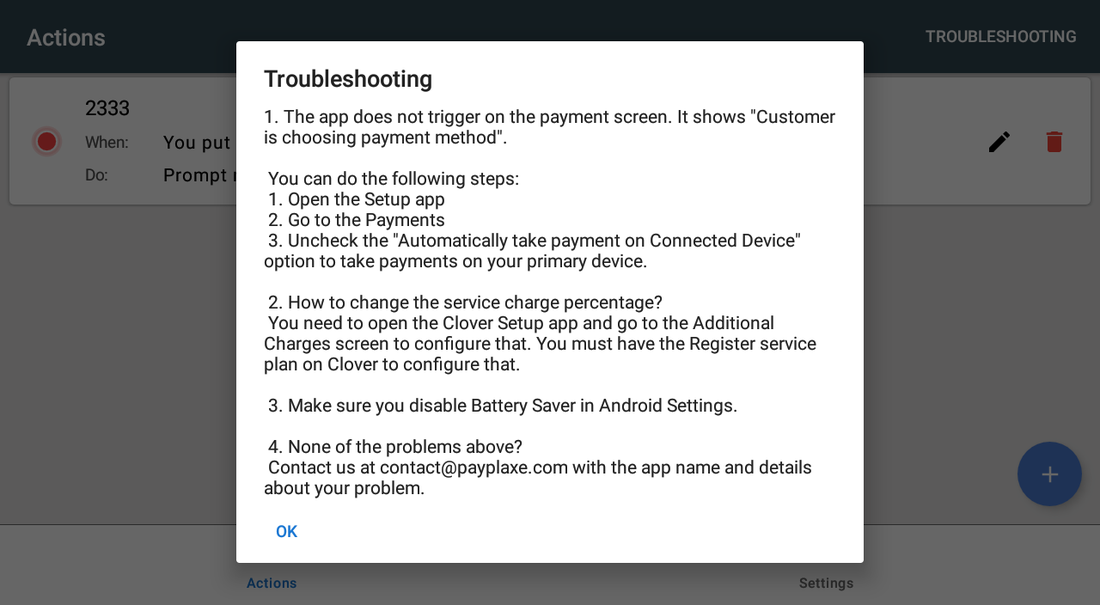
Built-in troubleshooting
The same answers are always one tap away on the device, in English or Spanish depending on the device language.
| Setting | What it does |
|---|---|
| Rule does not fire at payment | Uncheck Automatically take payment on Connected Device in Clover Setup → Payments. |
| Service charge percentage | Configured in Clover Setup → Additional Charges; needs the Register plan. |
| Device sleeps or misbehaves | Disable Battery Saver in Android settings. |
| Anything else | Email contact@payplaxe.com with the app name and details. |
Screenshots taken from the running app on a Clover device. The apps’ interface language is English. Click a screenshot to enlarge.
Everyday use
What the cashier does after the app is configured.
- Nothing to do for automatic rules — they apply themselves.
- For a Prompt me rule a dialog headed Apply action appears at the trigger moment: confirm or decline with the buttons you named. A note rule shows the note text, which can be retyped, up to 100 characters. Declining counts as handled — that rule does not ask again on this order.
- If a rule was applied by mistake, go to the payment screen in the Clover Register, tap the Actions tender button, then the red Revert applied actions button at the bottom of Select action and revert it there.
- The same Select action dialog applies a rule by hand: tap APPLY on its row. Every rule is listed, paused ones included, and the change lands on the open order at once — read the rule name before you tap.
- If a rule must be paused for a day, tap the coloured dot on its row and confirm Do you want to disable this trigger? instead of deleting it.
Troubleshooting
Symptom on the left, what to do on the right.
| Symptom | What to do |
|---|---|
| Please set action when saving. | Step 4 (Set trigger object) is empty. Tap the red bar and choose the item, charge, note or amount. |
| Please select your service charge. | The service charge no longer exists in Clover, or none was picked. Create it in Clover Setup → Additional Charges and select it again. |
| It's illegal to apply surcharges in your state. | In CT, MA and PR the app refuses to save an Add Service Charge or Add Custom Item - % of order subtotal rule whose title or object name contains 'card', 'cash', 'surcharge' or 'nca'. Rename the rule, or run a cash discount program with Order Discounts and check with your processor first. |
| This action can be editable by managers and admins only. | Restrict access is on in Settings. Sign in as a manager or admin to change the rule. |
| No rule fires on this device at all. | Open Settings and check 2. Turn on the app. With that switch off the device applies no rule, even though the list still shows them as active. |
| The Prompt me dialog never appears. | The app needs the draw over other apps permission and shows a Warning! dialog on every open until it is granted. Confirm that dialog and switch the permission on for Actions. |
| A prompt was declined by mistake. | The decline is recorded against the order, so the rule does not ask again on it. Apply it by hand: payment screen → Actions tender button → APPLY on the rule's row. |
| The rule fires on the wrong orders. | Check step 6 — with no order type selected the rule applies to all of them. |
| Action can't be reverted. | The app could not push the change through Clover, so nothing was taken off the order. Try again while the order is still open on the Register; if it fails again, remove the item, fee or discount by hand in the order. |
| The app's dialog never appears on the payment screen; Clover shows "Customer is choosing payment method". | Open the Clover Setup app → Payments and uncheck Automatically take payment on Connected Device, so payment is taken on the primary device. |
| Settings cannot be opened or changed. | Sign in with an employee whose Clover role is Manager or Admin. Some apps also have their own Restrict access switch that locks the configuration. |
| The app works erratically, or stops reacting after the device has been idle. | Turn off Battery Saver in the device's Android settings and keep the device online. |
| A change made on one device is not visible on another. | Settings sync through the cloud; give it a minute and make sure both devices have a network connection. |