

How it works
It asks for the customer at the right moment
With the switch on, the customer selection dialog opens as soon as the first item is added to the order in the Register. It opens once per order; an empty order never prompts.
Tax exemption comes from a list
When a customer from the list is on the order, the app marks that whole order tax-removed in Clover, so every tax on it is dropped. Take the customer off the order and the tax comes back. It is an all-or-nothing switch on the order, not a per-item exemption.
The customer's name goes into the order note
Assigning a customer writes their first and last name into the Clover order note. Removing the customer clears the note. Anything you typed there is overwritten.
Only assigned, paid sales are reported
A line is written when the order has a customer assigned, is paid in full and totals more than zero. Date, amount and customer ID, with a period total and a share action. Anonymous sales never appear.
Exemption paperwork is still yours
The app applies what you told it. Collecting and keeping the exemption certificates, and being able to show them, stays your responsibility.
What it does
Automatic customer prompt
Trigger the app in the Register opens customer selection when the first item is added to the order. It opens once per order.
Tax-exempt list
Mark the customers who are exempt. When one of them is on the order, the app clears the tax on that whole order in Clover; take the customer off and the tax comes back.
Search and filters
Type a name to filter the list. A query that contains digits is sent to Clover as a phone-number lookup, so the whole list changes. In Reports the filter picks one customer.
Reports
Date and time, amount, customer ID and details for each paid order that had a customer assigned, with the period total.
Share the log
Create the report, scan its QR code or e-mail the link when accounting asks for it. Access to the report expires.
Web version
customerassigner.payplaxe.com opens Setup, the tax-exempt list and Reports in a browser. It is the same app you already have on Clover — the setup side of it, with nothing extra to buy. Sign in with Login via Clover. The work at the register stays on the Clover device.
Price & installation
How to install
- Open the Clover App Market — on the device, or at clover.com/appmarket in your web dashboard.
- Find the app by name, or open its direct link from the button above.
- Tap Connect / Install and accept the permissions the app requests.
- The 30-day free trial starts automatically. The subscription then appears on your monthly Clover invoice.
- Open the app on the Clover device and sign in with a Manager or Admin employee account to configure it.
- To cancel later, uninstall the app from the App Market — the steps are right below.
How to cancel the subscription
Cancelling means uninstalling the app — there is no separate billing screen.
- Open the App Market — on the Clover device, or in the web dashboard.
- Open My Apps. Every app you pay for is listed there with its monthly fee.
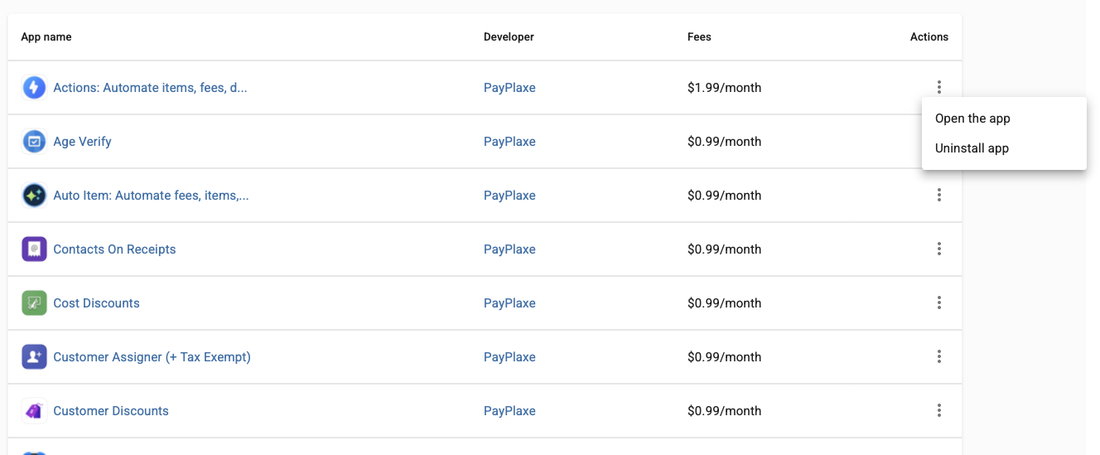
- Tap the ⋮ button on the app's row and choose Uninstall app.
- The app's own page works too: ⋮ next to the green Open the app button → Uninstall app.
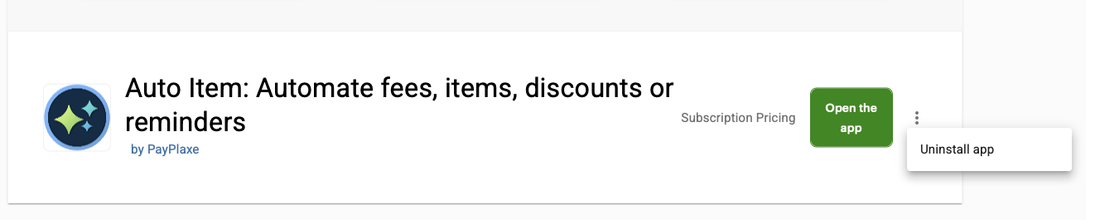
- Confirm. The subscription stops there and then — the app is off your next Clover invoice.
Install and cancel any time from the Clover App Market.
First setup
Do this once, in this order. It takes a few minutes and the app is then ready for the shift.
- Add the customers to the Clover Customers app first.
- Open Assigner on the Clover home screen — the app and the App Market listing are called Customer Assigner — then Setup.
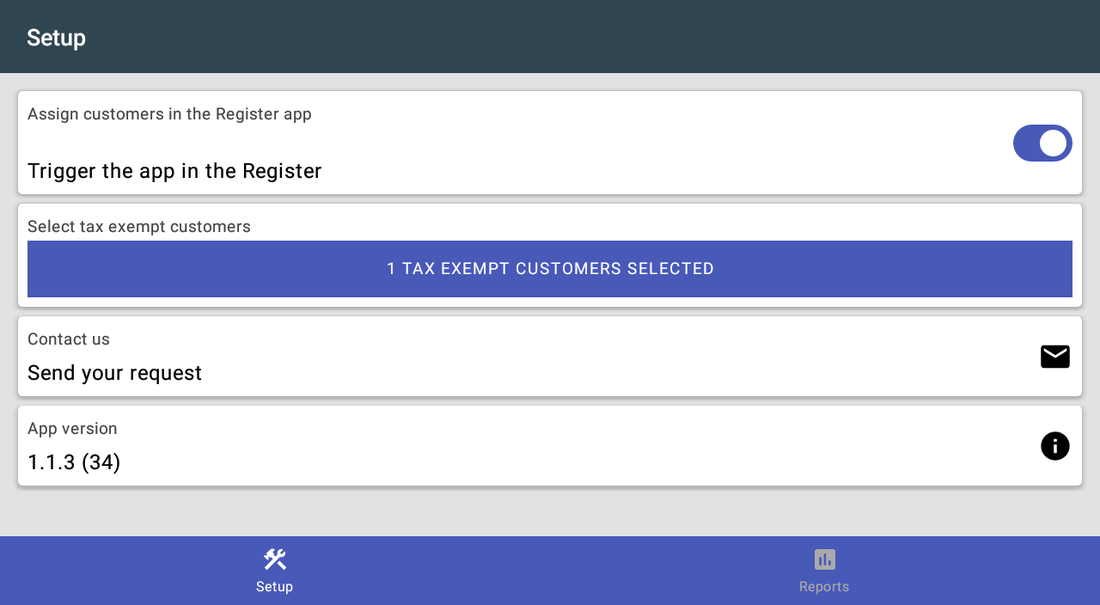
- Check Trigger the app in the Register. It is on by default, and it belongs to this device, so repeat the check on every Clover device.
- Open Select tax exempt customers, tap the round + button, then search the customer list and tap an exempt organisation to add it. The screen closes after each customer, so tap + again for the next one. The red DELETE on a card takes one off the list.
- Run a test sale with an exempt customer and check that no tax is charged on the order.
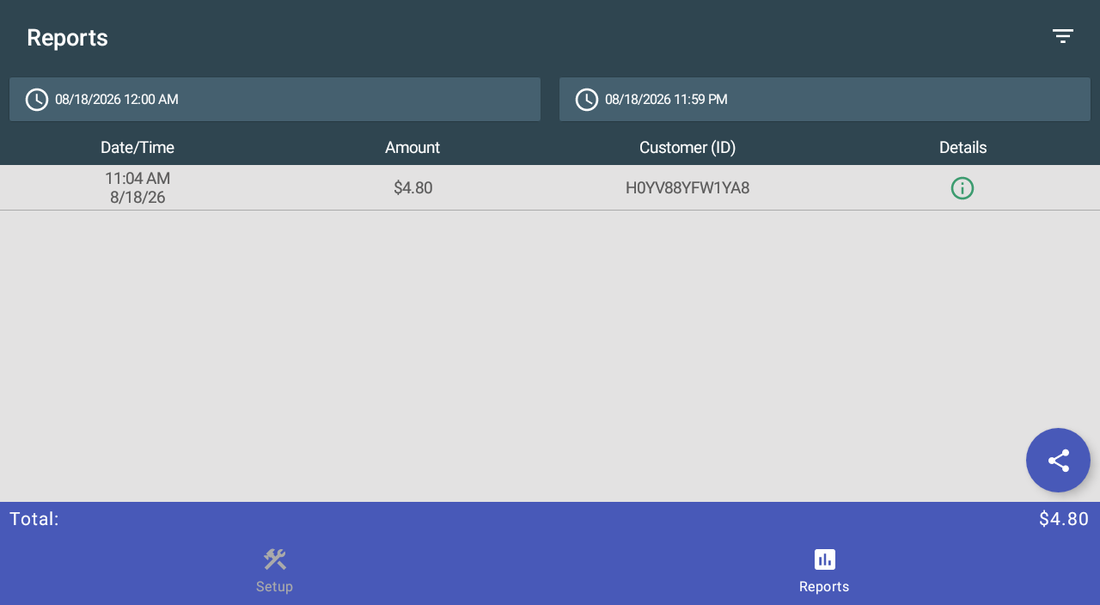
- Open Reports to confirm the sale was recorded. It appears only after the order is paid in full.
Setup scenarios
Each scenario is a complete configuration — follow the steps in order.
1Never lose a customer on an order again
Loyalty, customer discounts and history all depend on the customer being attached to the sale.
- Open Assigner on the Clover home screen → Setup.
- Check Trigger the app in the Register. It is on by default, so this is a check, not a change.
- The switch is saved on the device it is set on — set it on every Clover device that rings up sales.
- Add the first item to the order in the Register — the customer selection dialog opens. It opens once per order.
- Pick the customer, or tap CANCEL if it is a walk-in.
- Pair it with Customer Discounts so the right discount follows the person automatically.
2Tax-exempt customers
Schools, charities and resellers must not be charged tax, and the paperwork has to hold up.
- Open Select tax exempt customers — the button shows how many are selected.
- Tap the round + button, search the customer list and tap an exempt organisation — it is added straight away and the screen closes. Repeat for each organisation.
- There is no confirm step — each customer is saved as soon as you tap them. Tapping one that is already on the list answers You already added this customer.
- To take an organisation off the list, open the same screen and tap the red DELETE on its card.
- Ring up a sale, assign that customer and check the tax on the order.
- Keep the customer records in Clover complete, with the exemption reference in the customer's details.
3Report on assigned sales
Accounting wants the list of orders tied to customers or exempt from tax.
- Open the Reports tab.
- Set the start and end of the period you need — each field asks for a date, then a time.
- Review the orders: date and time, amount, customer ID. Only paid orders that had a customer assigned are listed.
- Tap the details icon on a row to open Info with date, amount and customer ID, and Reprint Receipt for that order.
- Use the filter icon to open Set filters and pick one customer; the icon turns yellow while the filter is on.
- Tap the share button and confirm Create report? — the app warns that access to the report expires after one hour. Then scan the QR code under Link generated!, or tap SEND VIA EMAIL and enter an address.
- Check the total at the bottom against your Clover reporting.
Reference
Screens and settings
Every screen of the app and what each setting does. (4)
Screens and settings
Every screen of the app and what each setting does. (4)
Setup
| Setting | What it does |
|---|---|
| Trigger the app in the Register | The switch on the Assign customers in the Register app card. Opens customer selection when the first item is added to an order. On by default, and saved on this Clover device only. |
| Select tax exempt customers | Opens the exempt list; the button reads N Tax Exempt Customers Selected. |
| Contact us | Support request from the app. |
| App version | The installed version. |
| Bottom tabs | Setup · Reports. |
Tax Exempt Customers
| Setting | What it does |
|---|---|
| Search field | Filters the list by first or last name. |
| Customer card | First name and last name of one exempt customer. |
| DELETE | Removes that customer from the exempt list at once, with no confirmation. |
| + button | Opens Select Tax Exempt Customers to add one. |
| Empty list | Reads Tap on the "Plus" button to add tax-exempt customers. |
Select a customer
| Setting | What it does |
|---|---|
| Search field | Filters by name. A query with digits is sent to Clover as a phone lookup. |
| TAX-EXEMPT | Red badge on a customer who is on the exempt list. |
| Assigned | Green ribbon on the customer currently on the order; that card moves to the top. |
| REMOVE FROM ORDER | Red bar on the assigned customer. Takes them off the order, clears the order note and puts the tax back. |
| CANCEL | Closes the dialog and leaves the order as it is. |
Reports
| Setting | What it does |
|---|---|
| Date range | Two fields set the start and the end of the period; each asks for a date, then a time. |
| Columns | Date/Time, Amount, Customer (ID) and Details. |
| Rows | One line per paid order that had a customer assigned. |
| Details icon | Opens Info with date, amount and customer ID, and Reprint Receipt for that order. |
| Filter icon | Opens Set filters to show one customer's orders. The icon turns yellow while the filter is on. |
| Share button | Creates the report, shows a QR code of a temporary link and can e-mail it. |
| Total | The sum for the selected period. |
Screenshots taken from the running app on a Clover device. The apps’ interface language is English. Click a screenshot to enlarge.
Everyday use
What the cashier does after the app is configured.
- Add the first item to the order; the customer dialog opens — pick the customer or tap CANCEL for a walk-in.
- Assigning a customer replaces the Clover order note with their name, so keep nothing else in the order note.
- For an exempt customer, check that no tax is charged before taking payment — the app drops every tax on that order.
- Review Reports at the end of the period and share the log with accounting.
Troubleshooting
Symptom on the left, what to do on the right.
| Symptom | What to do |
|---|---|
| The dialog does not appear. | It opens on the first item added to an order, and only once for that order — reopening the same order does not prompt again, and an empty order never prompts. If it never opens at all, check Trigger the app in the Register in Setup on that device; the switch is per device. |
| Tax is still charged for an exempt customer. | The customer was not added in Select tax exempt customers, or was not assigned to the order. A list change made in the browser reaches the device only after it syncs — open Setup on the Clover device. |
| A customer is missing from the list. | Add them in the Clover Customers app, then reopen the picker. To find someone by phone number, type the digits — Clover answers that search. |
| A sale is missing from Reports. | Only orders that had a customer assigned, were paid in full and total more than zero are recorded. An anonymous or unpaid order is never listed. |
| The order note was replaced by a customer name. | That is the app: assigning a customer writes their first and last name into the Clover order note, and removing the customer clears it. Keep order notes you need somewhere else. |
| The app's dialog never appears on the payment screen; Clover shows "Customer is choosing payment method". | Open the Clover Setup app → Payments and uncheck Automatically take payment on Connected Device, so payment is taken on the primary device. |
| Settings cannot be opened or changed. | Sign in with an employee whose Clover role is Manager or Admin. Some apps also have their own Restrict access switch that locks the configuration. |
| The app works erratically, or stops reacting after the device has been idle. | Turn off Battery Saver in the device's Android settings and keep the device online. |
| A change made on one device is not visible on another. | Settings sync through the cloud; give it a minute and make sure both devices have a network connection. |