

How it works
A deposit is a template
Name, amount and colour, entered on Enter deposits params. Created once, reused on every sale.
It travels with the item
Deposits are added to items as modifiers or as custom items. Custom items is the default. In modifiers mode the app writes into your Clover inventory: it creates a hidden modifier group named DepositManager and keeps one modifier per deposit inside it.
In custom items mode the cashier confirms
Nothing is added while the order is built. When the payment screen opens, the app asks Add deposits? and, on Add deposit, puts one line for the whole order on it. Settings row 4.3 Automate deposits adds it without asking; row 4.4 Separate deposits gives each template its own line.
Returns are counted
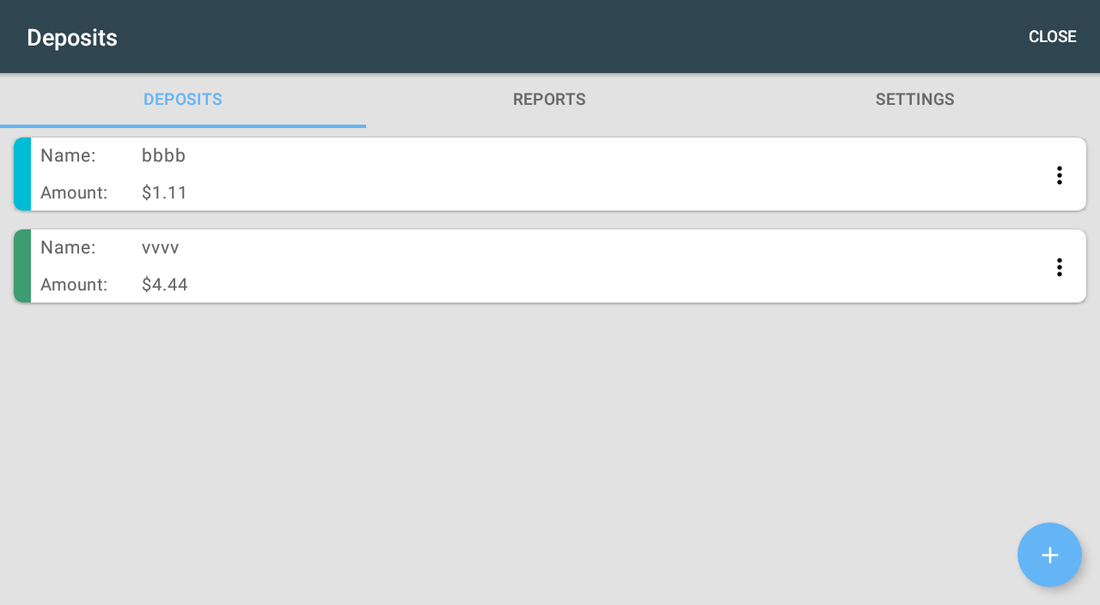
On the DEPOSITS tab you count returned containers with + and −, or tap the number to type a quantity. The red bar shows the cash to hand back. The same counting screen opens in the Clover Register when the cashier taps the deposit tender.
Money in and money out stay apart
The app's own reports show applied deposits and returned deposits as two separate totals, so you can read them apart from your Clover sales report. On the order itself the deposit is a normal line item or modifier, so it is still part of the Clover order total.
A deposit is not revenue
The money is held for the customer and goes back when the container does. Keep that in mind when you reconcile the day and when you talk to your accountant.
What it does
Deposit templates
Name, amount and colour for each type of deposit, plus the items it is attached to.
Modifier or custom item
Choose whether deposits are added to items as modifiers or as custom items. Custom items is the default. Modifiers mode creates a hidden modifier group named DepositManager in your Clover inventory.
Counters and cash return
Count returned containers with + and −, then hand the total back with RETURN CASH. The money leaves the Clover cash drawer.
Reports
Applied Deposits and Returned Deposits, each over a date range with a total. Export builds a report link and mails it.
Tender button in the Register
The deposit tender opens a return screen inside the Clover Register. The cashier counts the containers, then APPLY AS PAYMENT pays the order down by that amount, or REMOVE CASH takes the money out of the drawer. You set the button name in Settings.
Receipts
One switch, Print returned deposits on receipts. It adds the deposits returned on the Register tender screen to that order's receipt.
Employee restrictions
Per employee: Add/remove cash, Issue a payout and Edit templates.
The same screens in a browser
deposits.payplaxe.com opens Deposits, Reports and Settings with Login via Clover. It is the same app you already have on Clover — the setup side of it, with nothing extra to buy. Counting containers and returning cash stay on the Clover POS.
Price & installation
How to install
- Open the Clover App Market — on the device, or at clover.com/appmarket in your web dashboard.
- Find the app by name, or open its direct link from the button above.
- Tap Connect / Install and accept the permissions the app requests.
- The 30-day free trial starts automatically. The subscription then appears on your monthly Clover invoice.
- Open the app on the Clover device and sign in with a Manager or Admin employee account to configure it.
- To cancel later, uninstall the app from the App Market — the steps are right below.
How to cancel the subscription
Cancelling means uninstalling the app — there is no separate billing screen.
- Open the App Market — on the Clover device, or in the web dashboard.
- Open My Apps. Every app you pay for is listed there with its monthly fee.
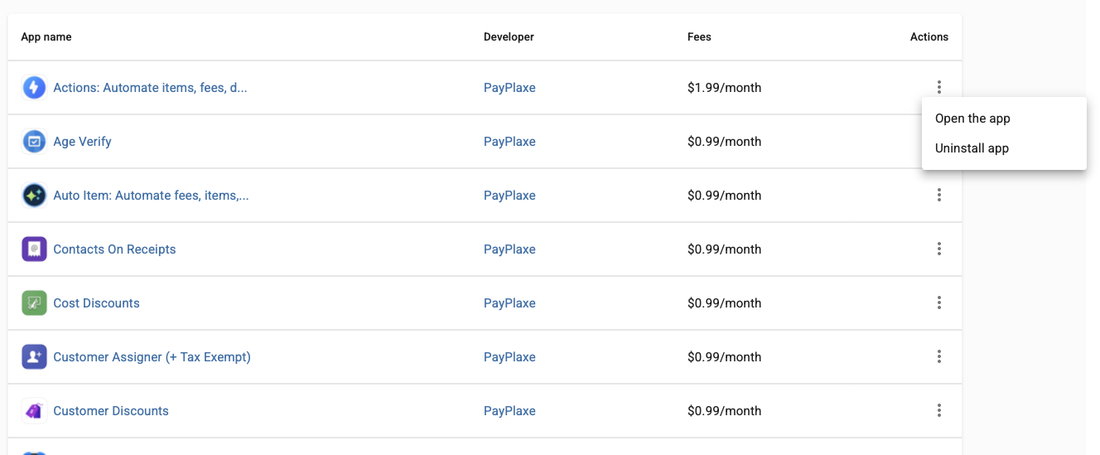
- Tap the ⋮ button on the app's row and choose Uninstall app.
- The app's own page works too: ⋮ next to the green Open the app button → Uninstall app.
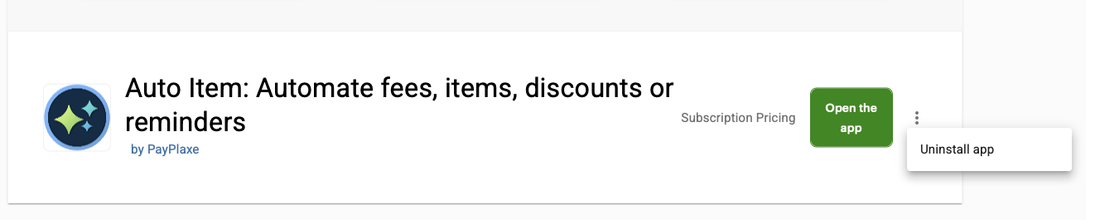
- Confirm. The subscription stops there and then — the app is off your next Clover invoice.
Install and cancel any time from the Clover App Market.
First setup
Do this once, in this order. It takes a few minutes and the app is then ready for the shift.
- Open Deposits Manager (the tile on the device is named Deposits).The tabs are DEPOSITS, REPORTS and SETTINGS.
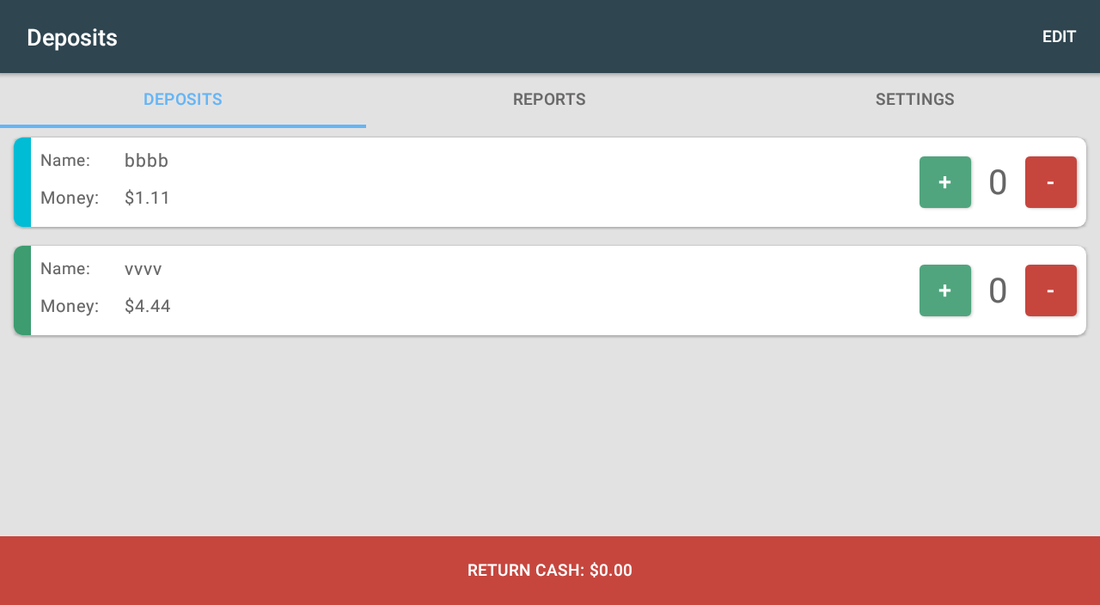
- Open SETTINGS and set Tender Button Name in row 1.That is the button the cashier taps in the Register to give deposits back.
- Choose in row 4 whether deposits are added as modifiers or as custom items and keep to that choice.Rows 4.1 to 4.4 only appear in custom items mode.
- Go back to the DEPOSITS tab, tap EDIT then + to open Enter deposits params and create your first deposit: Enter name, Enter amount, Select items, Color, then SAVE.
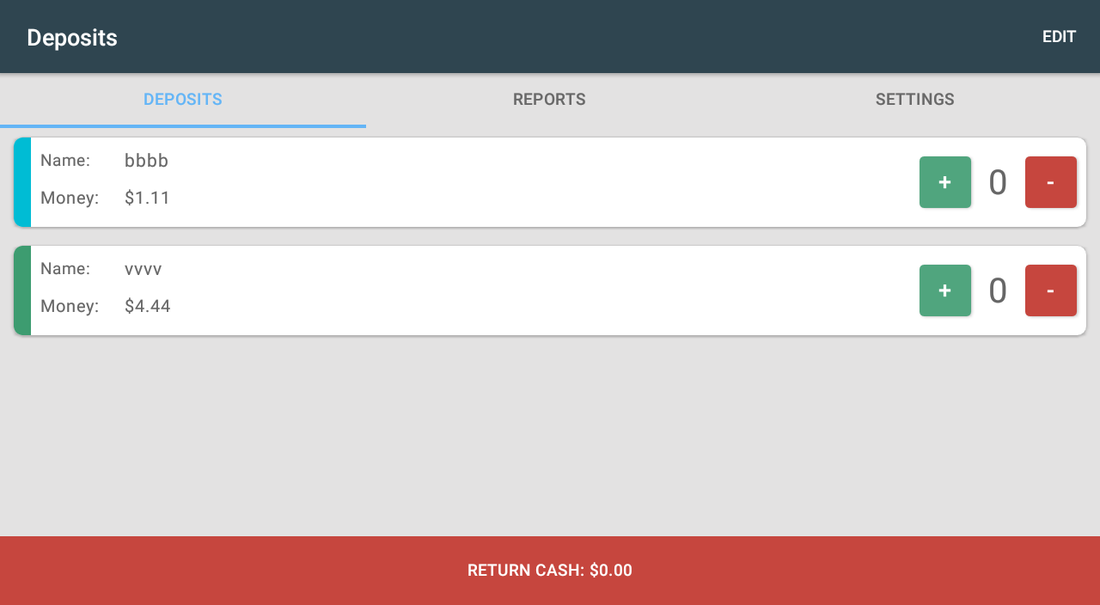
- Check row 4.2 Apply taxes to deposit item and row 3 Payout Settings.Tax on the deposit line is on by default, and Payout Settings decides whether APPLY AS PAYMENT also takes the cash out of the drawer.
- Use EDIT on the DEPOSITS tab whenever you need to rename a deposit or change its amount.
- Sell one item and check the order.In custom items mode confirm Add deposits? on the payment screen; in modifiers mode the deposit is already on the item.
Setup scenarios
Each scenario is a complete configuration — follow the steps in order.
1Bottle deposits added to the sale
Every bottle sold carries a deposit that must appear on the order.
- Open Deposits → SETTINGS and set Tender Button Name in row 1.
- Choose in row 4 whether deposits are added as modifiers or as custom items.
- Open the DEPOSITS tab, tap EDIT, then +, and fill in Enter deposits params: Enter name, Enter amount, Select items, Color, then SAVE.
- Check row 4.2 Apply taxes to deposit item. It is on by default, so the deposit line is taxed like a normal item.
- Sell a bottle in the Register. In custom items mode the dialog Add deposits? appears when the payment screen opens: tap Add deposit. In modifiers mode the deposit is attached to the item as soon as the item is added.
2Returning containers for cash
The customer brings back six bottles and expects the deposit back.
- Open the DEPOSITS tab.
- Find the deposit template and tap + once per returned container, or tap the number and type the quantity.
- Check the total on the red RETURN CASH bar. If you counted too many, use − before you confirm.
- Tap the bar, read the amount in the confirmation and leave Open register ticked if the cash drawer should open.
- Tap REMOVE CASH. The cash is removed from the Clover drawer and logged as a returned deposit. The app has no undo for it.
- The Cash removed dialog then offers Print Receipt if the customer wants a slip.
3Giving the deposit back during a sale
The customer returns containers while paying for new goods.
- Build the order in the Clover Register and open the payment screen.
- Tap the deposit tender button. Its name is the one set in row 1 of Settings.
- Count the returned containers with + and −. The red bar shows RETURN AMOUNT with the counted total.
- Tap the bar, then APPLY AS PAYMENT to pay this order down by that amount, or REMOVE CASH to take the money out of the drawer.
- If the return is larger than the order, the app shows Change with the difference to hand over.
4Reconcile deposits at the end of the day
Deposits collected and deposits returned should both be visible.
- Open the REPORTS tab.
- Open Applied Deposits, set the two date fields and read the Total: bar.
- Open Returned Deposits and do the same.
- Export builds a report link on the server. The dialog shows it as a QR code, and Send via Email sends it to the address you type. Nothing is saved on the device.
- Use Restrictions to limit who may hand deposits back if the numbers do not add up.
Reference
Screens and settings
Every screen of the app and what each setting does. (6)
Screens and settings
Every screen of the app and what each setting does. (6)
Deposits tab
| Setting | What it does |
|---|---|
| Deposit card | Name and amount of the deposit; the colour stripe is the one you picked. |
| + / − and counter | Counts the containers a customer is returning right now. Tap the number to type a quantity. |
| RETURN CASH | Opens the confirmation with the counted total and an Open register tick. REMOVE CASH takes that cash out of the Clover drawer, records a returned deposit and then offers Print Receipt. The app has no undo for it. |
| EDIT | Switches the list to editing mode. |
| Tabs | DEPOSITS · REPORTS · SETTINGS. |
Edit mode
| Setting | What it does |
|---|---|
| ⋮ menu | Edit or delete a deposit template. |
| + button | Adds a new deposit template. |
| CLOSE | Leaves editing mode and returns to counting. |
Enter deposits params (template editor)
| Setting | What it does |
|---|---|
| Enter name | The template name. It reaches the order line and the applied deposits record in modifiers mode, or in custom items mode when row 4.4 Separate deposits is on. Otherwise the order carries one line named by row 4.1 Deposit Item Name, which is Deposit until you change it. |
| Enter amount | The deposit value collected per item. |
| Select items | The products this deposit is attached to. The button shows how many are selected. |
| Color | Helps the cashier pick the right deposit quickly. |
| SAVE | Saves the template. |
Return screen in the Clover Register
Opens from the payment screen when the cashier taps the deposit tender button.
| Setting | What it does |
|---|---|
| Deposit rows | The same templates as the Deposits tab, each with + and −. |
| RETURN AMOUNT | The red bar with the counted total. Tap it to open the confirmation. |
| APPLY AS PAYMENT | Pays this order down by the counted amount. It also removes that cash from the drawer while Payout Settings is Remove cash after payouts. |
| REMOVE CASH | Takes the counted amount out of the Clover drawer and records a returned deposit. |
| Open register | Ticked by default. Decides whether the cash drawer opens. |
| Change | Shown when the return is larger than the order total. It is the cash to hand over. |
| CANCEL | Closes the screen without returning anything. |
Reports tab
| Setting | What it does |
|---|---|
| Applied Deposits | Deposits collected on paid orders. Columns: Date, Amount, Type, Order, Details. |
| Returned Deposits | Deposits handed back. Columns: Date, Amount, Reason, Order, Details. |
| Date fields | The two fields at the top of the table. They set the period the table covers. |
| Open | In the Order column. Opens that order in Clover. |
| Details | The info icon opens one record and offers Print Receipt. |
| Total: | The bar at the bottom. It sums the rows shown. |
| Export | Builds a report link on the server. The dialog shows it as a QR code and Send via Email sends it to the address you type. Nothing is downloaded to the device. |
Settings tab
Rows 4.1 to 4.4 only appear while the app is set to custom items.
| Setting | What it does |
|---|---|
| 1 Tender Button Name | The name of the deposit tender button in the Clover Register. It can only be changed on the device. |
| 2 Print returned deposits on receipts | Adds the deposits returned on the Register tender screen to that order's receipt. Returns made on the Deposits tab belong to no order and never print. |
| 3 Payout Settings | Remove cash after payouts or Don't remove cash after payouts. It decides whether APPLY AS PAYMENT also takes the cash out of the drawer. |
| 4 Use modifiers / Use custom items | How deposits are added to items. Custom items is the default. Modifiers mode maintains a hidden DepositManager modifier group in your Clover inventory. |
| 4.1 Deposit Item Name | The name of the single deposit line in custom items mode. It is Deposit until you change it. |
| 4.2 Apply taxes to deposit item | On by default. The deposit line is taxed like a normal item. |
| 4.3 Automate deposits | Adds the deposits on the payment screen without asking. Off by default, so the cashier answers Add deposits?. |
| 4.4 Separate deposits | Each deposit template becomes its own line on the order instead of one combined line. |
| 5 Restrictions | Per employee: Add/remove cash, Issue a payout, Edit templates. |
| 6 Open Cash Drawer | This switch is not saved. Whether the drawer opens is decided by the Open register tick in the return confirmation, which is on by default. |
| 7 Support | Contact Us opens the support options. |
| 8 App version | The installed version of the app. |
Screenshots taken from the running app on a Clover device. The apps’ interface language is English. Click a screenshot to enlarge.
Everyday use
What the cashier does after the app is configured.
- Selling in custom items mode: the app asks Add deposits? when the payment screen opens. Tap Add deposit and the deposit line goes on the order.
- Selling in modifiers mode: the deposit is attached to the item as it goes into the order, nothing to press.
- Returning at the counter: open the DEPOSITS tab, tap + once per returned container, check the total, tap RETURN CASH, keep Open register ticked if the drawer should open, then confirm with REMOVE CASH. The cash leaves the drawer and the app has no undo for it.
- Returning during a sale: tap the deposit tender on the payment screen, count the containers, then APPLY AS PAYMENT to pay the order down or REMOVE CASH to take the money out of the drawer.
- Correct an over-count with − before confirming.
- At close, open REPORTS and compare Applied Deposits with Returned Deposits.
Troubleshooting
Symptom on the left, what to do on the right.
| Symptom | What to do |
|---|---|
| The deposit does not appear on the order. | In custom items mode it is added only when the payment screen opens, after you confirm Add deposits?. It stays off the order if that prompt was cancelled, if Delete all deposits was tapped, or if the order is already locked, in which case the app answers Order is locked for managing. Otherwise the deposit is not attached to that item, or the app is in the other mode than you expect. |
| A cashier returned cash by mistake. | Open Restrictions and remove both Add/remove cash, which blocks REMOVE CASH, and Issue a payout, which blocks APPLY AS PAYMENT on the Register tender screen. Removing only one leaves the other way open. The app cannot undo a return that is already logged. |
| The deposit line disappeared from the order. | Delete all deposits in the Add deposits? dialog removes every deposit line from the order without asking again. Start the payment once more and tap Add deposit to put them back. |
| A modifier group named DepositManager appeared in my inventory. | The app creates it while it is set to modifiers, and keeps one modifier per deposit inside it. It is not shown by default in the Register. The app also deletes the modifiers in that group that no open order uses, so do not put your own modifiers in it. In custom items mode the app does not touch the inventory. |
| Deposits appear in sales totals. | They are recorded separately as applied and returned deposits; check the REPORTS tab rather than the Clover sales report. |
| The tender button is missing in the Register. | Open the app and let the DEPOSITS tab load — the tender button is registered each time that tab opens. If you renamed the button in SETTINGS, return to the DEPOSITS tab once so the new name is registered. |
| The app's dialog never appears on the payment screen; Clover shows "Customer is choosing payment method". | Open the Clover Setup app → Payments and uncheck Automatically take payment on Connected Device, so payment is taken on the primary device. |
| Settings cannot be opened or changed. | Sign in with an employee whose Clover role is Manager or Admin. Some apps also have their own Restrict access switch that locks the configuration. |
| The app works erratically, or stops reacting after the device has been idle. | Turn off Battery Saver in the device's Android settings and keep the device online. |
| A change made on one device is not visible on another. | Settings sync through the cloud; give it a minute and make sure both devices have a network connection. |