

How payouts work
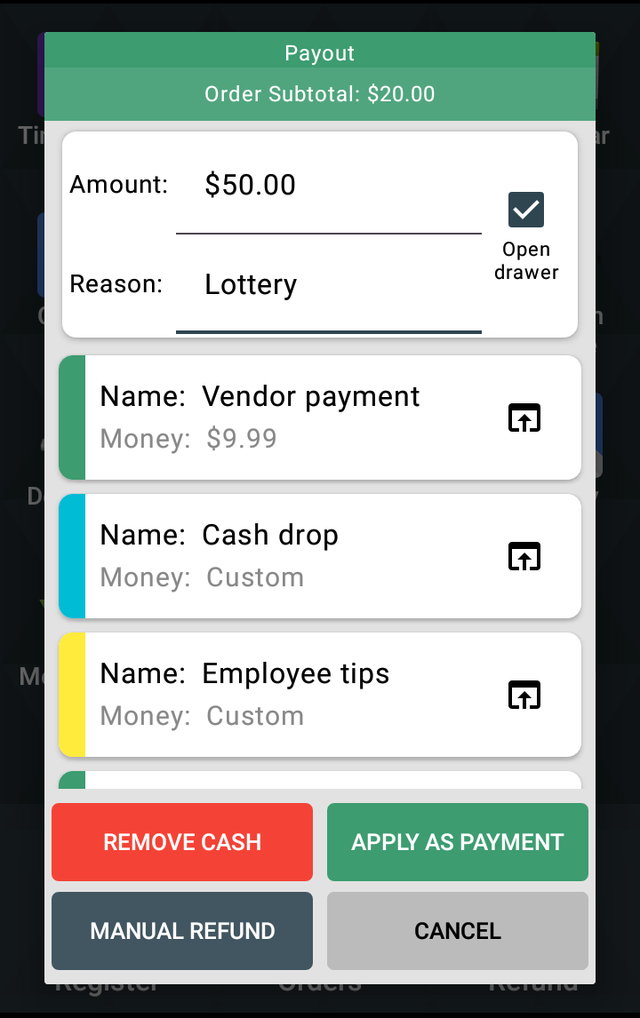
A payout is money you hand to the customer — a lottery win, a bottle deposit. The app takes it as payment for the order.
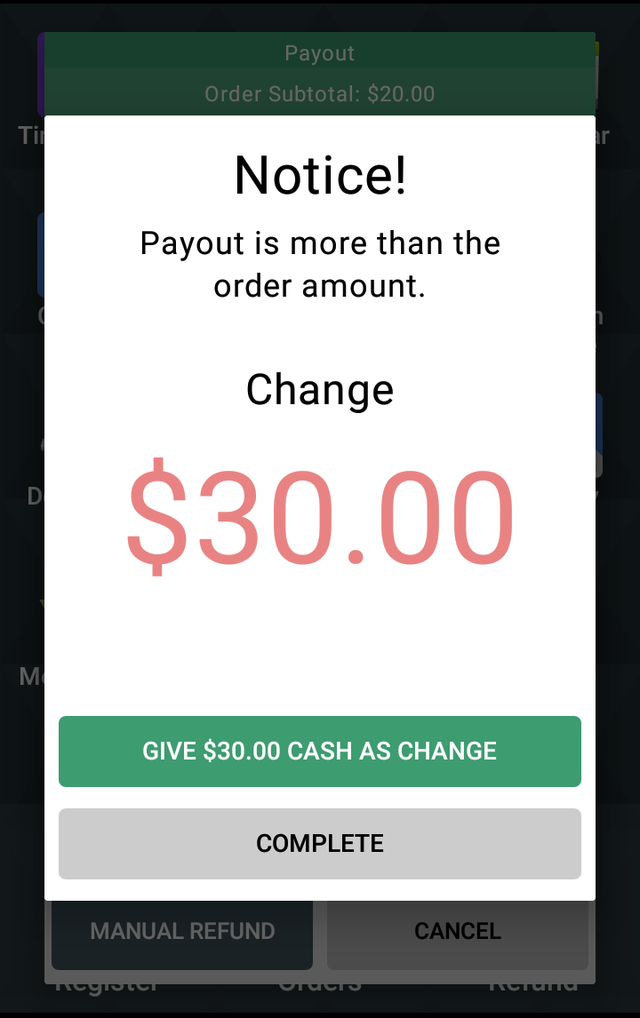
Only the amount of the order can be paid with a payout. Anything above it goes back to the customer in cash.
In the examples below the order is $20.00.
| The customer has… | What you tap | What happens |
|---|---|---|
| a $10 ticket | APPLY AS PAYMENT | $10 goes to the order, the customer pays the other $10 |
| a $50 ticket | APPLY AS PAYMENT, then GIVE $30.00 CASH AS CHANGE | the order is paid, $30.00 handed over in cash |
| no order at all | REMOVE CASH | cash leaves the drawer, no order is touched |
How it works
You name the button
The app registers a tender in Clover under the name you choose. It appears on the payment screen next to Cash and Card.
You prepare the reasons
A reason is a template: name, colour, an optional fixed amount, an optional barcode, and whether the drawer opens.
The cashier picks a reason
Tapping the button opens your list of templates. The cashier selects one, confirms the amount and chooses the mode.
Three ways to move the money
Apply as payment lowers the order total. Remove Cash takes money out of the drawer. Manual refund records a negative transaction.
Everything is written down
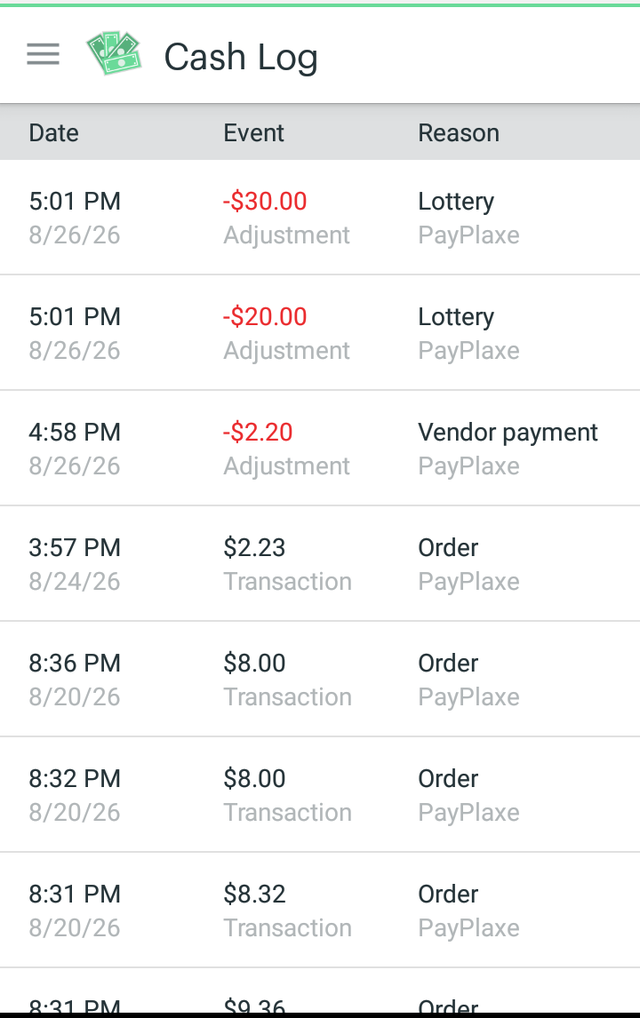
The log keeps the employee, the reason, the amount and the time. Depending on the receipt setting, the payout is printed too.
Reports
Filter the log by employee or reason, reprint a receipt, or email the report as an Excel file.
Your own paperwork still applies
The log records what the app did. It does not replace the rules you work under: lottery payout limits, cash handling policy and drawer counts are still yours to follow.
What it does
Payout button on the payment screen
A tender you name yourself, for example Payouts, next to Cash and Card in the Clover Register.
Three payout modes
Apply as payment lowers the order total. Remove Cash takes money out of the drawer. Manual refund records a negative transaction.
Payout templates
Preset the name, reason, amount, colour and whether the drawer opens. A barcode can be attached so a template is found by scanning.
Payouts without a sale
Launch Clover Register opens the Register on a new order carrying one placeholder line priced $0.00, so a payout can be taken with nothing sold.
Repeat a payout
Long-tap a template with a preset amount and enter a count — the app multiplies the preset by the count and issues one payout of the total, logged as a single record. Templates without a preset amount are not affected.
Logs and Excel export
The last 10,000 records, filters by employee and reason, receipt reprint, and an emailed link to the Excel report.
Receipts
None, Standard (printed inside the receipt) or Manually. You can decide per payout.
Employee restrictions
Control per employee who may issue payouts, add or remove cash, edit templates, and open logs and reports.
Mobile companion
Scan the QR code in the app to review payouts and email reports from the PayPlaxe Android companion app. The phone app cannot issue payouts.
Web version
payoutmanager.payplaxe.com opens Reports, Payout Reasons and Settings in a browser on any computer. It is the same app, not a separate product: the browser is where it is set up, with the same Clover account and nothing extra to buy. Sign in with Login via Clover. Payouts themselves stay on the Clover device.
Price & installation
How to install
- Open the Clover App Market — on the device, or at clover.com/appmarket in your web dashboard.
- Find the app by name, or open its direct link from the button above.
- Tap Connect / Install and accept the permissions the app requests.
- The 30-day free trial starts automatically. The subscription then appears on your monthly Clover invoice.
- Open the app on the Clover device and sign in with a Manager or Admin employee account to configure it.
- To cancel later, uninstall the app from the App Market — the steps are right below.
How to cancel the subscription
Cancelling means uninstalling the app — there is no separate billing screen.
- Open the App Market — on the Clover device, or in the web dashboard.
- Open My Apps. Every app you pay for is listed there with its monthly fee.
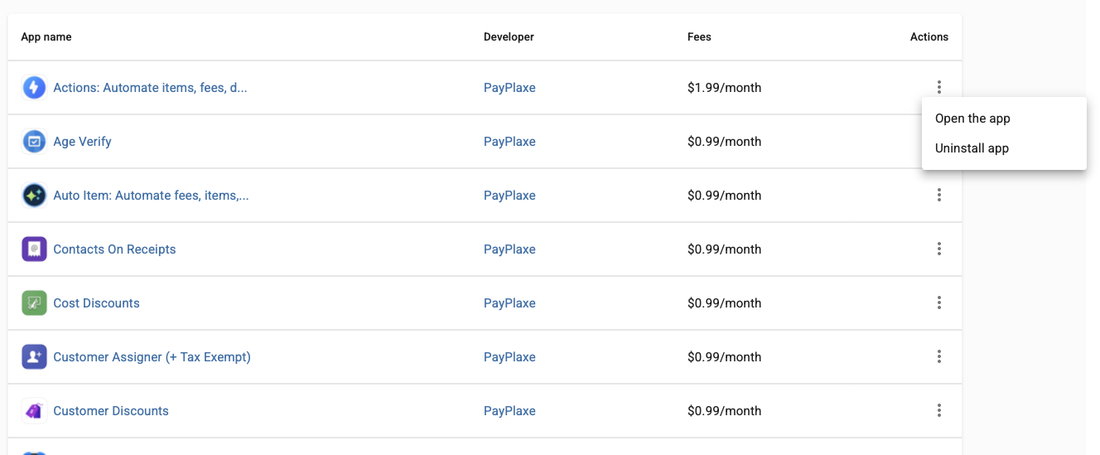
- Tap the ⋮ button on the app's row and choose Uninstall app.
- The app's own page works too: ⋮ next to the green Open the app button → Uninstall app.
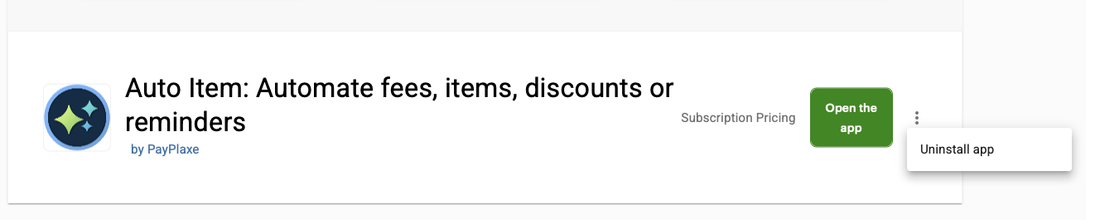
- Confirm. The subscription stops there and then — the app is off your next Clover invoice.
Install and cancel any time from the Clover App Market.
First setup
Do this once, in this order. It takes a few minutes and the app is then ready for the shift.
- Open Payout Manager on the Clover device. The app tile and the title bar read Payouts.If the app says Please login as Manager or Admin, switch to an employee with that role.
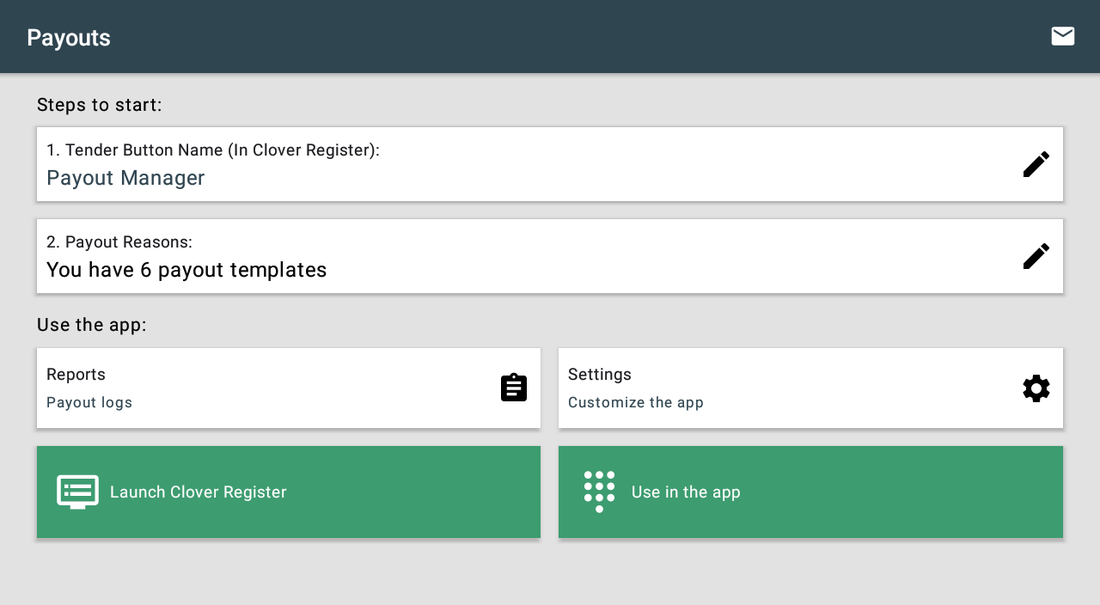
- Step 1 — tap the pencil next to Tender Button Name (In Clover Register) and type the name your cashiers will look for, e.g. Payouts.
- Step 2 — open Payout Reasons and tap + to create your first template.
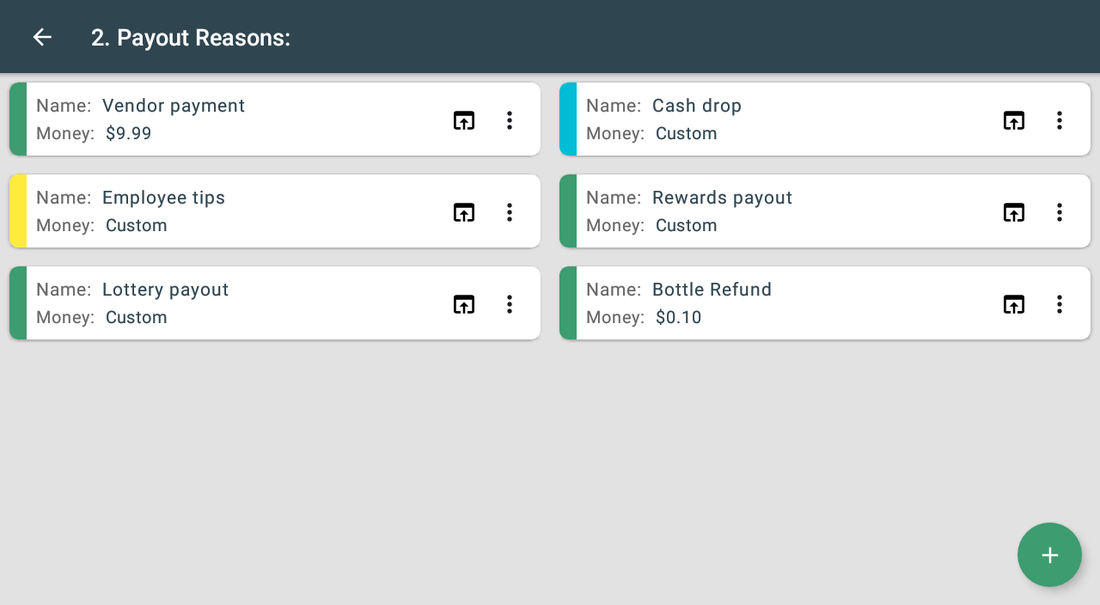
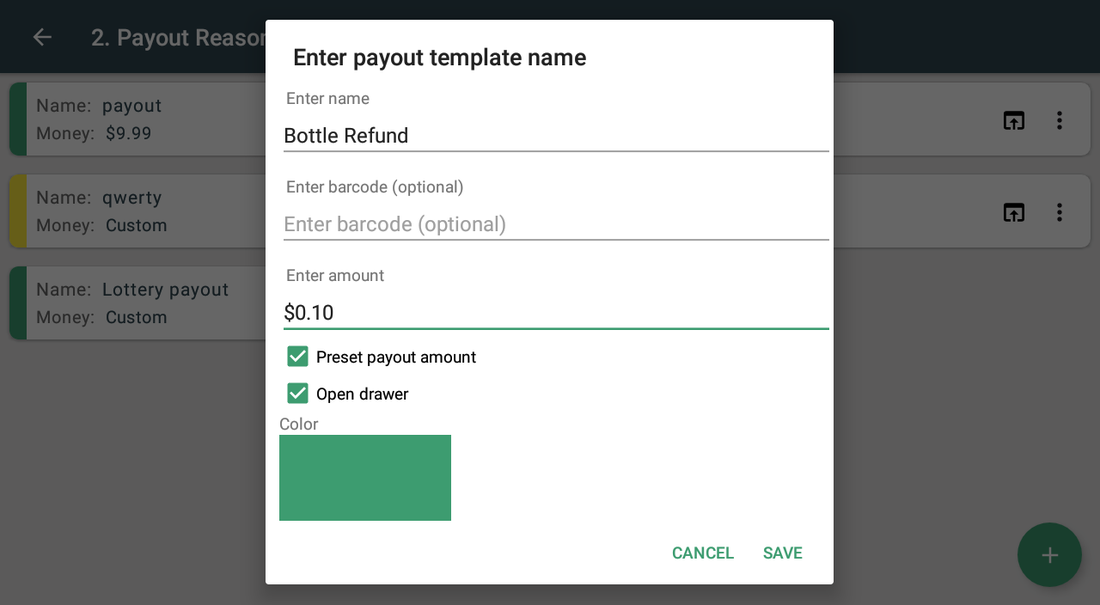
- Fill in the name, leave Preset payout amount unticked for variable payouts (lottery) or tick it and enter a fixed value for fixed ones (bottle deposit).Turn Open drawer on for cash payouts, pick a colour and save.
- Open Settings → Receipt Type and choose Standard so payouts print inside the receipt.
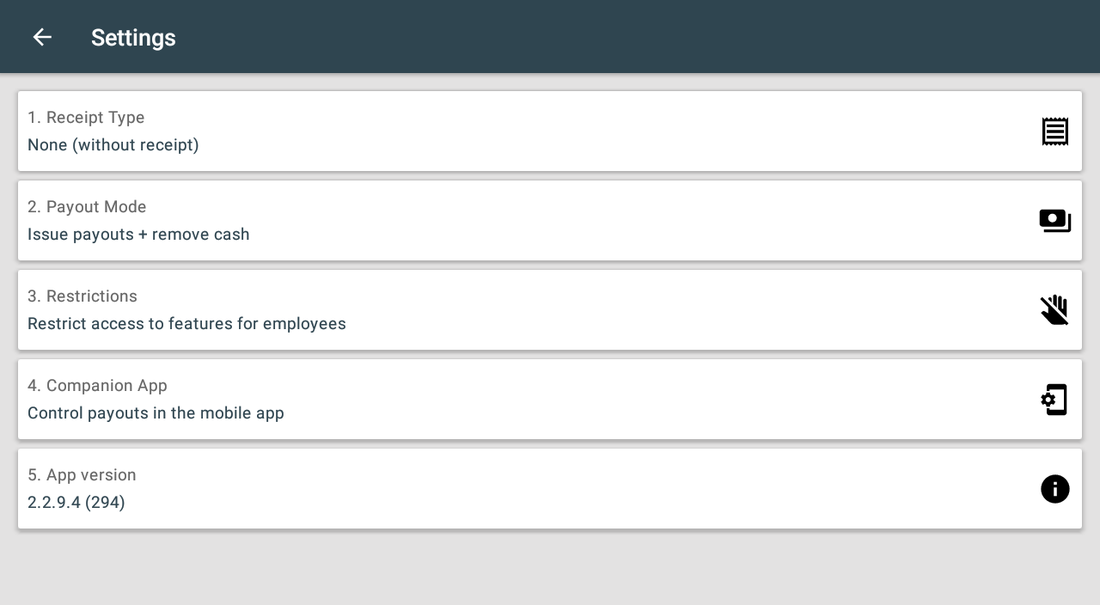
- In Payout Mode choose Issue payouts + remove cash if the money physically leaves the drawer, or Issue payouts only if you reconcile cash elsewhere.
- Open Restrictions, pick the cashier and tick what they must not do — usually Edit templates and Open reports. A ticked box blocks the action; unticking it grants the action back.
- Test it: tap Launch Clover Register, go to the payment screen, tap your tender button, issue a $1 payout and check the log.
Setup scenarios
Each scenario is a complete configuration — follow the steps in order.
1Lottery and video gaming payouts
Pay a winner at the counter, with the amount typed in on the spot and the reason stored for the audit trail.
- Open Payout Manager on the Clover device — the app tile and the title bar read Payouts — and sign in as Manager or Admin.
- Step 1 — Tender Button Name (In Clover Register): type the name your cashiers will see, e.g. Payouts.
- Step 2 — Payout Reasons: tap + and create a template named Lottery payout.
- Leave Preset payout amount empty so the cashier types the win amount, and turn Open drawer on.
- Set Receipt Type to Standard so the payout prints on the receipt.
- Set Payout Mode to Issue payouts + remove cash so the drawer total stays correct.
- In the Register, open the payment screen, tap your Payouts button, choose Lottery payout, enter the amount and confirm.
2Bottle deposit refunds by barcode
Return container deposits in one tap, or scan the returned item to pull up the right template instantly.
- Create a template named Bottle Refund in Payout Reasons.
- Set Preset payout amount to the deposit value, e.g. $0.10.
- Fill Enter barcode (optional) with the container barcode — type it in, or scan the item while the template editor is open and the code drops straight into the field.
- Turn Open drawer on so the cashier can hand over the coins.
- At the counter: open the payout dialog and scan the bottle barcode — the template is selected automatically.
- For several bottles, long-tap the template and enter the count — the app fills in one payout of count × the deposit.
3Cash drops and drawer management
Take money out of the drawer during the shift and keep a record of who did it and why.
- Create a template named Cash drop with no preset amount.
- In the Register payout dialog choose the template and pick Remove Cash.
- Enter the amount removed and confirm — the app shows Cash removed and logs the record.
- To put a float back, open Use in the app on the home screen and tap ADD CASH — the Register payout dialog has no Add cash button, only REMOVE CASH, APPLY AS PAYMENT, MANUAL REFUND and CANCEL.
- Review the movements later in Payout logs, filtered by employee.
4Payout with no sale attached
Pay a supplier, payroll or a tip when there is nothing in the cart.
- Open Payout Manager on the Clover device — the tile reads Payouts — and tap Launch Clover Register.
- The Register opens on a new order that already holds one placeholder line priced $0.00, with the payout tender button available. The line adds nothing to the total, but it stays on the order — delete it in the Register if you go on to sell something on that order.
- Choose the reason (for example Vendor payment), enter the amount and confirm.
- Choose Remove Cash if the money physically leaves the drawer.
5Restrict staff and keep an audit trail
Cashiers issue payouts; only managers change templates and see reports.
- Open Restrictions in the app settings.
- Pick an employee from the list — admins can never be restricted, and a manager cannot restrict another manager. An admin can restrict managers.
- Tick what that employee must not do — the dialog is headed 'Name' can't:, so a ticked box blocks the action: Issue a payout, Add/remove cash, Edit templates, Open reports. Warning: unticking a box removes the restriction and grants that action back.
- Open Payout logs to review activity; use Filter by employee and Select reasons to narrow it down.
- Tap the share button at the bottom of the Logs screen, confirm Create report?, then tap Send via Email and enter your address to receive the Excel export link.
Reference
Screens and settings
Every screen of the app and what each setting does. (5)
Screens and settings
Every screen of the app and what each setting does. (5)
Home screen
The two numbered rows are the setup; the five tiles below are day-to-day use.
| Setting | What it does |
|---|---|
| 1. Tender Button Name | The name of the payout button inside the Clover Register. Cashiers see exactly this text. |
| 2. Payout Reasons | Your payout templates. The row shows how many you have. |
| Reports · Payout logs | Every payout with employee, reason and amount, plus filters and export. |
| Settings · Customize the app | Receipt type, payout mode, restrictions and the companion app. |
| How the app works | Two guides built into the app — First setup and How payouts work. They open on the device without an internet connection. |
| Launch Clover Register | Opens the Register on a new order carrying one placeholder line priced $0.00, so you can issue a payout with nothing sold. |
| Use in the app | Add or remove cash from inside Payout Manager, without an order — used for drawer drops and floats. |
Payout templates
One card per reason. The coloured stripe is the colour you picked; Money: Custom means the amount is typed at payout time.
| Setting | What it does |
|---|---|
| Card colour | Helps cashiers find the right reason quickly on a busy screen. |
| Name | The reason stored with every payout and printed on the receipt. |
| Money | Either the preset amount or Custom when the cashier enters it. |
| Drawer icon | Solid when Open drawer is on for this template, faded when it is off. Tapping it only shows a message such as Cash drawer will open after payout — it does not open the Register. |
| ⋮ menu | Edit and Delete for the template. |
| + button | Creates a new payout template. |
Template editor
| Setting | What it does |
|---|---|
| Enter name | Required. Shown in the payout dialog, the log and on the receipt. |
| Enter barcode (optional) | Scan this barcode at the payout dialog to select the template instantly. Type the code in, or scan the item while the template editor is open — the code drops straight into this field. |
| Preset payout amount | Off = the cashier types the amount every time. On = a fixed amount, e.g. a bottle deposit. |
| Enter amount | Appears when the preset is on; the fixed value for this reason. |
| Open drawer | Opens the cash drawer after the payout. Leave it off for records that do not move physical cash. |
| Color | The stripe colour of the card in the list. |
Settings
| Setting | What it does |
|---|---|
| 1. Receipt Type | None — nothing printed. Standard — the payout prints inside the receipt. Manually — the app asks after each payout whether to print. |
| 2. Payout Mode | Issue payouts + remove cash — the amount is recorded in the Clover Cash Log and applied to the order. Issue payouts only — it is applied to the order only. Default: Issue payouts only. |
| 3. Restrictions | Per employee: issue a payout, add/remove cash, edit templates, open reports. A ticked box blocks the action. Admins can never be restricted; a manager cannot restrict another manager, but an admin can. |
| 4. Companion App | Shows a QR code to pair the phone app; the screen says Scan this QR-code via Payout Manager on your Android device, and in Google Play and on the phone that app is called Payouts Manager. LINK TO ANDROID APP asks for an email address and sends the Google Play link to it. From the phone you review payouts and email reports; payouts are issued on the Clover device only. |
| 5. App version | The installed version — quote it when you contact support. |
Logs and reports
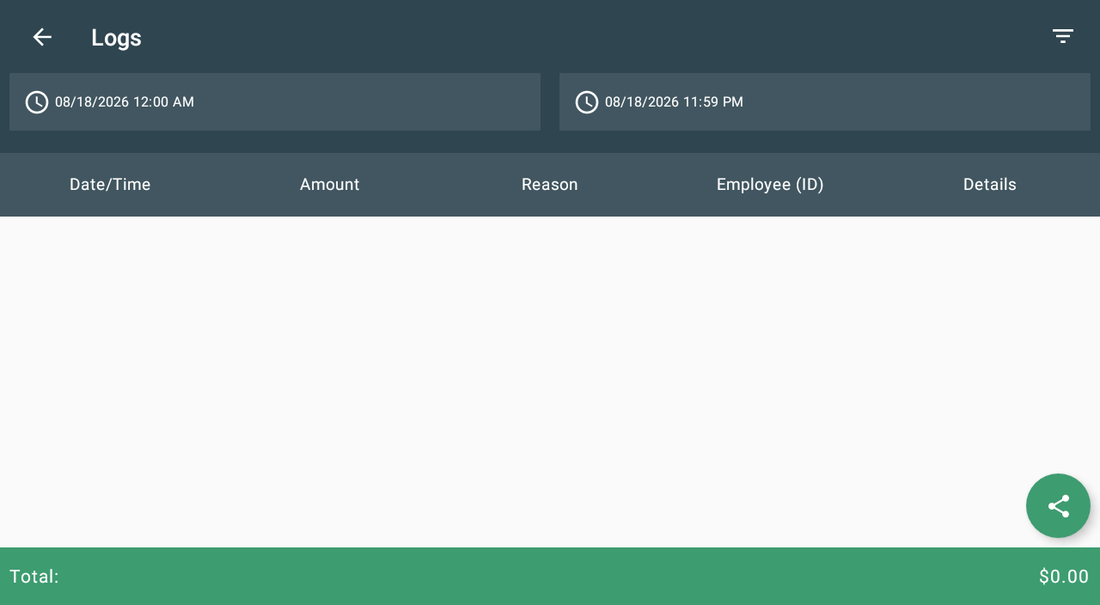
Opens on today by default. The last 10,000 records are loaded.
| Setting | What it does |
|---|---|
| Date range | Two fields at the top set the start and the end of the period. |
| Columns | Date/time, amount, reason, employee (ID) and details of each payout. |
| Filter icon | Filter by employee and Select reasons. Each dialog has its own Clear filter button that resets that filter only — clear both to see everything again. |
| Info icon (Details column) | Opens the record's details, with Reprint Receipt. |
| Share button | Creates the report and emails you a link to the Excel export. |
| Total | The sum of everything currently shown, respecting the filters. |
Screenshots taken from the running app on a Clover device. The apps’ interface language is English. Click a screenshot to enlarge.
Everyday use
What the cashier does after the app is configured.
- Ring up the order as usual (or leave the cart empty for a payout with no sale).
- On the payment screen tap your payout tender button, e.g. Payouts.
- Pick the reason, or scan the barcode attached to it.
- Enter the amount if the template has no preset; on a template with a preset amount, long-press it and enter a count — one payout of count × the preset is filled in.
- Choose the mode: Apply as payment, Remove Cash or Manual refund, then confirm.
- If the payout is larger than the order, the app shows how much cash to give as change.
- Hand over the money; the drawer opens if the template says so and the receipt prints according to the receipt type.
Troubleshooting
Symptom on the left, what to do on the right.
| Symptom | What to do |
|---|---|
| Payout is more than the order amount appears. | That is a warning, not an error. Confirm it and the app shows Give $X cash as change — the difference to hand over. |
| A cashier sees You can't issuing payouts or You can't open logs. | The employee is restricted. Open Settings → Restrictions, tap the employee and untick the actions in the 'Name' can't: list. Ticking a box adds a restriction — it does not remove one. |
| The emailed report link no longer opens. | Report links expire. Open the logs, tap the share button and create a new one. |
| Register not found when using Launch Clover Register. | The Clover Register app is missing or disabled on the device. Install or enable it from the App Market. |
| The drawer does not open after a payout. | Open the template and turn Open drawer on — it is a per-template setting. |
| Payouts do not appear in the log. | Check the date range at the top of the Logs screen; it defaults to today. The list also loads only the most recent 10,000 records. If the device was offline at the moment of the payout, the record never reaches the log — check the connection before a busy shift. |
| The app's dialog never appears on the payment screen; Clover shows "Customer is choosing payment method". | Open the Clover Setup app → Payments and uncheck Automatically take payment on Connected Device, so payment is taken on the primary device. |
| Settings cannot be opened or changed. | Sign in with an employee whose Clover role is Manager or Admin. Some apps also have their own Restrict access switch that locks the configuration. |
| The app works erratically, or stops reacting after the device has been idle. | Turn off Battery Saver in the device's Android settings and keep the device online. |
| A change made on one device is not visible on another. | Settings sync through the cloud; give it a minute and make sure both devices have a network connection. |