
How it works
A code is content plus a schedule
You pick the type, fill in the fields, write the caption printed above it, and choose the days it prints.
The content sits inside the code
A WiFi code carries the network name and the password. Change the password and you have to update the code.
Several codes can print together
Each active code prints its own block with its own caption.
Stored with your account, loaded when the app opens
Codes are saved to your merchant account and the browser version edits the same list. Each Clover device downloads them and rebuilds the printed block when QRCodes is opened on it. After editing on another device or on the web, open the app once on every device that prints receipts.
What it does
Six code types
WiFi password, plain text, email, SMS, vCard contact and website URL.
Caption above the code
QR text prints above the code so customers know what they are scanning.
Schedule
One time between two dates or Always, limited to the weekdays you choose.
Several codes at once
WiFi every day plus a review link at weekends, for example.
Size of the code and the caption
CUSTOMIZE holds two separate settings: Set QR code size (Small, Medium, Big) for the printed code, and Set font size (10–50) for the caption.
Test print
The printer icon prints the code block on its own — the caption and the code, not a receipt. Scan it yourself before customers do.
Stored in the cloud
Codes are saved under your merchant account. Each Clover device loads them when QRCodes is opened on it; there is no background sync.
Web version
qrcodes.payplaxe.com opens the same app in a browser, with QR Codes and Settings. It is the same app you already have on Clover — the setup side of it, with nothing extra to buy. Sign in with Login via Clover. It cannot print: the printer icon there only shows the code on screen, and a code saved in the browser starts printing on receipts once you open QRCodes on the Clover device.
Price & installation
How to install
- Open the Clover App Market — on the device, or at clover.com/appmarket in your web dashboard.
- Find the app by name, or open its direct link from the button above.
- Tap Connect / Install and accept the permissions the app requests.
- The 30-day free trial starts automatically. The subscription then appears on your monthly Clover invoice.
- Open the app on the Clover device and sign in with a Manager or Admin employee account to configure it.
- To cancel later, uninstall the app from the App Market — the steps are right below.
How to cancel the subscription
Cancelling means uninstalling the app — there is no separate billing screen.
- Open the App Market — on the Clover device, or in the web dashboard.
- Open My Apps. Every app you pay for is listed there with its monthly fee.
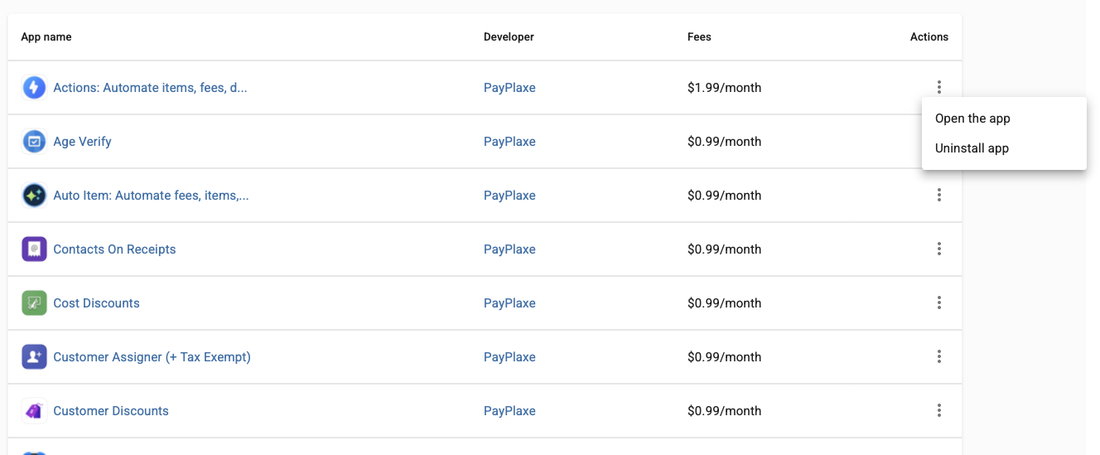
- Tap the ⋮ button on the app's row and choose Uninstall app.
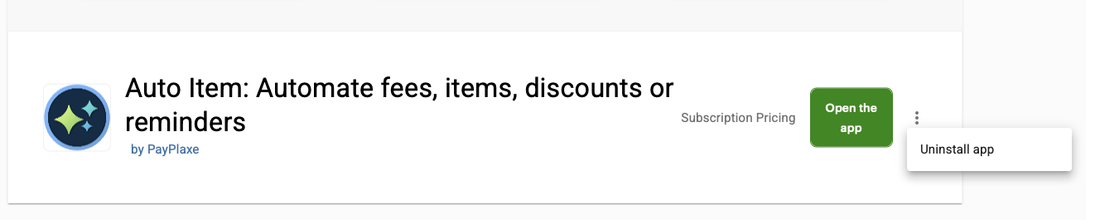
- The app's own page works too: ⋮ next to the green Open the app button → Uninstall app.
- Confirm. The subscription stops there and then — the app is off your next Clover invoice.
Install and cancel any time from the Clover App Market.
First setup
Do this once, in this order. It takes a few minutes and the app is then ready for the shift.
- Open QRCodes; each card shows the name, the type, the print mode and the weekdays it prints on.
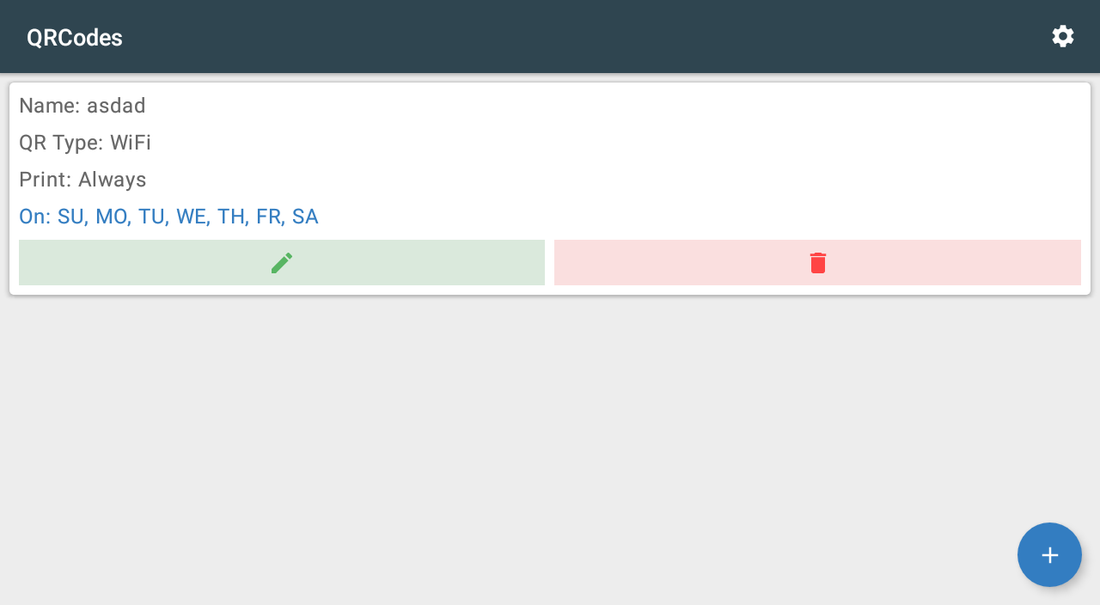
- Tap + to create a code.
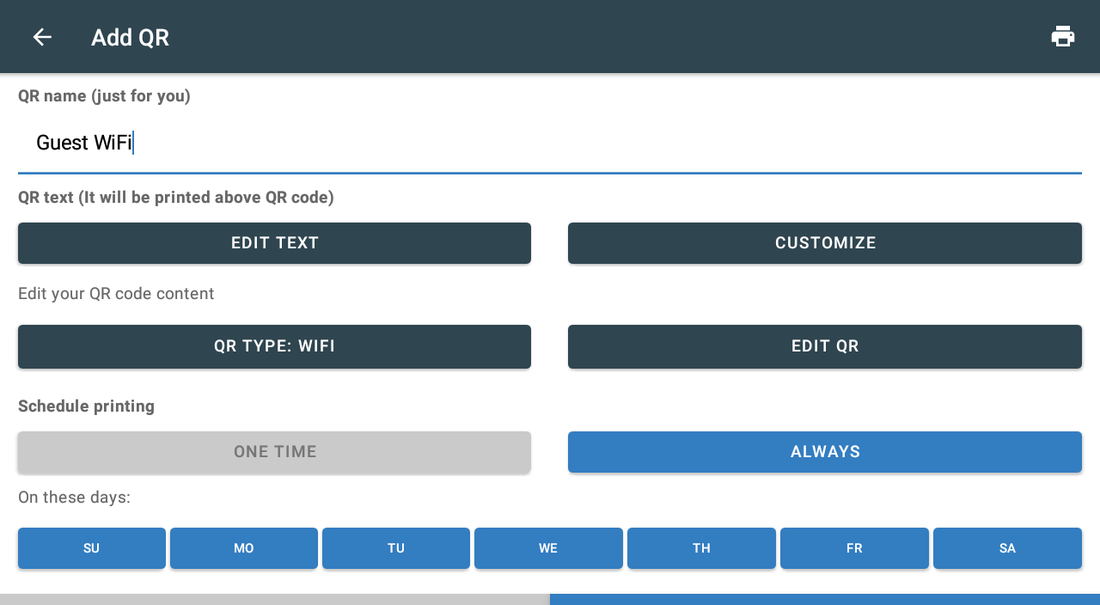
- Fill QR name (just for you) — an internal label.
- Tap EDIT TEXT and write the caption customers read above the code.
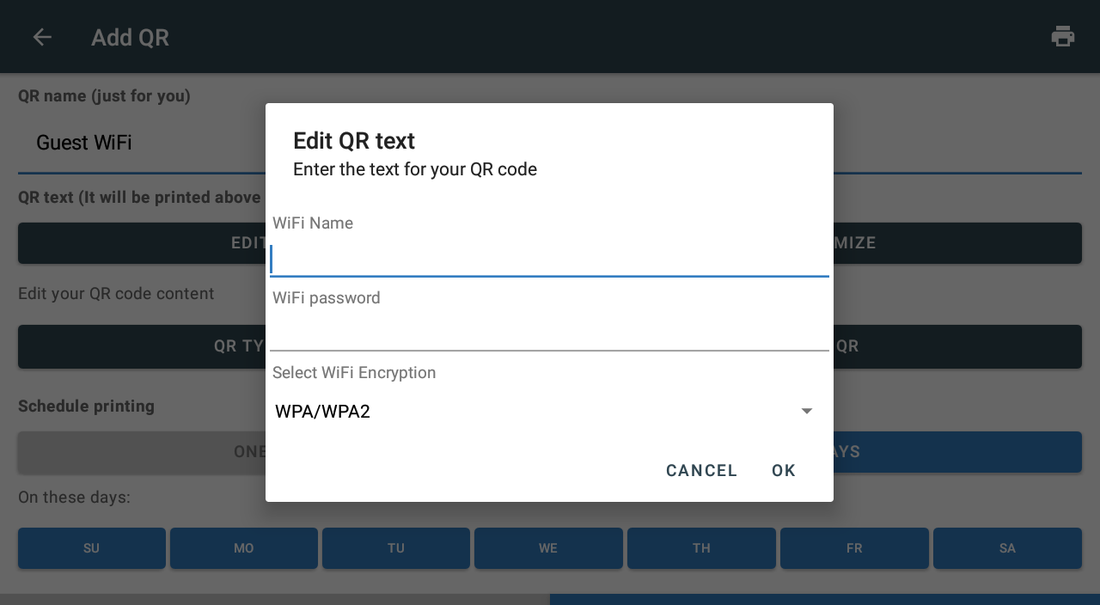
- Tap QR TYPE and pick the type, then tap EDIT QR and fill its fields.
- Choose ONE TIME or ALWAYS, tick the weekdays and save.
- Use the printer icon to print the code and scan it with your own phone.
Setup scenarios
Each scenario is a complete configuration — follow the steps in order.
1Share the guest WiFi password
Nobody has to read a password off a chalkboard or ask staff twice.
- Open QRCodes and tap +.
- Enter a name in QR name (just for you), e.g. Guest WiFi.
- Tap EDIT TEXT and write the caption customers will read, e.g. Scan to join our WiFi.
- Tap QR TYPE and pick WiFi, then tap EDIT QR and enter the network name, password and encryption (usually WPA/WPA2).
- Set the schedule to ALWAYS and tick every weekday.
- Use the printer icon to print the code, and scan it with your own phone to be sure it connects.
2Ask for a Google or Yelp review
The best moment to ask is right after the purchase, and the receipt is already in the customer's hand.
- Create a new code, tap QR TYPE and pick URL.
- Tap EDIT QR and paste the link to your review page, e.g. https://g.page/r/….
- Write a short caption above it, such as How did we do? Scan to review us.
- Set ALWAYS, or restrict it to your busiest weekdays.
- Print the code with the printer icon, scan it, and confirm the link opens the review form.
3A limited-time promotion link
A campaign page that must stop printing on its own.
- Create a code with the URL type pointing at the campaign page.
- Choose ONE TIME in the schedule and set the start and end dates.
- Select the weekdays the promotion runs.
- Keep your permanent WiFi code active alongside it.
- After the campaign, delete the code or leave it for reuse next time.
Reference
Screens and settings
Every screen of the app and what each setting does. (4)
Screens and settings
Every screen of the app and what each setting does. (4)
Codes list
| Setting | What it does |
|---|---|
| Name | Your internal label for the code. |
| QR Type | WiFi, Text, Email, SMS, vCard or URL. |
| Always or a one-time period. | |
| On | The weekdays saved for this code. |
| Pencil / bin | Edit or delete the code. |
| + button | Creates a new code. |
| Gear icon | Opens Settings. |
Code editor
| Setting | What it does |
|---|---|
| QR name (just for you) | Internal label, not printed. |
| EDIT TEXT | The caption printed above the code. |
| CUSTOMIZE → Set QR code size | Size of the printed code: Small, Medium or Big. |
| CUSTOMIZE → Set font size | Size of the caption text, 10 to 50. It does not change the code. |
| QR TYPE / EDIT QR | The code type and its content. |
| Schedule printing | ONE TIME or ALWAYS. |
| On these days | The weekdays the code prints on. |
| Printer icon | Prints this code block on the Clover printer — the caption and the code, not a receipt. |
Code content — WiFi
| Setting | What it does |
|---|---|
| WiFi Name | The network SSID exactly as it is broadcast. |
| WiFi password | The password that will be embedded in the code. |
| Select WiFi Encryption | Usually WPA/WPA2. |
| CANCEL / OK | Discards or stores the content. |
Settings
| Setting | What it does |
|---|---|
| Contact us / Send your request | Opens the support request form. |
| Your merchant ID | Your Clover merchant ID, so support can identify you. |
| App version | The installed version of the app. |
Screenshots taken from the running app on a Clover device. The apps’ interface language is English. Click a screenshot to enlarge.
Everyday use
What the cashier does after the app is configured.
- Nothing to do — active codes print on receipts by themselves.
- Update the WiFi code whenever the password changes, then open QRCodes on every Clover device that prints receipts — a device where the app has not been opened keeps printing the old password.
- After creating or editing a code on another device or in the browser, open QRCodes on this device too; codes are loaded only when the app opens.
- Delete or let a one-time promotion code expire when the campaign ends.
Troubleshooting
Symptom on the left, what to do on the right.
| Symptom | What to do |
|---|---|
| The code does not print. | It is outside its date range, or today's weekday is not ticked. It also does not print if QRCodes has never been opened on this Clover device — open it once so the app registers with the receipt printer and builds the printed block. A code added on another device or in the browser needs the app opened here too. |
| Scanning does not connect to WiFi. | The password or the encryption type in the code is wrong; edit the code and test print again. |
| Customers do not know what the code is for. | Write a caption in EDIT TEXT — it prints directly above the code. |
| The code prints too small or too large. | Open CUSTOMIZE and change Set QR code size — Small, Medium or Big. Set font size (10 to 50) only changes the caption printed above the code. |
| A code created or edited on another device or in the browser does not print here. | Codes are loaded only when the app opens. Open QRCodes on this Clover device once; it downloads the codes and rebuilds the printed block. There is no background sync, so waiting does not help. |
| The app's dialog never appears on the payment screen; Clover shows "Customer is choosing payment method". | Open the Clover Setup app → Payments and uncheck Automatically take payment on Connected Device, so payment is taken on the primary device. |
| Settings cannot be opened or changed. | Sign in with an employee whose Clover role is Manager or Admin. Some apps also have their own Restrict access switch that locks the configuration. |
| The app works erratically, or stops reacting after the device has been idle. | Turn off Battery Saver in the device's Android settings and keep the device online. |
| A change made on one device is not visible on another. | Settings sync through the cloud; give it a minute and make sure both devices have a network connection. |