

How it works
One block, several lines
Each contact becomes a line with the icon for its type followed by the value. The block prints under an Our contacts heading; the type name itself is not printed. It is added to printed receipts only — receipts sent by email or text message are unchanged.
The list is stored in your PayPlaxe account
Contacts are kept for the whole business, not on one device, so the device needs Internet to show, add, edit or delete them. Printing itself uses the copy already on the device.
Each device prints its own copy
A Clover device refreshes its copy only when Contacts is opened on it. After you add, edit or delete a contact, open Contacts once on every device that prints receipts; waiting does not update them. Until you do, those devices keep printing the old details on customers' receipts.
Values are capped at 40 characters
A value longer than 20 characters is cut at the exact middle of the text and printed on two lines, even in the middle of a word. Keep a value to 20 characters or fewer to fit it on a single row of thermal paper.
One button controls printing, on that device
The Enabled / Disabled button turns the block on and off without deleting your contacts. It is stored on the device you tap it on; every other Clover device keeps its own setting.
You see it before customers do
Test Print prints the block on real paper. It sends the block straight to the printer, so it does not prove the block reached a customer receipt — check a real receipt as well.
No role restriction
The app has two screens and no access lock. Any employee who can open Contacts can add, edit or delete a contact for the whole business.
What it does
Fourteen contact types
Phone, Email, Web, Instagram, What's App, Facebook, Telegram, LinkedIn, Twitter, Coordinates (GPS), YouTube, TikTok, Weibo and Skype, in the order the app lists them. Each prints as the type's icon followed by the value.
Printed receipts only
The block is added to receipts printed on paper. Receipts sent by email or text message are not changed.
Up to 40 characters
Each value is limited to 40 characters. A value longer than 20 characters is split at the exact middle of the text and printed on two lines, even in the middle of a word.
Test print
Print the block on paper before customers see it. Test Print goes straight to the printer, so check a real customer receipt as well.
One button per device
The Enabled / Disabled button turns printing on and off without deleting the contacts. It applies only to the Clover device you tap it on.
Edit any time
Change a number or a handle in a couple of taps. The change is saved for the whole business, but each device prints from the copy it downloaded the last time Contacts was opened on it.
Price & installation
How to install
- Open the Clover App Market — on the device, or at clover.com/appmarket in your web dashboard.
- Find the app by name, or open its direct link from the button above.
- Tap Connect / Install and accept the permissions the app requests.
- The 30-day free trial starts automatically. The subscription then appears on your monthly Clover invoice.
- Open the app on the Clover device and sign in with a Manager or Admin employee account to configure it.
- To cancel later, uninstall the app from the App Market — the steps are right below.
How to cancel the subscription
Cancelling means uninstalling the app — there is no separate billing screen.
- Open the App Market — on the Clover device, or in the web dashboard.
- Open My Apps. Every app you pay for is listed there with its monthly fee.
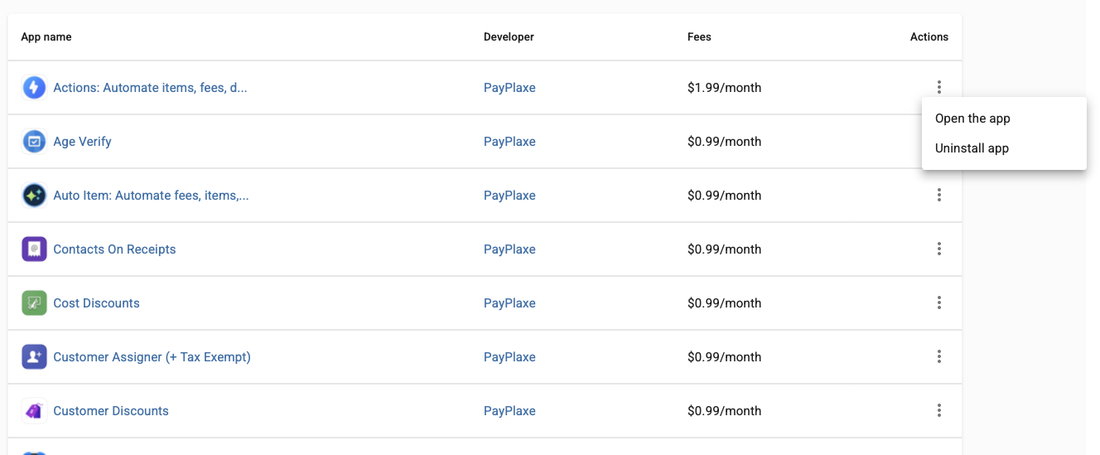
- Tap the ⋮ button on the app's row and choose Uninstall app.
- The app's own page works too: ⋮ next to the green Open the app button → Uninstall app.
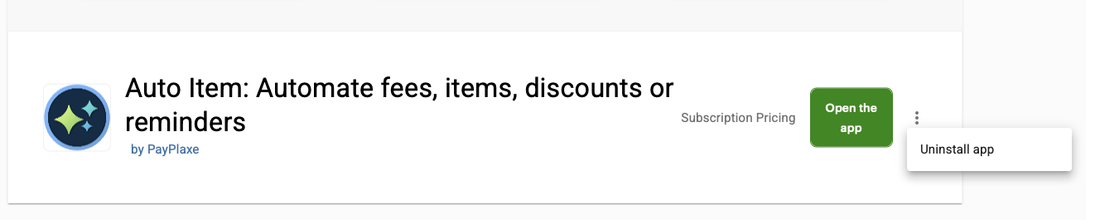
- Confirm. The subscription stops there and then — the app is off your next Clover invoice.
Install and cancel any time from the Clover App Market.
First setup
Do this once, in this order. It takes a few minutes and the app is then ready for the shift.
- Open Contacts — the tile on the Clover home screen. The button at the top reads Enabled or Disabled.
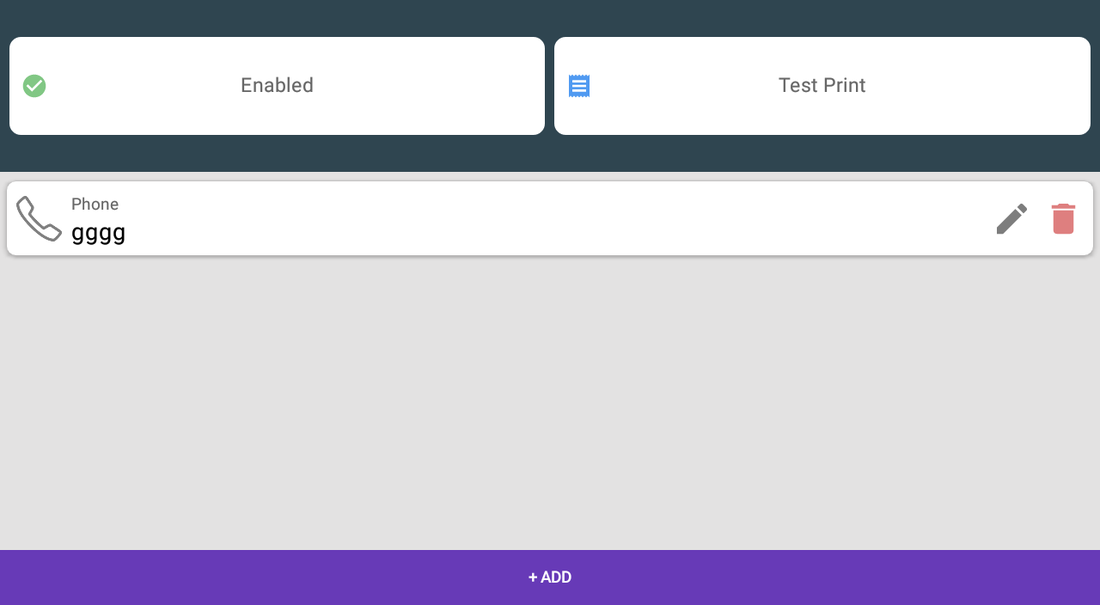
- Tap + ADD and choose a type on the Select contact type screen.
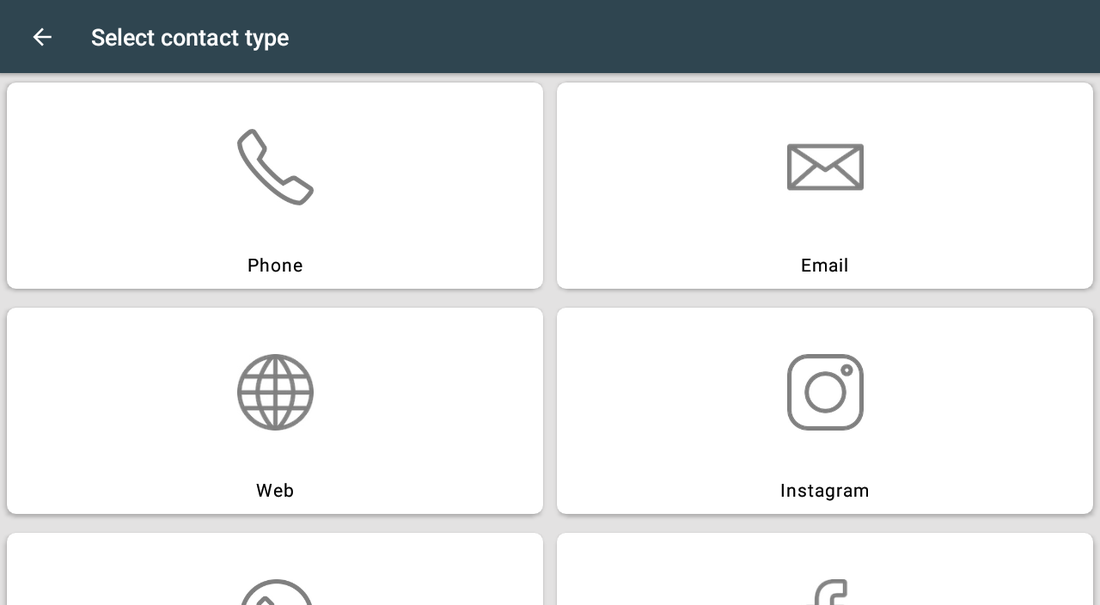
- Enter the value — a phone number, an address, or a handle with the @. The field hint shows an example and (max length = 40).
- Tap Add; Successfully added confirms it. Repeat for the other contacts, keeping the list to three or four lines.
- To remove a contact, tap the bin on its row and confirm Are you sure?. The contact is deleted for the whole business and cannot be recovered.
- Make sure the button reads Enabled and tap Test Print.
- Open Contacts once on every other Clover device that prints receipts, so each one downloads the list.
Setup scenarios
Each scenario is a complete configuration — follow the steps in order.
1Print your phone number and website
The two details customers look for first when they need to come back.
- Open Contacts — the tile on the Clover home screen — and tap + ADD.
- Choose Phone and enter the number in the format your customers expect.
- Tap + ADD again, choose Web and enter the address, e.g. www.example.com.
- Make sure the button at the top reads Enabled.
- Tap Test Print and check the paper, then check one real customer receipt.
- Open Contacts once on every other Clover device that prints receipts, so each one downloads the list.
2Add your social accounts
Customers who follow you come back more often than those who do not.
- Add an Instagram contact and enter the handle with the @, e.g. @yourshop.
- Add What's App with the number customers can message.
- Keep the list short — three or four lines is enough on a narrow receipt.
- Run a test print and check that no value is split across two lines.
- Edit or delete a contact from its row whenever an account changes. Deleting applies to the whole business at once and cannot be undone.
- Open Contacts once on every other Clover device afterwards, so each one picks up the change.
3Pause printing during a rebrand
Old details should not be printed while the new ones are not ready.
- Open the app and tap the button at the top so it reads Disabled.
- Receipts from that device print without the contact block; your entries stay saved.
- The button is stored per device. Repeat this on every Clover device that prints receipts, or delete the contacts, which applies to the whole business.
- Update the values when the new details are confirmed.
- Tap the button so it reads Enabled again, then run Test Print to check the block. While printing is switched off, Test Print refuses with Please enable app.
- Open Contacts once on each device so all of them print the new values.
Reference
Screens and settings
Every screen of the app and what each setting does. (2)
Screens and settings
Every screen of the app and what each setting does. (2)
Contacts screen
| Setting | What it does |
|---|---|
| Enabled / Disabled | The button at the top left. Its label shows the current state; tapping it turns printing of the contact block on or off. The setting is stored on this device only — other Clover devices keep their own. |
| Test Print | Prints the block immediately on this device's receipt printer. It refuses with Please enable app while the button reads Disabled, and with Please, add contacts when the list is empty. |
| Contact row | The type label and the value; the pencil edits the value only — the type cannot be changed, so delete the row and add a new one instead. The bin deletes the row after an Are you sure? confirmation. |
| + ADD | Adds another contact. While the list is empty the screen reads No contacts. |
Select contact type
| Setting | What it does |
|---|---|
| Phone / Email / Web | The three most used; any format for the phone, e.g. support@example.com, www.example.com. |
| Instagram / Telegram / Twitter / TikTok | Handles — enter them with the @. The TikTok field's example hint reads e.x. @telegram; enter your TikTok handle there anyway. |
| What's App / Facebook / LinkedIn / Coordinates (GPS) / YouTube / Weibo / Skype | Any format your customers will recognise; Coordinates (GPS) takes latitude and longitude, e.g. -0.12, 51.50. |
| Length limit | 40 characters per value; a value longer than 20 characters is cut at the exact middle of the text and printed on two lines. |
Screenshots taken from the running app on a Clover device. The apps’ interface language is English. Click a screenshot to enlarge.
Everyday use
What the cashier does after the app is configured.
- Nothing to do — the block prints on every paper receipt while the button reads Enabled on that device. Receipts sent by email or text message do not carry it.
- Edit a value the moment a number or an account changes; the change is saved for the whole business straight away.
- Then open Contacts once on every other Clover device that prints receipts. Until you do, those devices keep printing the old number on customers' receipts.
Troubleshooting
Symptom on the left, what to do on the right.
| Symptom | What to do |
|---|---|
| Nothing prints. | The button at the top reads Disabled on that device. Tap it so it reads Enabled. The setting is per device, so check the device that printed the receipt. |
| The receipt shows an empty Our contacts heading. | The list on that device is empty, and printing is still switched on. Add a contact, or tap the button so it reads Disabled to remove the heading. |
| A device still prints an old number after an edit. | That device has not refreshed its copy. Open Contacts on it once; waiting does not update it. |
| A value is printed over two lines. | Values longer than 20 characters are cut at the exact middle of the text, even in the middle of a word. Shorten the value to 20 characters or fewer and test print again. |
| Check your Internet connection. | The device is offline. Listing, adding, editing and deleting contacts all need Internet. Printing keeps using the copy already on the device. |
| Please enable app when tapping Test Print. | Printing is switched off on this device. Tap the button so it reads Enabled, then test print. |
| Please, add contacts when tapping Test Print. | The list is empty. Add at least one contact first. |
| Empty contact when saving. | The value field is empty — type the contact before saving. |
| The block is missing from an emailed or texted receipt. | The app adds the block to receipts printed on paper only. Digital receipts cannot carry it. |
| Nothing from this app appears on the payment screen. | That is normal. The app has no register screen; its only action at the register is adding the block to the printed receipt. |
| There is no Settings or Contact us inside the app. | The app has two screens only: the contacts list and Select contact type. There is no Settings screen, no support screen and no access lock — any employee who can open the app can change the list. For help, use the email address or the text-message number listed below. |
| The app's dialog never appears on the payment screen; Clover shows "Customer is choosing payment method". | Open the Clover Setup app → Payments and uncheck Automatically take payment on Connected Device, so payment is taken on the primary device. |
| Settings cannot be opened or changed. | Sign in with an employee whose Clover role is Manager or Admin. Some apps also have their own Restrict access switch that locks the configuration. |
| The app works erratically, or stops reacting after the device has been idle. | Turn off Battery Saver in the device's Android settings and keep the device online. |
| A change made on one device is not visible on another. | Settings sync through the cloud; give it a minute and make sure both devices have a network connection. |