

How it works
Products are grouped by age
A group holds the items or categories that need a check, plus the minimum age for them.
The check happens in the Register
Adding a restricted item stops the sale until a date of birth is entered. Only inventory items are matched: the item itself is in a group, or one of its categories is. A custom or open-price line typed at the register carries no inventory item, so it is never checked.
One check per order
The app asks for the age once. It asks again only if a later item requires a higher age than the age already read for this order — a customer verified at 19 for an 18+ item is asked again at a 21+ item, while a customer verified at 34 is not. If a check was skipped, no further prompt appears in that order.
Two ways to answer
Scan the barcode on a driver's licence, or type the birthday in the order shown on the prompt — mm/dd/yy in dollar markets, dd/mm/yy elsewhere.
What ends up in the report
When the order is paid, one line is written for it: the date, the age last read for that order and the order ID. An order verified twice still gives one line. A skipped check is recorded too and shows as Skipped. A failed check, or an order that is never paid, produces no line. You can also print your own line on the receipt.
The app helps, you are still responsible
The check is a prompt on the screen. Looking at the ID, refusing the sale and following your state's rules is still the cashier's job.
Your setup lives in your PayPlaxe account
The groups, the settings and the verification log are stored for your merchant on PayPlaxe's servers, not on the Clover device — so they survive a reinstall, and the browser shows the same data. The Clover device works from a copy that it reloads each time Age Verify is opened there.
What it does
Groups with their own age
One group for 18+, another for 21+, each with its own list of items or categories.
Items or categories
Cover a whole category at once, or pick individual items.
Driver's licence scanning
Scan the licence barcode with the Clover scanner and the app reads the date of birth from it.
Manual entry
Type the date of birth when there is no scannable ID. Use the order shown on the prompt — mm/dd/yy in dollar markets, dd/mm/yy elsewhere.
Autocomplete
The check runs as soon as the last digit of the date of birth is entered, so nobody has to press a confirm button. It works the same way after a licence scan.
Skip control
Decide whether employees may skip a verification at all.
Receipt line
Print your own text, for example Age Verified, on receipts for orders where the age prompt was answered. A skipped check also counts, so turn skipping off if the line has to mean the ID was actually checked.
Reports
One line per order, written when the order is paid: date and time, the age read and the order ID. A skipped check appears as Skipped; a failed check and an order that is never paid do not appear at all.
Web version
ageverify.payplaxe.com opens the same groups, reports and settings in a browser. It is not a separate product: this is the setup side of the app you already have, with nothing extra to buy. Sign in with Login via Clover — your Clover account, no password and no QR code. Everything that happens at the register stays on the Clover device, and a change made in the browser reaches the register only after Age Verify has been opened there once.
Price & installation
How to install
- Open the Clover App Market — on the device, or at clover.com/appmarket in your web dashboard.
- Find the app by name, or open its direct link from the button above.
- Tap Connect / Install and accept the permissions the app requests.
- The 30-day free trial starts automatically. The subscription then appears on your monthly Clover invoice.
- Open the app on the Clover device and sign in with a Manager or Admin employee account to configure it.
- To cancel later, uninstall the app from the App Market — the steps are right below.
How to cancel the subscription
Cancelling means uninstalling the app — there is no separate billing screen.
- Open the App Market — on the Clover device, or in the web dashboard.
- Open My Apps. Every app you pay for is listed there with its monthly fee.
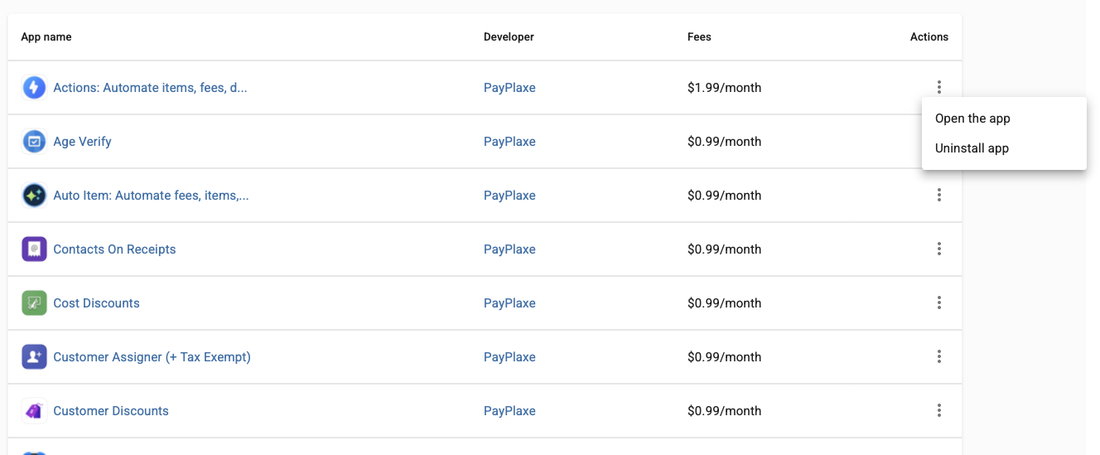
- Tap the ⋮ button on the app's row and choose Uninstall app.
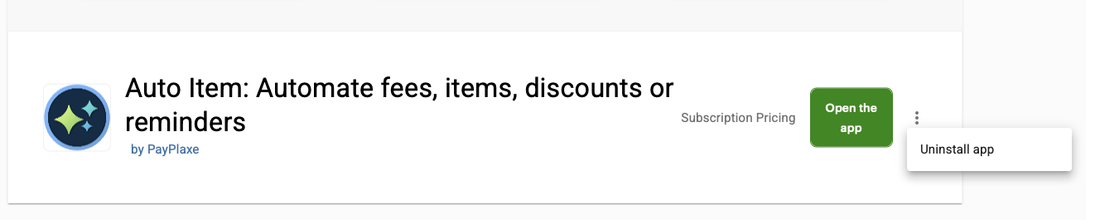
- The app's own page works too: ⋮ next to the green Open the app button → Uninstall app.
- Confirm. The subscription stops there and then — the app is off your next Clover invoice.
Install and cancel any time from the Clover App Market.
First setup
Do this once, in this order. It takes a few minutes and the app is then ready for the shift.
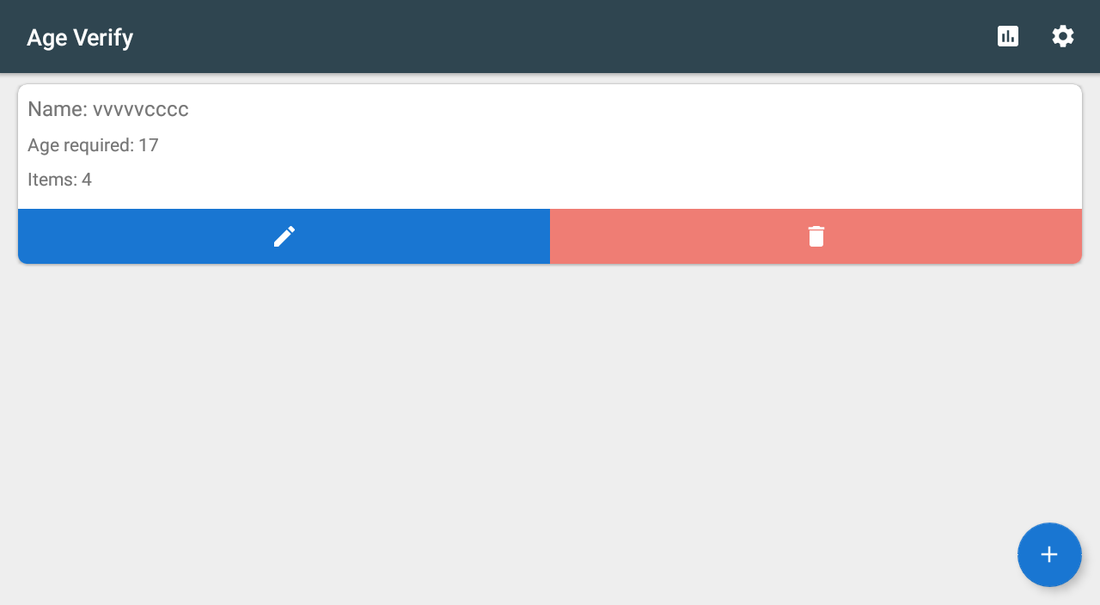
- Open Age Verify; existing groups show their name, required age and item count.
- The first time, allow the Android permission draw over other apps when the app asks. Without it the age prompt cannot open over the Register.
- Tap + to create a group.
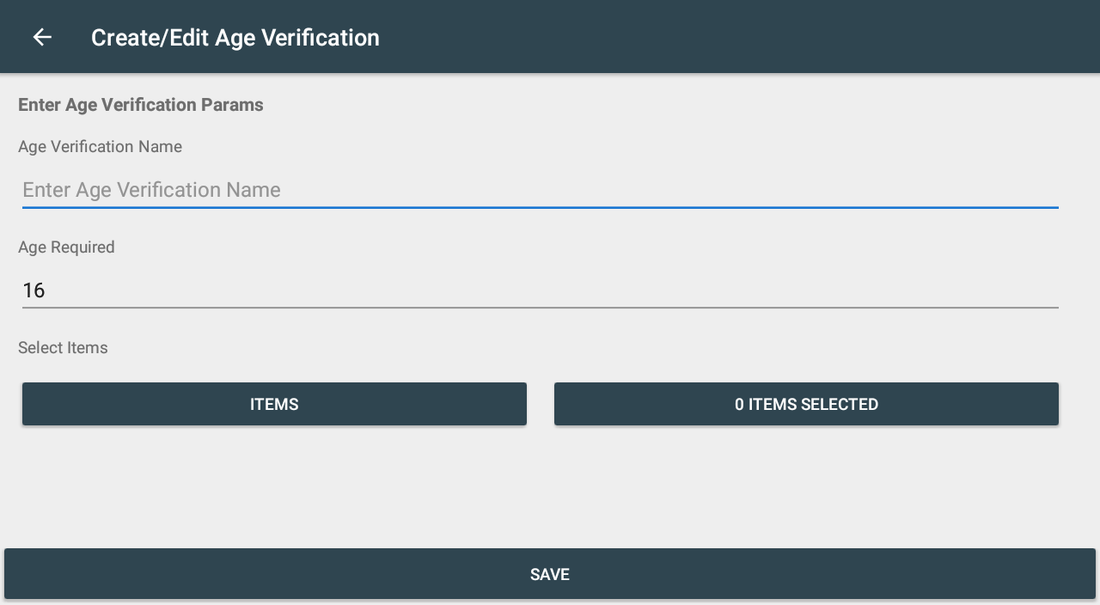
- Enter the group name and Age Required (e.g. 21).
- Tap ITEMS (or switch to categories) and select the restricted products, then SAVE.
- Open Settings: decide whether staff may skip a check, turn on Autocomplete so the check submits itself, and enable the receipt line if you need proof. These three appear only for Manager and Admin employees; anyone else sees only Contact us and App version.
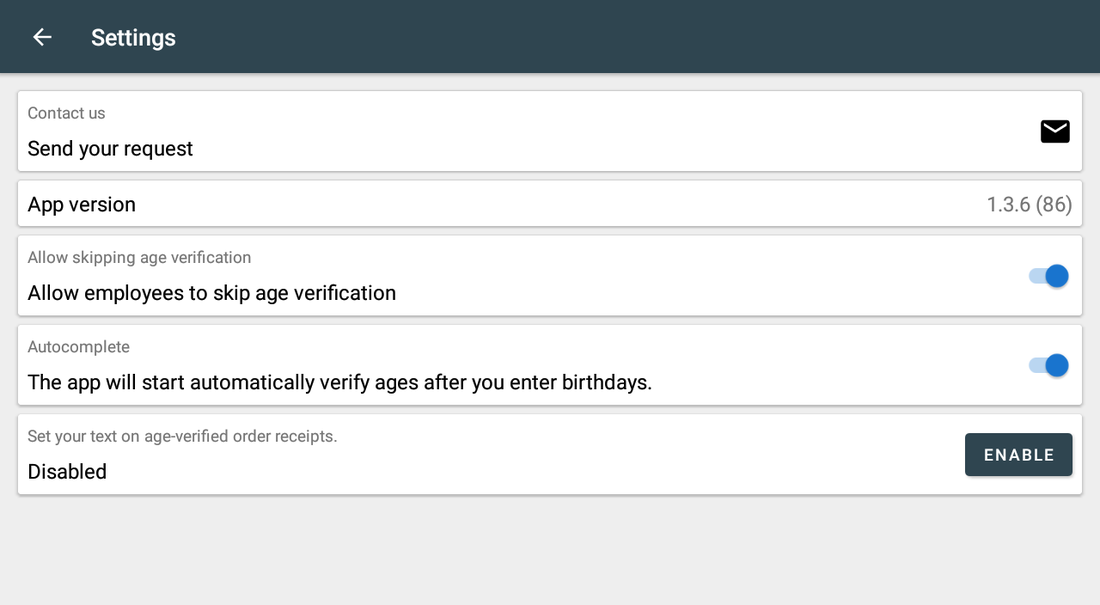
- Test it on a real order: add a restricted item, scan a driver's licence at the prompt and confirm the sale continues.
Setup scenarios
Each scenario is a complete configuration — follow the steps in order.
121+ on alcohol, 18+ on tobacco
Two different legal ages in one store, on two different sets of products.
- Open Age Verify and tap +.
- Name the first group Alcohol 21+ and set Age Required to 21.
- Tap Items (or switch to categories) and select everything alcoholic, then save.
- Create a second group Tobacco 18+ with age 18 and its own items.
- In the Register, add one of those products — the app asks for the date of birth before you can continue.
2Scan the driver's licence instead of typing
Faster at the counter and less room for a typo.
- Make sure your Clover scanner is working — the same one you use for barcodes reads the licence.
- Add a restricted item in the Register so the age prompt appears.
- Scan the back of the driver's licence; the date of birth is read from the barcode.
- Turn on Autocomplete in Settings so the check submits itself as soon as the licence is read.
- Train the cashiers: scan the licence when the prompt appears, and type the birthday only as a fallback.
- If a licence is not recognised, send the details to contact@payplaxe.com so the format can be added.
3Tighten the policy: no skipping, print the proof
For audits you need evidence that the check happened.
- Open Settings and turn Allow employees to skip age verification off.
- Enable Set your text on age-verified order receipts and write the line you want printed.
- Run a test sale and confirm the receipt carries the line.
- Open Reports to review checks by date, age and order.
- Export or share the report when you need it for an inspection.
Reference
Screens and settings
Every screen of the app and what each setting does. (5)
Screens and settings
Every screen of the app and what each setting does. (5)
Groups list
| Setting | What it does |
|---|---|
| Name | Your label for the group. |
| Age required | The minimum age enforced for these products. |
| Items / Categories | How many items the group covers. A group built from categories shows Categories: N instead. |
| Blue pencil / red bin | Edit or delete the group. |
| Report icon | Opens the verification history. |
| Gear icon | Opens Settings. |
Group editor
| Setting | What it does |
|---|---|
| Age Verification Name | Your label for the group; shown in the groups list. |
| Age Required | The minimum age, e.g. 18 or 21. |
| ITEMS / categories | Choose whether the group is built from items or categories. |
| 0 ITEMS SELECTED | Opens the picker; the count updates as you select. |
| SAVE | Stores the group; it works on the next order. |
Settings
On the Clover device the three switches below appear only for Manager and Admin employees; anyone else sees just Contact us and App version. The browser version shows them to anyone who can sign in.
| Setting | What it does |
|---|---|
| Allow skipping age verification | On lets employees bypass a check; off makes it mandatory. |
| Autocomplete | Runs the check as soon as the date of birth is complete, instead of waiting for a confirm tap. |
| Set your text on age-verified order receipts | Prints your own line (e.g. Age Verified) on receipts for orders where the age prompt was answered. A skipped check also counts, so turn skipping off if the line has to mean the ID was actually checked. |
| Contact us | Support request from the app. |
| App version | The installed version. |
Age prompt (Register)
The prompt opens over the Register when a restricted item is added. It has no cancel button and does not close when you tap outside it.
| Setting | What it does |
|---|---|
| SKIP | Records the check as skipped and lets the sale continue. Shown only when Allow skipping age verification is on. A skipped check still triggers the receipt line and is logged as Skipped. |
| Red bin | Deletes the restricted line item from the Clover order and closes the prompt. Use it when you refuse the sale — the product leaves the order itself, so check the order before taking payment. |
| Enter birthday (mm/dd/yy) | The hint above the field: the order to type the date in. Dollar markets show mm/dd/yy, other markets dd/mm/yy. |
| 0–9 / CLEAR | The keypad types the date. CLEAR removes the last digit, not the whole date. |
| VERIFY | Runs the check. With Autocomplete on it runs by itself as soon as the date is complete. |
| Warning! | The red panel shown when the age read is below the group's age; it names the customer's age. Close returns to the same prompt, which asks again. |
| DL scanned | Confirms a driver's licence barcode was read and the date of birth taken from it. Only the standard US licence barcode is recognised. |
Reports
Opens from the report icon in the groups list, on today's checks.
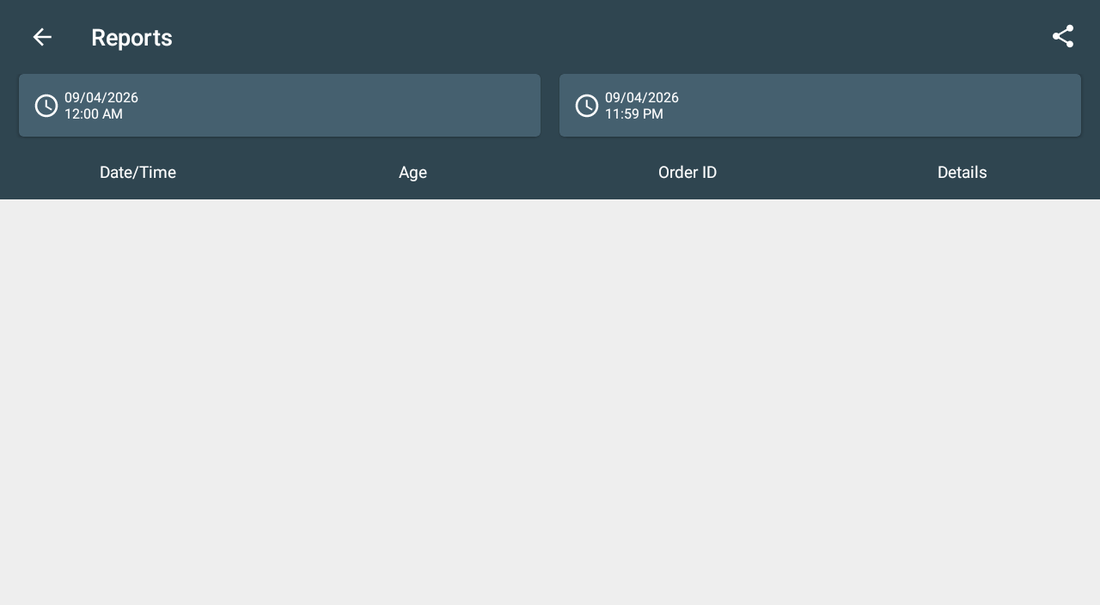
| Setting | What it does |
|---|---|
| Start / end date and time | The range shown. It opens on today; on the Clover device the picker goes back about six months, in the browser about 90 days. |
| Date/Time | When the check was recorded. |
| Age | The age read for that order. Skipped means the check was skipped. |
| Order ID | Tap it to open that order in Clover. |
| Details | Opens Info with the same three values, plus Reprint, which prints the bill again with your receipt line on it, and Open Order. |
| Share | Creates an export link, shows it as a QR code and offers SEND VIA EMAIL. Access to the link expires after one hour. |
| Loaded last 1000 records | The message when the range holds more than 1000 checks: only the last 1000 are listed. Export a long period in parts. |
Screenshots taken from the running app on a Clover device. The apps’ interface language is English. Click a screenshot to enlarge.
Everyday use
What the cashier does after the app is configured.
- Add the restricted item; the age prompt appears by itself. It has no cancel button.
- Scan the customer's driver's licence, or type the birthday in the order shown on the prompt — mm/dd/yy in dollar markets, dd/mm/yy elsewhere.
- The check is asked once per order. A later item asks again only if it requires a higher age than the age already read.
- If the age is too low, a red Warning! panel gives the customer's age and Close brings the prompt back. To finish the sale without that product, tap the red bin at the top of the prompt — it deletes the restricted line from the order, so check the order before taking payment.
- The sale continues; the receipt carries your verification line if you enabled it.
Troubleshooting
Symptom on the left, what to do on the right.
| Symptom | What to do |
|---|---|
| A licence is not recognised. | Type the date of birth manually to finish the sale, then send the licence details to contact@payplaxe.com so the format can be added. |
| Staff skip the check. | Turn Allow employees to skip age verification off. |
| The prompt asks again inside one order. | That happens when the next item requires a higher age than the age already read for the order. Switching the active employee clears the stored verifications for every open order, so an order still open at that moment is asked again — and if it is paid after the switch without a new check, it gets neither the receipt line nor a report line. Check the age set for each group in the app. |
| No line on the receipt. | Enable Set your text on age-verified order receipts and write the text. If it is on and the line is still missing, check whether the active employee was changed while the order was open — that clears the order's verification, and with it the receipt line and the report line. |
| The prompt never appears. | Open Age Verify once on the Clover device and allow the Android permission draw over other apps — without it the prompt cannot open over the Register. If you created or changed the group in the browser, open Age Verify on the device once as well: the register works from the copy it loads there. |
| One product does not ask for an age. | The check runs on inventory items only — the item is in a group, or one of its categories is. A custom or open-price line typed at the register is not matched to any group and is never checked. Put the product in a group, or add its category to one, and ring it up from the inventory. |
| The app's dialog never appears on the payment screen; Clover shows "Customer is choosing payment method". | Open the Clover Setup app → Payments and uncheck Automatically take payment on Connected Device, so payment is taken on the primary device. |
| Settings cannot be opened or changed. | Sign in with an employee whose Clover role is Manager or Admin. Some apps also have their own Restrict access switch that locks the configuration. |
| The app works erratically, or stops reacting after the device has been idle. | Turn off Battery Saver in the device's Android settings and keep the device online. |
| A change made on one device is not visible on another. | Settings sync through the cloud; give it a minute and make sure both devices have a network connection. |