

How it works
An add-on to Clover Inventory
The app has no catalogue of its own. Items and Categories show what is in your Clover Inventory, and every change here is written back to it and syncs to your Clover devices.
Bulk work starts with categories
A price change asks which Clover categories to touch, then the server applies the percentage or the amount to the items in them. The app confirms that the request was submitted; the job itself takes up to about a minute.
Search is the fast path
Items are found by name, code, SKU or stock quantity, with more-than, less-than and equal filters.
Every change is written down
Logs keeps the change history for a date range, with the item name, the old value and the new value, and mails the list to an address you type.
Two rules run on the Clover device
The stock check and the age check are set up here and act when an item is added to an order in the Register. Both are held on the device you set them up on, so open the setup on every Clover station.
The same screens in a browser
inventory.payplaxe.com opens Items, Categories, Logs, Tools and Settings with your Clover account. It is not a separate product: this is the setup side of the app you already have, with nothing extra to buy. The two register-time rules are the exception: they are set up on the Clover POS.
Changes are hard to undo
A bulk price change cannot be rolled back from the app, and Delete all items and categories empties your Clover Inventory, not a copy of it. Export your items from the Clover dashboard first if you are unsure.
What it does
Bulk price changes
Increase or decrease prices by percent or amount for the Clover categories you select. The change runs as a job on the server: the app confirms the request, and the new prices follow within about a minute.
Item editing
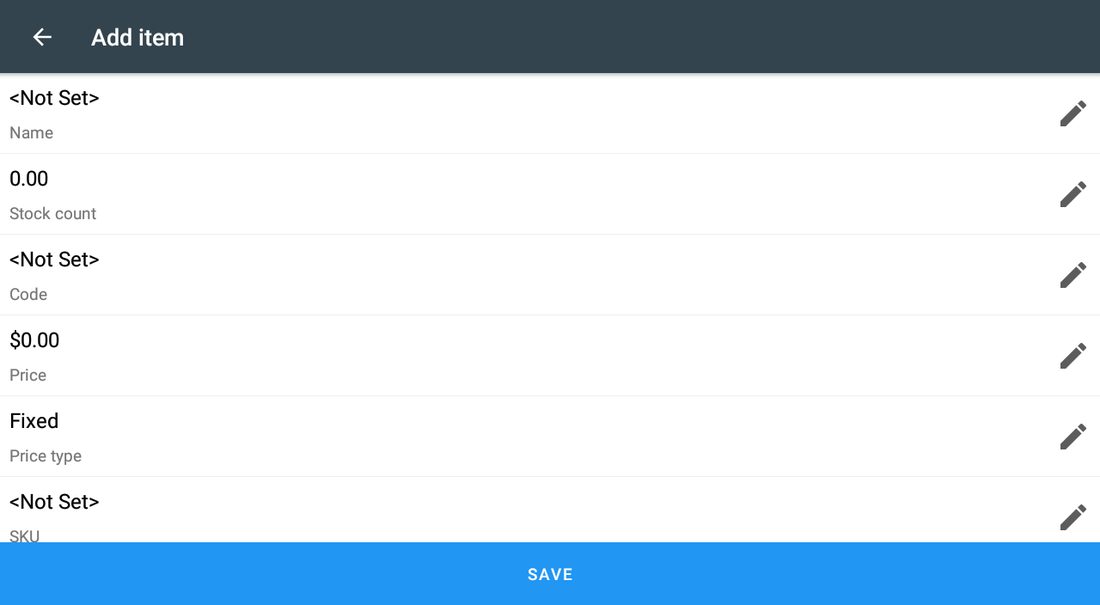
Create, edit and delete items in the Clover catalogue: name, stock count, code, price, price type (Fixed, Variable, Per unit), SKU, show-in-register and non-revenue flags.
Categories
Categories creates a category, renames it, deletes it and assigns items to it. They are the Clover categories, the same ones the Register and Clover Inventory use.
Search
Find items by name, item code, SKU or stock quantity, with more than, less than and equal filters.
Change logs
Logs lists what changed between two dates: the item name, Old value: and New value:. The share button mails the same list to an address you type.
Check stock count on Clover POS
When the stock count of an item is lower than the quantity on the open order, the app removes the extra lines from that order in the Register. It needs stock tracking in Clover and the switch turned on for that device, and it skips the items on the exceptions list.
Age verification setup
Groups of age-restricted Clover items are set up here: a name, Age Required and the items the group covers. The Settings row is called Age Verification on Clover POS, and the check runs on the Clover device when the item is added to an order.
Merchant ID at hand
The Settings screen shows the account name and the Merchant ID that support asks for.
Wipe the Clover catalogue
Delete all items and categories deletes them from your Clover Inventory, not only from this app. You have to type confirm delete to run it, and there is no undo.
Price & installation
How to install
- Open the Clover App Market — on the device, or at clover.com/appmarket in your web dashboard.
- Find the app by name, or open its direct link from the button above.
- Tap Connect / Install and accept the permissions the app requests.
- The 30-day free trial starts automatically. The subscription then appears on your monthly Clover invoice.
- Open the app on the Clover device and sign in with a Manager or Admin employee account to configure it.
- To cancel later, uninstall the app from the App Market — the steps are right below.
How to cancel the subscription
Cancelling means uninstalling the app — there is no separate billing screen.
- Open the App Market — on the Clover device, or in the web dashboard.
- Open My Apps. Every app you pay for is listed there with its monthly fee.
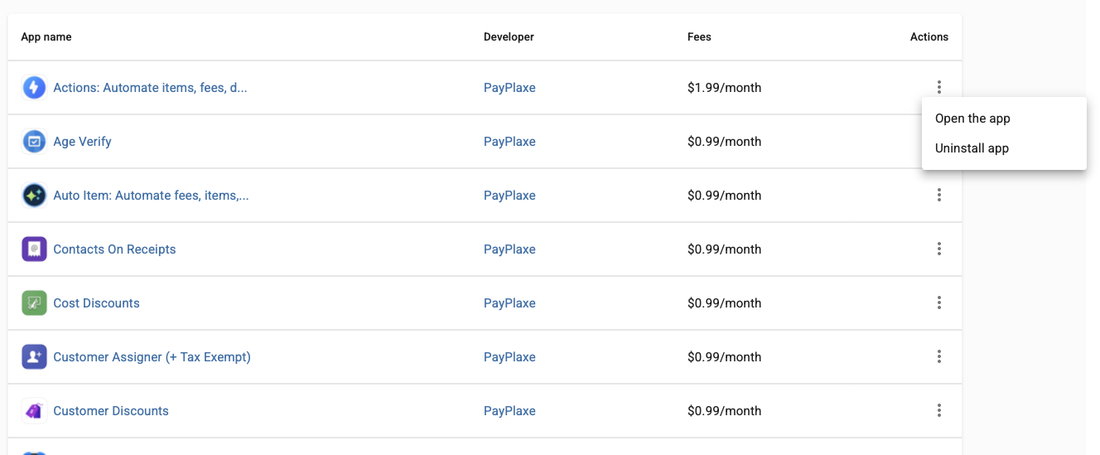
- Tap the ⋮ button on the app's row and choose Uninstall app.
- The app's own page works too: ⋮ next to the green Open the app button → Uninstall app.
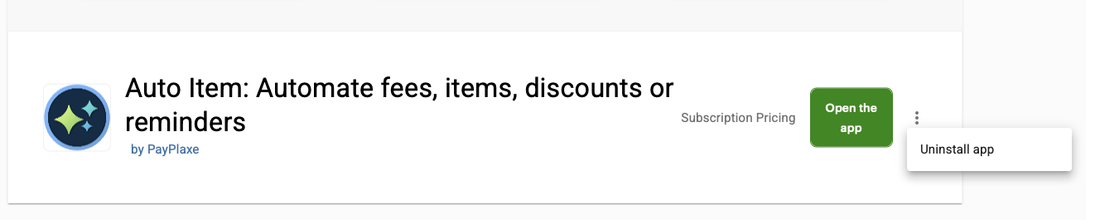
- Confirm. The subscription stops there and then — the app is off your next Clover invoice.
Install and cancel any time from the Clover App Market.
First setup
Do this once, in this order. It takes a few minutes and the app is then ready for the shift.
- Open the app.On the Clover home screen the icon is labelled Inventory; the screen inside says Inventory Manager. Items lists your Clover catalogue with stock counts.
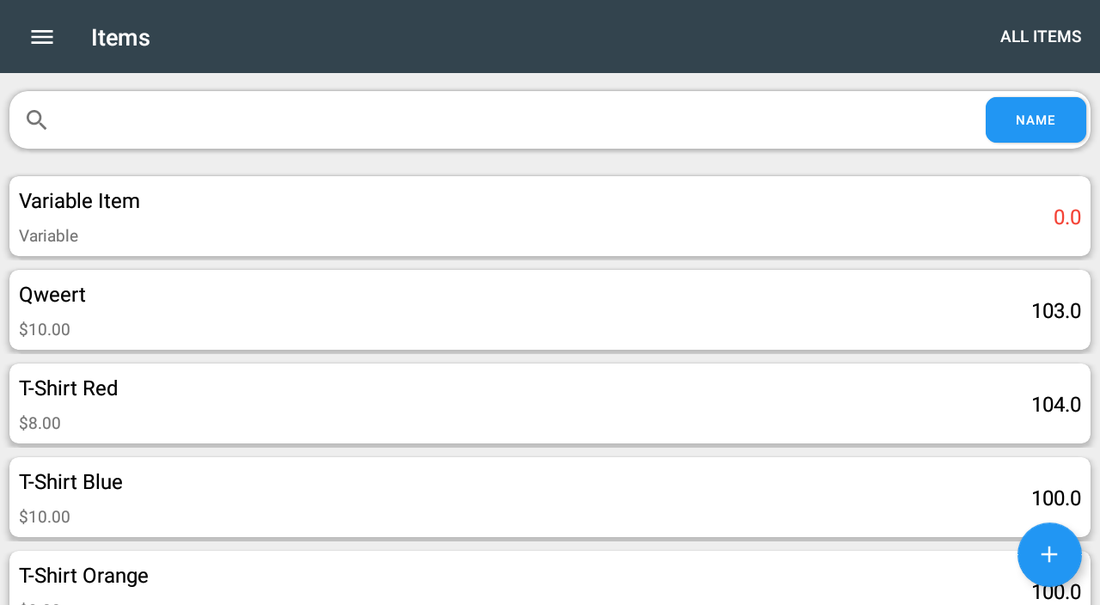
- Use the search field and the NAME selector to switch between name, code, SKU and stock searches.
- Tap + to create an item. Tapping a row opens the quick dialog for the stock count; the pencil icon there opens the full editor.
- Open Categories to create a category, rename it or assign items to it.
- For bulk price work open Tools → Increase/Decrease prices and select the categories.
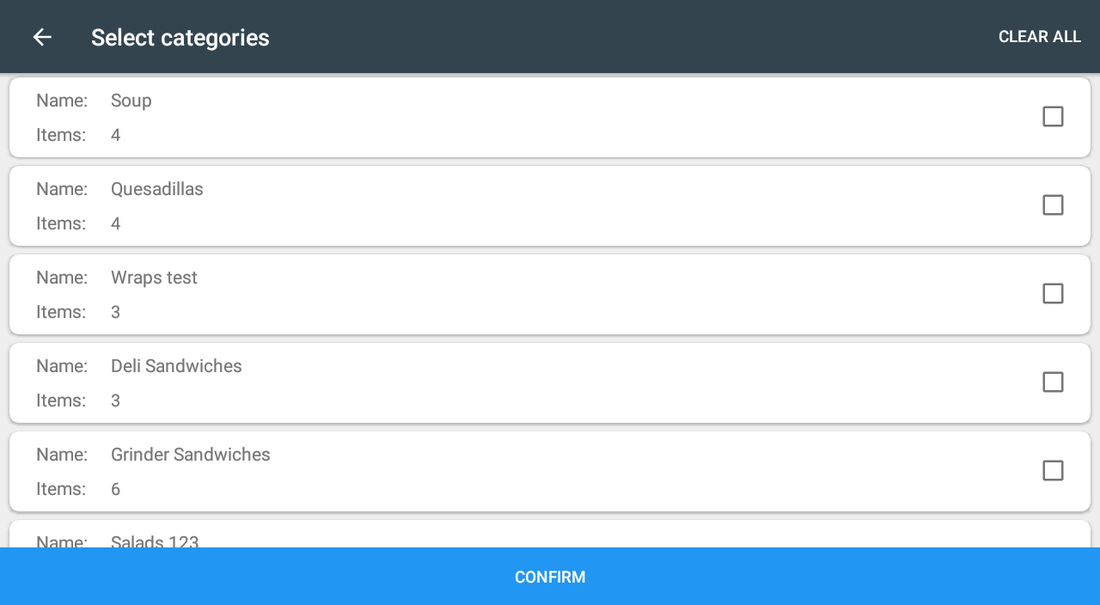
- Choose increase or decrease, percent or amount, enter the value and submit. The percent field fills from the right — it must read 5.00 to mean 5%.
- Open Clover Inventory afterwards so it syncs, then spot-check a few items.
Setup scenarios
Each scenario is a complete configuration — follow the steps in order.
1Raise prices for a category by 5%
Supplier costs went up for one group of goods only.
- Open the app → Tools → Increase/Decrease prices.
- Select the Clover categories the change applies to and confirm.
- Choose increase and the type percent, then key digits until the field reads 5.00 — the field fills from the right, so a bare 5 means 0.05%. The row underneath must read Which is 5.0% before you submit.
- Submit the price modify request. The app answers that the request was submitted; the server needs up to about a minute.
- Open Clover Inventory and sync, then spot-check a few items.
2Stop cashiers ringing up more than you have
Cashiers keep selling goods that are not on the shelf.
- Turn stock tracking on for those products in Clover Inventory. Without it the app checks nothing.
- Open Settings → Check stock count on Clover POS and switch Enable/disable the feature on.
- Open Exclude items from tracking stock and select the items that must stay sellable at any stock count (services, deposits, custom items).
- Repeat both steps on every Clover station. The switch and the exceptions list are stored on the device you set them up on.
- Test in the Register: with 2 in stock, add the item three times. The third line is removed from the order and a message names the item.
3Find and fix problem items quickly
Missing SKUs, wrong price types or negative stock hide in a large catalogue.
- Open the Items tab and switch the search type to Item Stock.
- Filter with Less than and a value of 1 to list everything at or below zero.
- Tap an item to fix the stock count on the spot; tap the pencil icon in that dialog to open the full editor for price, price type, code and SKU.
- Switch the search to SKU or Code and look a known identifier up — if the item does not come back, it has no SKU or code yet. The app has no filter that lists blank identifiers.
4See what changed, and mail the list
Several people edit the catalogue and a price is suddenly wrong.
- Open Logs.
- Tap the two date buttons at the top and set the start and the end of the range.
- Read the rows: each one names what was changed, the item, Old value: and New value:.
- Tap the share button, type an email address and press Send. The same list is mailed there.
- Fix the item in Items if the old value was the right one.
Reference
Screens and settings
Every screen of the app and what each setting does. (3)
Screens and settings
Every screen of the app and what each setting does. (3)
Items
| Setting | What it does |
|---|---|
| Search + type selector | Search by Name, Code, SKU or Item Stock (with more/less/equal). |
| Item row | Name, price and the current stock count. A count of zero or less is red. |
| ALL ITEMS | Filters the list by one Clover category. |
| + button | Creates a new item. |
| ☰ menu | Items · Categories · Logs · Tools · Settings. |
Item editor
| Setting | What it does |
|---|---|
| Name | The item name shown in the Register. |
| Stock count | The tracked quantity. |
| Code / SKU | Barcode and internal code. |
| Price / Price type | Fixed, Variable or Per unit. |
| Show in Register / Non-revenue item | Visibility and whether the item counts as revenue. |
Selecting categories
| Setting | What it does |
|---|---|
| Category row | Name and how many items it contains. |
| Checkbox | Includes the category in the operation. |
| CLEAR ALL | Unticks everything. |
| CONFIRM | Applies the selection to the pending operation. |
Screenshots taken from the running app on a Clover device. The apps’ interface language is English. Click a screenshot to enlarge.
Everyday use
What the cashier does after the app is configured.
- Use the search to find and fix an item in seconds instead of scrolling Clover Inventory.
- Run bulk price changes outside opening hours; they take time and need a sync afterwards.
- Keep Check stock count on Clover POS on so a cashier cannot ring up more than the stock count.
- Open Logs after a busy day to see which prices and stock counts changed, and by how much.
Troubleshooting
Symptom on the left, what to do on the right.
| Symptom | What to do |
|---|---|
| Prices did not change on the Register. | The price change is a job on the server: it takes up to about a minute. Then open Clover Inventory so it syncs with the cloud, and wait 1–2 minutes. |
| Items are still sellable when the stock is short. | Three things have to be true: stock tracking is on in Clover, Enable/disable the feature is on for that station, and the item is not in Exclude items from tracking stock. The switch is stored per device, so check the station you are testing on. |
| A line vanished from an order. | That is the stock check. It removes the lines that go past the stock count of the item, and a message names the item. Correct the stock count in Items, or add the item to Exclude items from tracking stock. |
| An item cannot be found. | Switch the search type — an item without a SKU will not appear in a SKU search. |
| You deleted everything by accident. | Delete all items and categories cannot be undone, and the items are gone from Clover Inventory as well. Restore from a Clover export. |
| The app's dialog never appears on the payment screen; Clover shows "Customer is choosing payment method". | Open the Clover Setup app → Payments and uncheck Automatically take payment on Connected Device, so payment is taken on the primary device. |
| Settings cannot be opened or changed. | Sign in with an employee whose Clover role is Manager or Admin. Some apps also have their own Restrict access switch that locks the configuration. |
| The app works erratically, or stops reacting after the device has been idle. | Turn off Battery Saver in the device's Android settings and keep the device online. |
| A change made on one device is not visible on another. | Settings sync through the cloud; give it a minute and make sure both devices have a network connection. |